Most of the 5th graders at our schools have at least one trophy – for soccer, baseball, basketball, dance, etc. Each year the fifth graders create their own sport trophy sculptures using wire, foil and plaster wrap.
2012 is an Olympic year. We begin by looking at photos of Olympic athletes in all sorts of sports. We talked about dynamic poses – athletes in motion – and how much more interesting they are than static poses.
It all starts with a pinch pot. Stuff with crumpled newspaper for support and turn upside down. Apply starfish, urchins, coral etc. to top of rock using vinegar to attach.
Vinegar, clay tool, toothpick
http://youtu.be/TUuvmrJIXiQ
If you don’t finish, wrap clay in damp paper towels and seal in Ziploc bag.
Day 2:
Finish adding sea life to rock.
I let them dry for 12 days, then fired on slow setting.
Although no slip was used to attach decorations, only one decoration came off during bisque firing.
Day 3:
We painted with pan watercolors and tiny brushes. Students had option of rinsing off excess paint (they called this ‘fading’). Also could draw on painted ‘rock’ with colored pencil.
A huge thank you to SDAEA’s Carol Catalano Webb, who brought back this lesson from California state conference AND made the YouTube movie. A huge thank you to the clay teacher who created the Powerpoint (we think it was Barry Bernam-please leave a comment if you know Barry!).
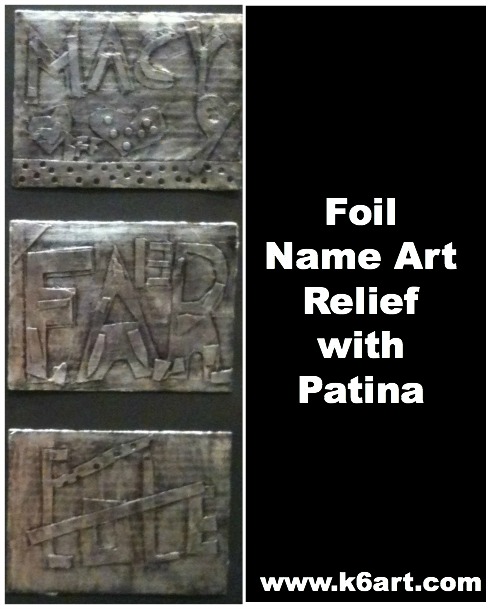
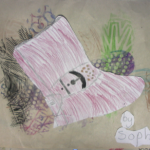
Name art: what a great idea for the first art project of the school year. The sixth grade recently finished their foil name art reliefs. You can download my foil relief Powerpoint here.
Materials:
sturdy cardboard for background
foil (I used pre-cut foil Pop-up Sheets and cut my background cardboard a bit smaller than the foil)
light cardboard or tagboard in two colors (I used red and gold)
We started by layering two colors of light cardboard to create a name art collage. Students could use their name, initials, or nickname. Students used hole punches to add interest to their designs.
It really helps to work with two colors of light cardboard when creating the relief.
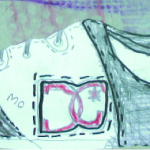
Day 3: Cover relief with foil and black marker, buff with steel wool
I had students bring their reliefs outside. I sprayed the cardboard with spray glue, then slapped on a sheet of pre-cut foil. Alternately, you could glue foil to a whole stack of reliefs during your prep time. Or you could let kids cover the relief with glue stick and lay on the foil themselves.
Next, we covered the foil completely with black permanent marker.
Students covered the foil with permanent black marker.
Finally we rubbed off the marker with steel wool to create an attractive patina.
Use fine steel wool.
All the students loved this project! They felt the resulting patina looked like old metal.
Sixth grade examples:
Biana added a basketball, hoop, and her jersey number to her name art relief.
Grace used a heart shape hole punch to add interest to her design. Jonah added layered geometric shapes.
Extensions:
After their reliefs were complete, students did crayon rubbings of their name art. Some did rubbings of their friends’ art on large tag board and used it to create their portfolios.
Want more name art ideas? Check out my other name art posts:
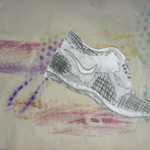
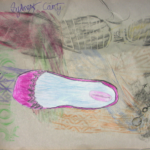
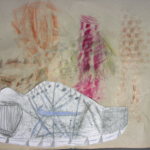
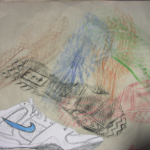
The fourth grade recently completed their shoe art. We did a two part project.
Students drew their shoes and took crayon rubbings of the soles
Part 1: shoe drawing. We started with each kid taking off a shoe and putting it on the table. Kids traced the shoe contour onto white drawing paper. Then students moved into observational drawing mode and added the shoe stripes/logos/dots to the drawings. We colored the shoes – kids could use realistic or imaginative colors.
Part 2: sole texture rubbing. Shoe off and on the table! This time, we did a texture rubbing of the shoe sole. We used newsprint and peeled crayons. Kids were encouraged to to multiple rubbings of their shoe in different colors, and then trade shoes with friends. So much fun! It was like collecting autographs, but of your friends’ shoes….
Last step: cut out the shoe drawing from part 1 and glue it on the texture rubbing.
Wow!!! Super successful project. Just be sure do this one when its dry outside or you will have mud on the tables.
Inspiration for the shoe contour lesson comes from long, long ago, when I was a parent volunteer in Jenny Luce’s art room. The sole rubbing portion of the lesson comes from the book ‘Make Prints!’ by Kim Solga.
Draw ballet flats from the top
Students drew their shoes and took crayon rubbings of the soles
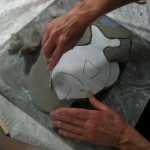
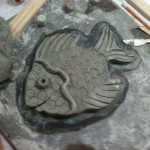
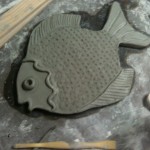
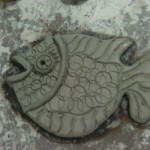
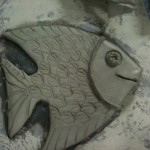
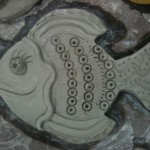
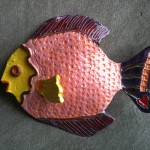
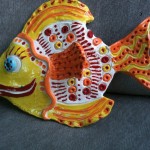
Today my fabulous colleagues stayed after school for a clay session. We made clay fish using slabs and templates. The sixth grade does this project in the spring. Allow three 40+ minute sessions for this lesson.
Day 1: Select template. Roll slab and cut fish. Wrap in wet paper towels and store in gallon Ziploc bag
Day 2: Add details and texture.
Allow to dry. Bisque fire…..then
Day 3: Glaze.
Texture tools include pencils, marker caps, glue caps and tips, and carved rubber stamps
Done! Artist added fin, and stamped name in tail using letter stamps.
Fish were allowed to dry 10 days, then bisque fired, glazed and fired again.


 See the trophies progress in Part 2 (now online) and the finished Olympic trophies in this post.