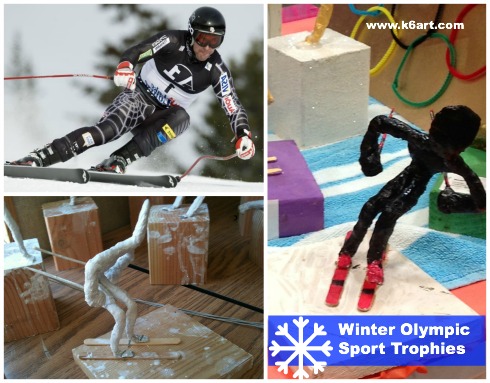
Thinking about a Winter Olympic art project? Why not make your own sport trophy for your favorite Olympic event? Our fifth graders created these sport trophies using floral wire, foil, and plaster wrap. Accessories were made from toothpicks and popsicle sticks. We used acrylic paint or metallic spray paint (everyone can ‘get a gold’ if you use gold spray paint!). Everything was attached to a wooden base. You’ll need reference photos as well.
Click here to see all my links to my favorite sculpture supplies. You can also find the floral wire at Michael’s and my favorite pop-up pre-cut foil at Costco and Smart and Final.
Click here, here, and here to see more examples and the complete lesson plan.
I taught this project to adults as well – they were able to create the unpainted trophies in about an hour. At the elementary level, this took us 6-8 sessions at 40 minutes per class. Middle and high school students with NICE LONG CLASS PERIODS (envy envy envy) should be able to do this in a couple of weeks.
Our students look forward to this project for years. They treasure their trophies for years after. A lot of work, but worth it.
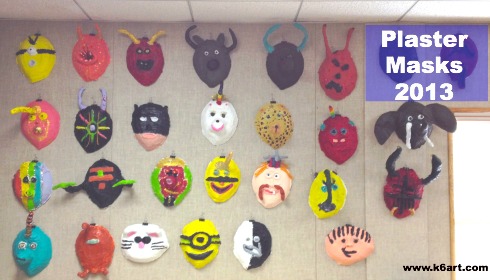
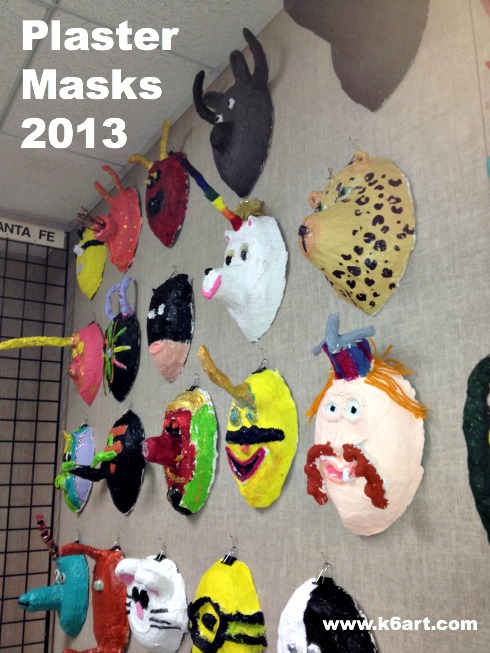
What’s the most popular, most anticipated project in the entire art program? Our plaster masks! Every year the 5th graders create masks using nothing more than plaster wrap and foil (and maybe a few yogurt cups). Painted and embellished with yarn and glitter, they hang in the art room until they star in the spring art show.
5th graders used plaster wrap and foil to create fanciful masks.
Plaster wrap is plaster-coated cotton gauze. It is similar to the material used to cast broken bones. Dip it in water, and it hardens within minutes.
Learning about masks
The week before the art project, we learn about masks. Masks can be used for plays and dances, for rituals, for protection, for celebrations (such as Halloween), or just for decoration. I bring in my entire mask collection from around the world. I distribute the masks between the tables, and we do a rotation so that everyone can try on all the masks. I show the kids all the students photos of the student masks from 2012. I also posted a link to all the masks at the Mingei Museum in San Diego, just in case they wanted to do some research at home.
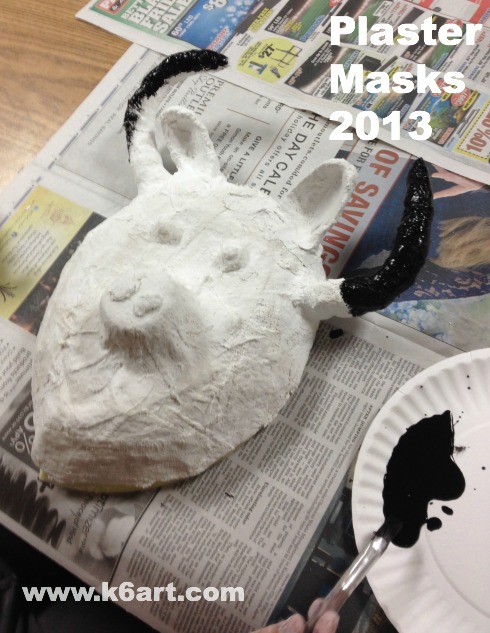
Start by covering the outside of the plastic armature or face form with foil (this keeps the armature clean so we can re-use it next year). Next, cover the outside of the armature with three layers of plaster wrap (dipped in water). After applying the wet plaster, students should smooth it with their fingers. Let dry overnight.
Warning! Don’t Pour the Plaster Water Down the Drain!
At the end of class, DO NOT DUMP THE PLASTER WATER DOWN THE DRAIN (Never. That plaster will harden in the drain and cause a nasty, expensive clog). Instead, pour all the plaster water into the 5-gallon bucket and put it in a corner. By morning, the heavy plaster will have settled to the bottom of the bucket, leaving clear water at the top. Pour off the clear water. Don’t dump the plaster residue. Stick the bucket back in the corner until the next class.
Days 2-4: Add facial features and horns
Prep as you did for the last class. Pass out scissors.
Most facial features such as eyes, nose and lips can be made by adding wadded or rolled wet plaster strips. For a snout, use an inverted yogurt cup covered with plaster strips. Students can cut plaster into smaller strips if desired.
Horns can be made using twisted foil. Just shape the foil, and ‘tape’ it to the face using strips of plaster. Then wrap the horn in plaster strips, starting at the base of the horn. You can use this technique to make tusks, arms, etc.
Horns are made from twisted foil covered with plaster wrap. Snout is an inverted yogurt cup covered with plaster wrap.
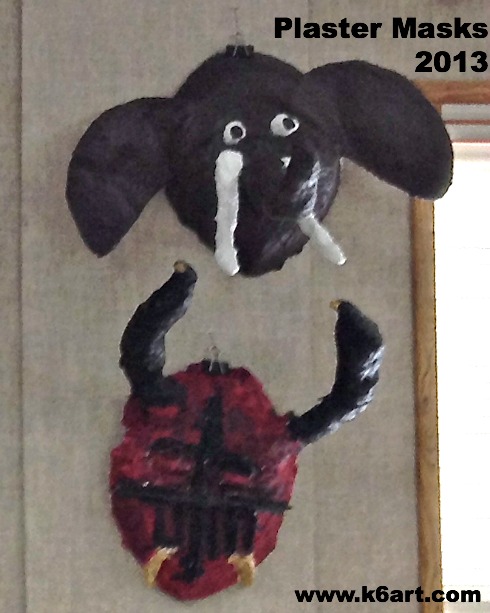
M’s mammoth mask has ears made from paper plates covered with two layers of plaster wrap. Trunk was made from yogurt cups, foil and plaster wrap. B’s villain mask has horns made from foil covered in plaster wrap.
Big elephant ears (and bird wings) were made using cut paper plates covered in two layers of plaster wrap.
Remove the armature and throw away the foil covering. Paint mask with acrylic paint. (Note: I have had bad results painting plaster with tempera. It cracked and flaked off. If you absolutely must use tempera, put some white glue in the paint).
Day 6: Decorate
Decorate the masks with yarn, glitter, etc. White glue works really well with yarn. Use hot glue to add heavier decorations.
Attach a binder clip to the top of the mask and pin to the wall.
Reflection:
I’m not going to lie – this is the most challenging project I offer to any grade any year, both for me and for the students. It is completely open-ended – they can make any sort of mask, and use any decoration I have in the art room. I have two parent volunteers most weeks for this project. It would be easier if I had more than 40 minutes per class, especially because I have to allow 7 minutes for clean up.
End of project plaster clean up
What to do with a bucket of plaster goo? After you have poured off all the clear water, scoop all the remaining plaster goo from the bottom of the bucket into an old cardboard box and throw the box away.
Sharpies or other permanent marker, black and colored
spray glue
small squares of felt
q-tips
pencil/erasers
Students began by writing their names in pencil on cardboard. They traced their names in glue, then yarn.
Students write their names in glue and yarn.
Next they added decorative glue/yarn lines. I sprayed the plates with spray glue and slapped on a piece of pre-cut foil.
Students carefully polished the foil with felt squares. This helps the foil adhere to the cardboard and smooths the foil. A q-tip is good for polishing tight areas. Finally, they got to the best part: coloring in with jewel-tone colored Sharpies. Black sharpie looks good too! Remind students to avoid coloring the raised yarn lines.
This week fourth grade finished their foil sea creatures. If you have never tried tooling foil repouseé, you simply must! It is so much fun. If you are unfamiliar with repouseé, check out this excellent post at A Faithful Attempt blog.
We talked about the repouseé process. We are going to use a pencil to shape and press lines and patterns into our foil. We will make texture. For practice, I gave kids a piece of heavy aluminum foil and we folded it four times. The number one rule: always keep the foil on the newspaper pad. The pencil will bend the metal down into the pad.
We practiced drawing different lines (wavy, straight, zig zag) and patterns on our test foil. I showed kids how to flip the foil to the back and press lines into the back of the foil. Once kids got used to working the foil front and back, they really enjoyed the process.
Day 2
I passed out square paper sketch sheets and templates (optional – I encouraged kids to make their own design so long as it filled the square). Goal: create a sea creature with a textured body and textured background. When the sketch was approved, I gave them a square of foil. They taped the sketch to the foil and retraced their lines. then they turned over the foil and pressed more lines into the back.
Optional templates ruled to fit foil squares.
Pencil sketch and completed art
Day 3:
Color with colored Sharpies. The color makes our repouseé art looks like jewels of the sea!
Here they are on display in the school lobby for our annual Ocean Week
Options:
Skip the background. Cut out the textured sea creature. Color on both sides and hang as a mobile.
Skip the pre-cut squares and do the project on folded heavy foil.
This week the fifth graders continued work on their spectacular sport trophies. The wire and foil figures are now posed and wrapped with plaster wrap. Almost all have been stapled to wooden bases. Our fifth graders have experience working with plaster (see this post and this post) so almost all finished wrapping the figures during our 40 minute class.
Volleyball
Don’t you love the poses and accessories?
Skier with popsicle stick skis and bamboo skewer poles.
Here’s a ‘wrap up’ (get it?) of all the steps so far:
wire armature made from two pieces of 18 inch pre-cut floral wire

 Click here, here, and here to see more examples and the complete lesson plan.
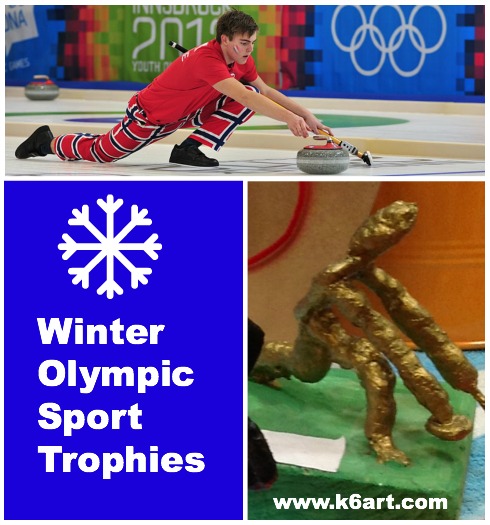 I taught this project to adults as well – they were able to create the unpainted trophies in about an hour. At the elementary level, this took us 6-8 sessions at 40 minutes per class. Middle and high school students with NICE LONG CLASS PERIODS (envy envy envy) should be able to do this in a couple of weeks.
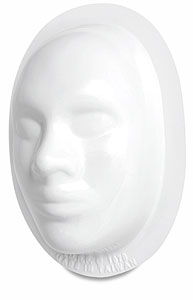 Face Form for Mask Making – $1.99


