Clay and Pasta Portraits


clay and pasta faces

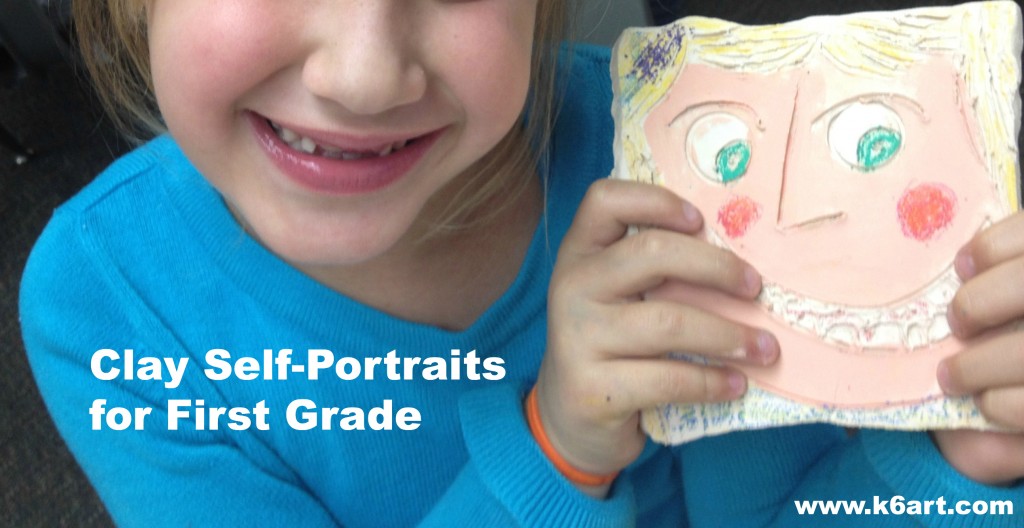
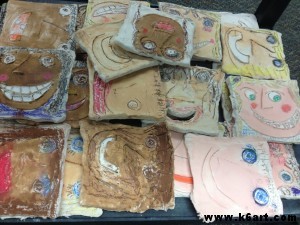
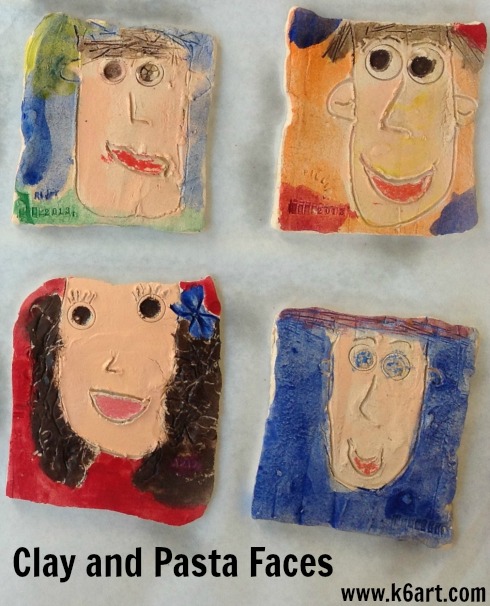
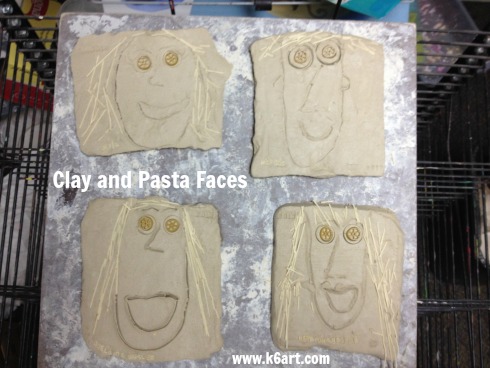
The first graders made these clay self-portraits earlier this year. They were fun to make, required a single firing, and surely will be treasured by the students and their parents for years to com.

Materials:

  • clay
  • marker or glue stick caps
  • dull pencils
  • alphabet pasta (available in the Hispanic foods section of Walmart, and through Amazon)
  • wagon wheel pasta
  • spaghetti
  • bow-tie pasta
  • ramen or egg noodles
  • optional: date stamps
  • tempera cakes (including peach)
  • Crayola multicultural paint
  • crayons
  • optional: ceramic spray gloss

Prep:

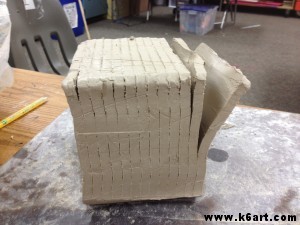
I used a multi-slab cutter to easily cut the clay block into identical clay tiles.

Alexandra's clay and pasta face

Making the face:

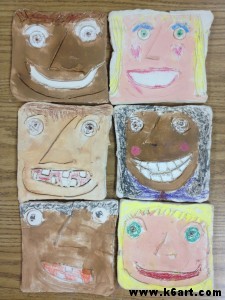
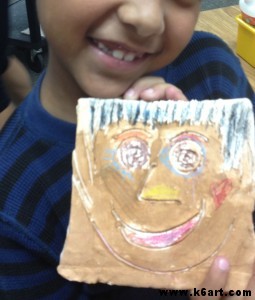
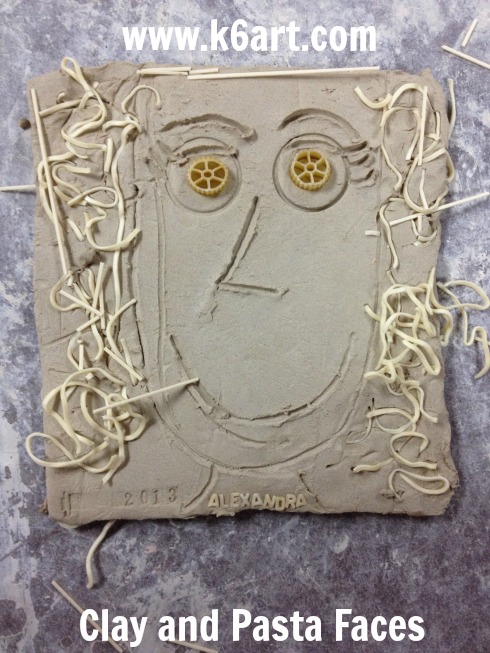
Students first used a dull pencil to draw the face, nose, smile, and neck. We stamped eyes with the glue stick caps. Then we added wagon wheel pasta for eyes. Curly-haired students pressed in Chinese egg noodles for hair; kids with straight hair pressed in broken lengths of spaghetti.  Some kids added bow tie pasta.

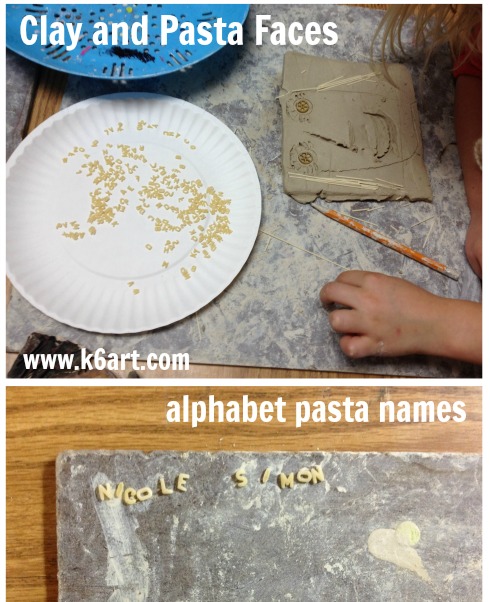
Next I passed out plates of alphabet pasta. The kids spelled out their names and pressed the letters into the clay.

Finally, I added the date with an old-school rubber date stamp from an office supply store.

Allow clay to dry, then bisque fire.

Note: we did not remove ANY of the pasta before firing – we just let it burn out in the kiln.

clay and pasta faces alphabet pasta

clay and pasta faces 3

Painting the clay:

After bisque firing, we painted them with tempera cakes. For the skin tones, I offered multicultural tempera as well as peach tempera cake. The first graders painted their faces in a snap.

Within a few minutes, the tempera settled into the porous bisque. Then the kids added mouths with crayon (or construction paper crayon). Some kids used crayon for the eye color and even for make up.

As a last step, I sprayed the clay portraits with glossy ceramic sealer.

Tips:

Live and learn – here’s what I found out:

  • don’t press to hard with the pencil when drawing the portraits. Some students cut right through the slab (but came away with nice face-shaped clay portraits!)
  • the pasta may attract rodents.
  • egg pasta leaves a yellow tint on the clay even after firing.
  • don’t press extremely hard with the wagon wheel pasta. If you do, the fired clay eyes will end up as a shallow well.

For more examples and ideas, see this post on last year’s clay self-portraits.

Enjoy!


Clay Self-Portraits for First Grade

clay self portraits for first grade

Self-portraits are awesome. Clay is awesome. Put them together and you get a fun projects kids love and parents treasure forever.

Multi-slab cutter easily slices clay into identical tiles.

Multi-slab cutter easily slices clay into identical tiles.

I used a multi-slab clay cutter to slice the clay into tiles. The first graders used bamboo skewers and old glue caps to draw faces on the slabs. Remind students to draw on the clay but not too deeply – don’t cut all the way through!

First graders created self-portraits using clay slabs. Allow two 40-minutes sessions plus drying time.

First graders created self-portraits using clay slabs. Allow two 40-minutes sessions plus drying time.

I let the clay dry for 12 days, then bisque fired.

Now for color!

I saw a fabulous post on no-fire glazing techniques on the Art Smudge blog. The authors used watercolor, chalk pastel, colored pencil and more to finish bisque-fired clay (note: if you work with clay, please check out this post – it is amazing!).

We used Crayola Washable Paint In Multicultural Colors for the skin, and colored pencil and construction paper crayon for other details. A few students used colored chalk for their hair (note: the chalk was messy and will have to sprayed with a fixative – I won’t use chalk next year).

After bisque firing, clay was painted with tempera, then colored with crayons and colored pencil.

After bisque firing, clay was painted with tempera, then colored with crayons and colored pencil.

We had a range of skin tones to match – the Crayola eight bottle set of skin-tone paints matched pretty well. If anyone can recommend a set of multicultural glazes/underglazes please leave a comment!

clay portrait tiles painted with tempera

clay self portraits


Great job first graders!

Do you use glazes or cold finishes for clay?

******Thanks for visiting! Don’t forget to please vote for 2012 Art Ed Blog of the Year, which you can do by clicking this link and voting for K-6 Art! Voting open through December 14, 2012.******

Clay Sea Rocks

5th graders made clay 'sea rocks'. Allow three 40-minute sessions.

Want an ocean-themed clay project with high success? Super fun? Colorful? Only one firing? And……NO SLIP!

Try this sea rocks lesson plan!

Supplies:

  • clay
  • newspaper
  • white vinegar in small cups
  • Q-tips
  • toothpicks
  • pencils
  • Popsicle stick or other clay tools
  • gallon-size Ziploc storage bags (if more than one session is required)

Day 1:

Look at photos of sea life that attaches to rock.

Coral reef.

For another artist’s take on sea life, view images from Disney movie ‘Finding Nemo’. Look at the sea life on the ocean floor.

Inspiration: colorful sea floor from Disney movie 'Finding Nemo'

Download this clay sea rocks powerpoint from CAEA conference (we think this project was presented by clay educator Barry Bernam around 2005).

It all starts with a pinch pot. Stuff with crumpled newspaper for support and turn upside down. Apply starfish, urchins, coral etc. to top of rock using vinegar to attach.

Vinegar, clay tool, toothpick


If you don’t finish, wrap clay in damp paper towels and seal in Ziploc bag.

Day 2:

Finish adding sea life to rock.


I let them dry for 12 days, then fired on slow setting.

Although no slip was used to attach decorations, only one decoration came off during bisque firing.

Day 3:

We painted with pan watercolors and tiny brushes. Students had option of rinsing off excess paint (they called this ‘fading’). Also could draw on painted ‘rock’ with colored pencil.


I will add shine with a little spray gloss (I use Rust-Oleum Painter’s Touch Spray Gloss ).

A huge thank you to SDAEA’s Carol Catalano Webb, who brought back this lesson from California state conference AND made the YouTube movie. A huge thank you to the clay teacher who created the Powerpoint (we think it was Barry Bernam-please leave a comment if you know Barry!).

Related Posts Plugin for WordPress, Blogger...