This week the second grade made Paul Klee cat paintings ON FELT!!
Second graders made Paul Klee cat paintings using white felt and liquid watercolors. Allow one hour.
The lesson plan is adapted from this post on The Art Annex blog.
We started out by watching this brief video on YouTube:
We used only three materials: white felt (9″x12″), black Sharpie and liquid watercolor, plus spray bottles of water.
I did a directed draw of the cat, focusing its lines and simple shapes. Students drew directly on the felt with their sharpies. Then we painted the cat by dabbing on liquid watercolor. The final step: spraying the felt with water so the colors could bleed and blend.
I dried the art on large sheets of cardboard.
Just in case you are wondering….I did this with just 12 students AND a volunteer. Students got to spray their own art. If I did this with a large class, I would probably assign the spraying to s few responsible students.
This year our art show featured a famous artist scavenger hunt – with a special twist : we used smartphones and QR codes to discover facts about famous artists.
We added square black and white QR (Quick Response) codes to all of our famous artist displays.
What are QR codes?
Some of you reading this are very familiar with QR (Quick Response) codes, but many are not. QR codes are square, black and white, pixellated computer-generated images. You need a smartphone (or camera-equipped iPod touch or iPad) plus a free scanner app to read a QR code.
Teacher uses a smartphone to scan the Modigliani QR code.
What happens when you ‘read’ (scan) a code with your smartphone?
Your smartphone opens to a new website, or displays text of your choice.
How To Read a QR code:
download a free scanner app (we use Red Laser) to your device
scan the QR code
Example:
Our QR (Quick Response) code for Pablo Picasso.
Here is the text you get when you scan QR code 8 above:
‘Pablo Picasso was born in Spain. He painted every day of his adult life. He is famous for his Cubist artworks. Kindergarteners made collage portraits inspired by Picasso’s unusual portraits.’
If you are reading this and own a smartphone, pull up this post on a laptop or computer and give it a try. I was actually able to scan my own computer screen using the Red Laser app.
How to generate your own QR codes (its easy and free):
The generators allow you to add your own text. We entered a brief 250-character statement about each famous artist, and then generated the code.
Why?
Our school is piloting a 1:1 iPad/iPod touch program in the 4th grade. The entire grade is utilizing the devices in the classroom. I thought the QR code scavenger hunt would be a fun way to integrate technology with art education, to get parents involved with technology, and just to have a fun family activity at the art show. Many parents were completely unfamiliar with codes – it was great to see kids showing their parents how to read them.
Two (awesome!) fourth graders, Max and Arman, generated the QR codes for all 10 famous artists for the 2012 art show, our 4th grade teachers, and fabulous parent volunteer M.B.G., who prepared all the forms and signage for the scavenger hunt.
The 5th graders showed off their amazing wire sculptures at the art show last week. We had about 70 – the biggest group to date. I want you to see some of the best examples, and how we displayed them.
Mariel (middle horse) and Natalie (dog) were able to sign their names in wire.
Connor was able to sign his name in wire.
Fish, pig and camel. Early finishers made name art.
How to Display Wire Sculpture:
Our silver-colored sculptures look best against a solid, dark background. We hung blue vinyl table covering (from a roll) across a wall. We attached twine in front of the covering, and hung the sculptures using paper clips (opened to form an ‘S’ hook).
Completed wire sculpture display.
Great job fifth graders!!!
Kudos to the parent volunteers who helped out in the art room every week. We really appreciate your efforts.
Thanks to our fabulous art show chair and her husband for designing and installing this display. That was a lot of hard work!
First grade students made Modigliani portraits with a twist! Instead of a self-portrait, we made portraits of our mothers. We began by viewing images of Modigliani’s portraits and talked about his distinct artistic style, specifically:
long neck
long, thin nose
blank, almond-shaped eyes
small, closed mouth
One of Modigliani's many portraits of Jeanne Hebuterne
Students began the portrait using Sharpie on white paper, then colored with oil pastels. The portraits are distinguished by hair style and color, eye color, skin color and jewelry. After drawing and coloring their mothers, students made a simple solid background.
First graders make portraits of their mothers in the style of Modigliani. Allow 2-3 40-minute sessions.
I have been teaching this project for years and the mothers love it! The first grade teachers hang the framed portraits in their classrooms for the annual Mother’s Day Tea.
I adapted this lesson from a project in the book Drawing Faces (see illustration on cover). I think it is out of print. It is available used, or may be available at your library.
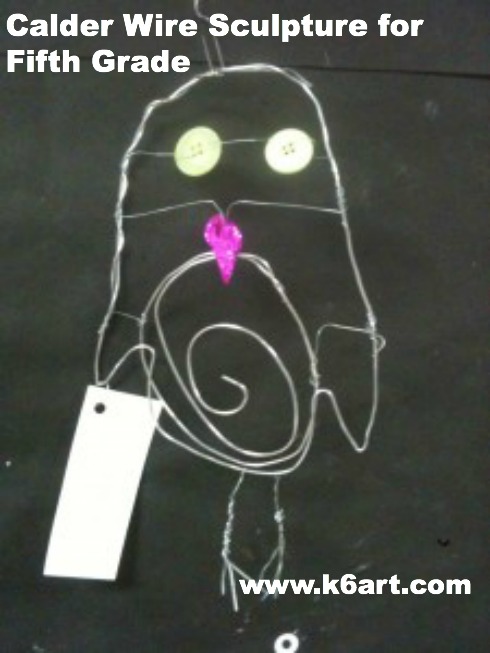
Of all the famous artists we study, students think Alexander Calder is the most fun. Fifth graders made Calder-inspired wire animal sculptures.
Alexander Calder’s Fish (1944).
5th graders made wire sculptures focusing on contour. Allow 2-3 40 minute sessions.
Materials:
Notes: When buying wire, the higher the gauge, the thinner and more flexible the wire. The wires below are soft enough for students to cut with our blunt-tip school scissors! Simplify your life and buy pre-cut 18″ floral wire (available at floral suppliers, Wal-Mart and Michaels).
pre-cut 18″ floral wire, 26 gauge. I call this super-fine and flexible wire ‘sewing wire’ because it is fine enough to pass through sequins, beads and window screen.
optional: Ziploc gallon-size storage bags for storing unfinished work between sessions
We begin by looking at this Calder wire sculpture Powerpoint. Next students sketch a contour drawing of an animal on copy paper. The sketch should touch all four edges of the paper and should be simple. Then students trace the contour with 14 gauge sculpture wire, overlap the ends and twist to secure.
Trace marker sketch with wire.
They can string shorter wires or pipe cleaners with beads, sequins and buttons across the center. Encourage kids to experiment.
We link up the sculptures in a chain (using my favorite paper-clip ‘S’ hooks) and suspend from the ceiling. Instant group Calder mobile!
Calder’s art is so varied and interesting, you could do an entire unit: a mobile lesson, stabile lesson, a wire sculpture lesson, a circus lesson, even a jewelry lesson.