Matisse Goldfish

20140411-175346.jpg
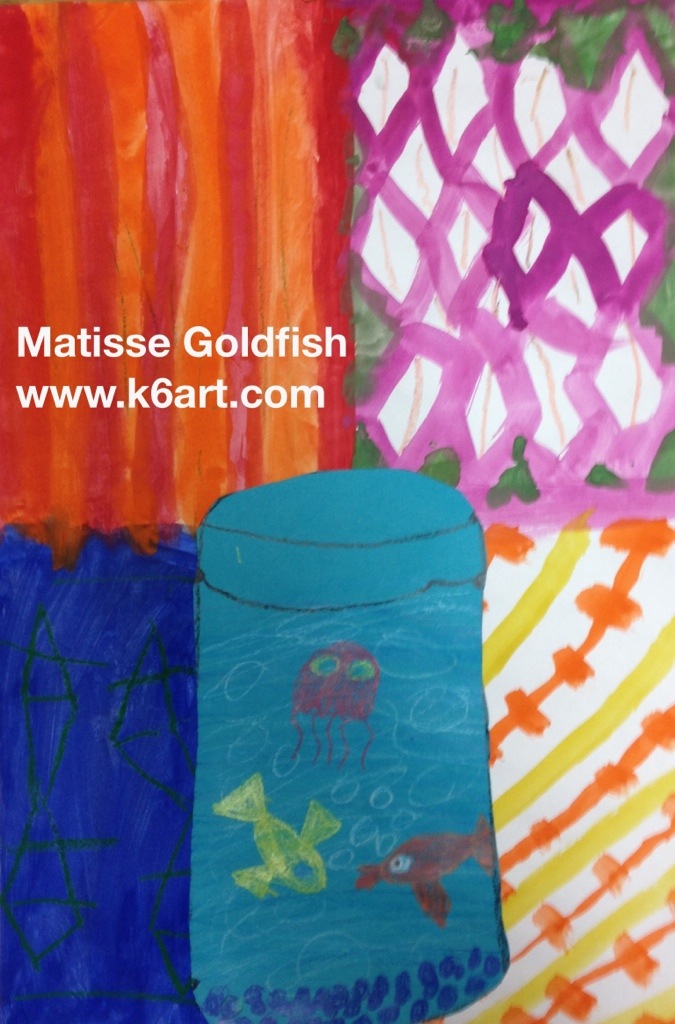
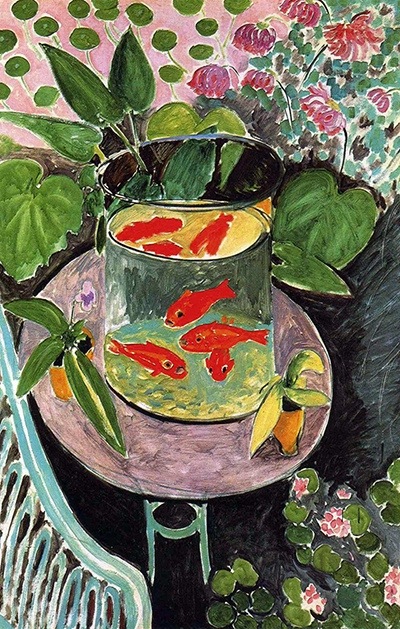
I love to create Matisse-inspired art projects with kids. Matisse’s paintings are full of color, pattern and energy. Here is a project that combines features of two of his famous paintings, Woman in a Purple Coat and Goldfish.
Day 1: pattern hunt

20140412-173143.jpg
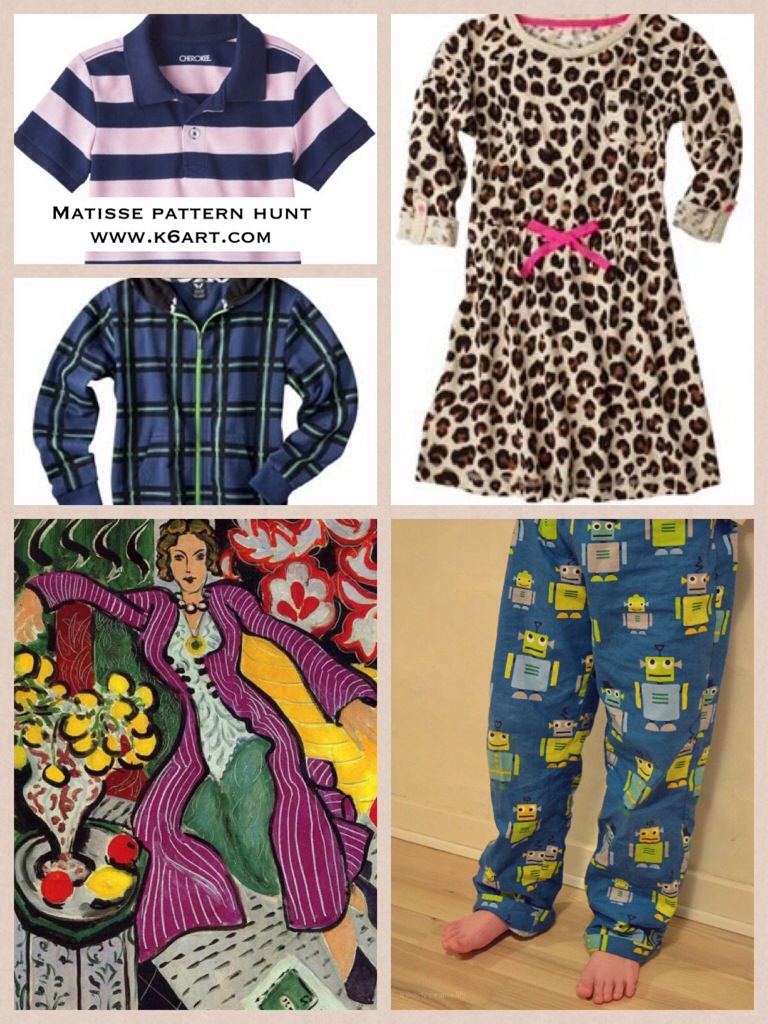
We begin with a ‘pattern hunt.’ I look around the room and find kids wearing patterned clothing. They stand up and we discuss their patterns. Then we take a very close look at Matisse’s Woman in a Purple a Coat, and tally up all the patterns one by one. I can’t tell you how excited those first graders became when they identified the patterned curtains and wallpaper in the painting. They tallied up 13 patterns, including the fruit on the table.

Day 2: create patterned paper
Materials:
White paper 12″x18″
Tempera cakes
Water cups, brushes
Oil pastels or construction paper

20140412-175214.jpg
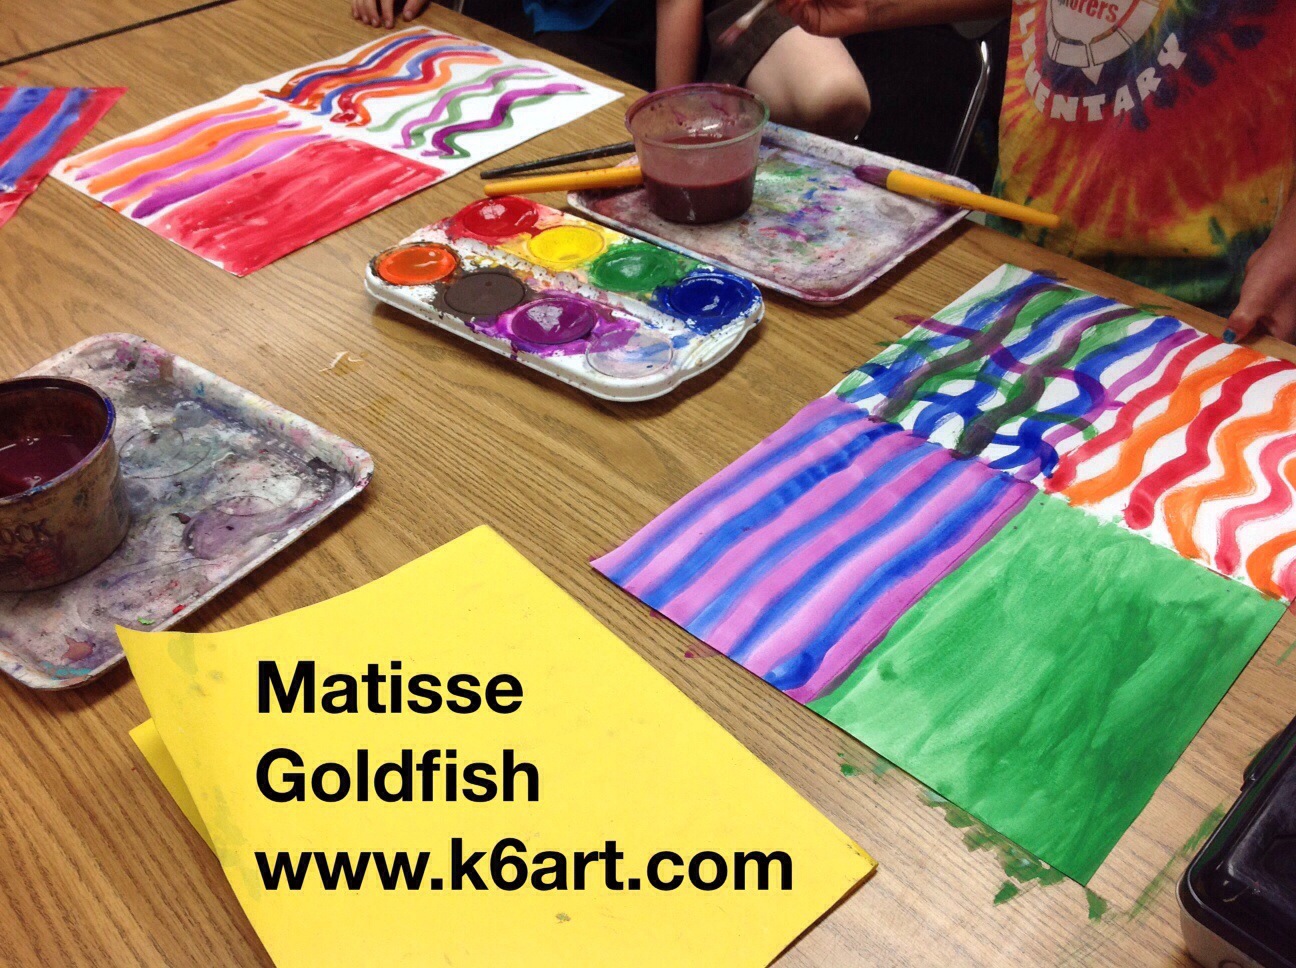
Here is a fast way to create four patterns. Fold the white paper into quarters and open. Using tempera cakes, paint one quarter a solid color. Paint the remaining quarters with patterned lines (wavy, zig zag, etc.). Now take oil pastels and create a pattern on the solid quarter. The tempera cake dries so quickly you can draw on it in just a few minutes. Add oil pastel patterns to the remaining quarters. Place on drying rack.

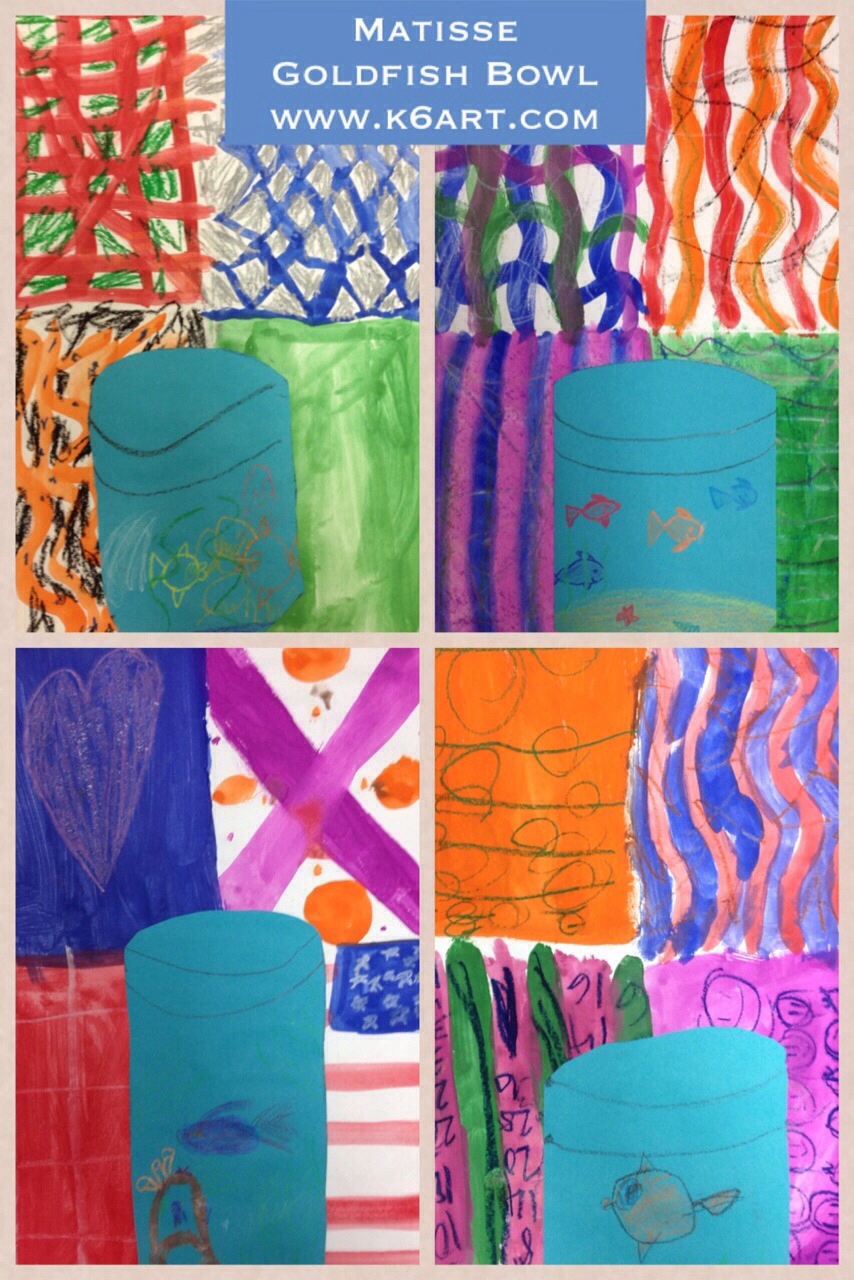
Day 3: create a goldfish bowl

>

20140412-224813.jpg
Materials
Blue paper, 6″x10″
Oil pastels (or construction paper crayons)
Scissors
Glue sticks
Turn blue paper vertically and draw a ‘rainbow’ at the top using a black oil pastel. Draw a ‘smile’ under the rainbow. Cut along the top line to remove the corners and create the look of a round vase edge.
Add goldfish or other aquarium creatures. Glue to patterned background paper with glue stick.

First Grade Results:
>

20140412-173748.jpg
Enjoy!

Do you have a favorite Matisse lesson?

>

Wyland Ocean Mural

Inspired by aquatic artist Wyland, our fourth graders recently completed a great big ocean-themed mural. We recreated the California kelp forest for the Wyland Foundation’s ‘Water is Life’ Mural Challenge.

Our entry in the Wyland mural challenge

The completed kelp forest mural. Dimensions 5’x10′

Who is Wyland?

Wyland Whaling Wall in Detroit.
Photo source: Wahkeenah via Wikimedia Commons

Wyland is an American artist best known for creating life-size whale murals. He painted 100 of these ‘whaling walls’ around the world, as well as many more paintings of  aquatic life. As seen in the whaling wall photo, Wyland often paints a ‘two worlds’ view of the ocean (both above and below the sea). Wyland’s art is very popular and he is commercially successful.

Materials

The Wyland Foundation provided us with a free kit, containing instructions, acrylic paints, brushes and a 5’x10′ Fredrix Paint It Yourself Classroom Mural Cotton Canvas Roll. We also used acrylic house paint and rollers. Blue painter’s tape was essential for getting a clean horizon line. We used Sharpies to sign the artwork and to add small details. We used soft-kut blocks and lino cutters to create fish stamps for our school of silvery fish. Tip: I matched our background paint to an undersea photo with the free Color Snap app.

The free Color Snap app is great for matching paint to a photo.

The free Color Snap app is great for matching paint to a photo.

Mural Process:

Brainstorming:

Students used their iPads to research the kelp forest and Wyland’s art. Students posted their  favorite images, plus  suggestions to an online board on Edmodo.

Painting:

We painted the mural in stages. Day 1: background, days 2 and 3 were for sea life and details.  A maximum of eight kids painted at one time; the rest made sea creature drawings at the adjacent lunch tables while they waited their turn to paint. We used several tricks to create the illusion of space in our mural, including size, placement, value, warm/cool colors and (most especially) overlap. This video shows six tricks artists use to show illusion of space.

We also had small teams of students on special assignment: team seal, team sea otter, official photographers, and fish stamp carvers.

Fourth graders add marine life to the kelp forest mural.

Fourth graders add marine life to the kelp forest mural.

Each student stamped a fish on the mural, creating our own school of Pacific Jack Mackerel.

Each student stamped a fish on the mural, creating our own school of Pacific Jack Mackerel.

Although we didn’t win the Wyland Challenge, we created a beautiful mural.  Everyone is so proud of it! We learned about the kelp forest, and how to create depth in art.  Thanks so much to the Wyland Foundation for all the art materials, and to our parent volunteers for all their help.

Want to learn more about Wyland? Watch 2007 video from the CBS Early Show.

Enjoy!

The mission of the Wyland Foundation is to help children and families around the nation rediscover the importance of healthy oceans and waterways through public art programs, classroom science education, and live events. Click here to see the winning 2013 murals and to find out about the 2014 Wyland ‘Water is Life’ Mural and Art challenge.

Four New Art Project Ideas for Grades K-6

Looking for new art project ideas? Here are four new (to me) art project ideas from my fabulous creative colleagues, Kelly and Nancy.

Kelly’s ‘Stained Glass’

'stained glass' sun

Kelly’s ‘stained glass’ sun made with watercolors and black glue.

Kelly from Skyline School brought these beautiful ‘stained glass windows’ made with fluorescent liquid watercolor and black glue. As a final step, her students rubbed their artwork with baby oil and a cotton ball to make the paper translucent. Primary grades used a paper plate tracer to make the sun. Upper elementary made the geometric window (note: upper grade students used carbon paper to transfer their symmetric designs).

'Stained Glass' window 2

Kelly’s ‘Stained Glass Window’ made with watercolor and black glue.

A New Twist on Monet

Kelly also brought these Monet water-lily paintings. Please zoom in on this painting – the paint texture is so interesting. Kelly didn’t offer a brush – her students applied paint with novelty rings purchased at Oriental Trading. These rings look like little sea urchins. If you try this, Kelly recommends pinching the ring instead of wearing it on her finger. Needless to say, her students LOVED this project!

Monet water lilies painted with novelty ring

Kelly’ s students painted their Monet-inspired art with a ring from Oriental Trading.

30-Minute Color Mixing

Nancy  teaches art at Solana Highlands School. She brought a color mixing project. Students used two colors plus black and white. After tinting, shading and creating a neutral, they drizzled black glue over the top. I love how much variety her students achieved. Some of these abstract compositions look like animal patterns. LOVE! Even more impressive: Nancy only has 30 minutes with her students. She does a lot of stations and table rotations to fit her projects in the tight time frame.

30-minute color mixing and black glue

Kindergarten Paper Quilts

Nancy did these paper quilt squares with the kindergarten. The kindergarteners start with a 6″ square of paper. They collage first, then Nancy adds holes with a three-hole punch. Next class, the kindergartener lace the holes. Nancy glues the squares together into a quilt.

kindergarten laced paper quilt collage


As always, I am FLOORED by my colleagues creativity. They always have interesting, challenging, beautiful projects – and they teach them so well. Thanks to Nancy and Kelly for sharing your ideas.


Enjoy!


Laurel Burch Complementary Color Cats

complementary color laurel burch cats

This Laurel Burch-inspired cat art project covers complementary colors, pattern and negative space. Tempera cakes and construction paper crayons are all you need for this project – quick, easy and neat!

Second graders learn about the complementary colors, then draw and paint a cat in the style of Laurel Burch. When dry, they add pattern and detail with a variety of crayons. Allow two 40-minute classes.

Second graders learn about the complementary colors, then draw and paint a cat in the style of Laurel Burch. Allow two 40-minute classes.

Meet Laurel Burch

Laurel Burch. Photo source: laurelburch.com

Laurel Burch. Photo source:

Laurel Burch was a self-taught  jewelry designer and painter. She was extremely successful despite serious illness. The Laurel Burch website has every resource you could want, including a great biography video and ‘fantastic feline’ slide show. We took a close look at the cat illustrations, and noticed the simple shapes, lines and patterns.

complementary color wheel

The Complementary Colors

I displayed the color wheel and we discussed the complementary colors (see this post). The complementary colors are directly across from each other on the color wheel.

There are three complement pairs: red/green; purple/yellow; and orange/blue. When two complements are displayed together, the colors contrast and ‘pop’.


The Art Project

Materials:

  • white sulphite drawing paper, 9″ x 12″ (or other white paper strong enough for painting)
  • primary and secondary color tempera cakes
  • brushes
  • water
  • examples of Laurel Burch cat illustrations
  • construction paper crayons
  • optional: metallic crayons

(note: this post contains compensated affiliate links)

Day 1: Draw and Paint the Cat

  1. Choose a complementary color pair.
  2. Draw the cat using a single construction paper crayon.
  3. Add eyes and other facial features, but do not add pattern or other detail.
  4. Paint the inside of the cat one of the complementary colors.
  5. Paint the negative space (background) in the other complementary color.
  6. Let dry.

Day 2: Decorate the Cat

  1. Hand out examples of Laurel Burch cat illustrations and construction paper crayons.
  2. Look at the patterns and other details on the cats and in the negative space (background).
  3. Do a quick review of the complementary colors.  Ask “What color is your cat? Find a crayon that is a complement of the cat color”.
  4. Retrace the cat’s original lines with that crayon.
  5. Use all the colors of construction paper crayons to color in the eyes, add designs and patterns. .
  6. Optional: add a little sparkle with metallic crayons.

color Laurel Burch paintings with crayons

 Second Grade Results:

Laurel Burch Complementary Color Cats gallery

I just love the way the complementary colors pop against each other. I also love how the opaque construction paper crayons pop atop the tempera paint!

I used tempera cakes and construction paper crayons because they were quick to set up and clean up. You could easily substitute regular tempera and oil pastels, or watercolor and regular crayons.

No matter what materials you use, this is a fun and successful project your students will really like.


Enjoy!


Related Posts Plugin for WordPress, Blogger...