School Auction Repousse Murals: Round Up

Yesterday I shared copper repousse mural from an old School Arts Magazine. It got me thinking….are any schools making repousse murals today?
P.S. Freestanding repousse murals make great group art projects for the school auction. If you are interested in making a repousse mural at your school, please read this excellent repousse mural tutorial from Donna Kern Ball. For more ideas, be sure to check out my ‘School Auction Ideas: Repousse’ board on Pinterest.

Yes!

I found several.

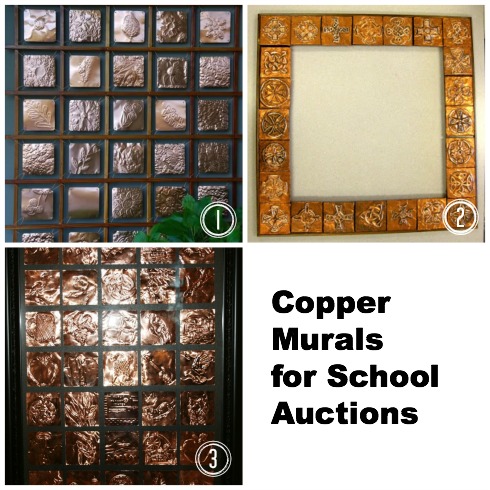
This auction project uses all the two-tone foils from blick. Nice!

Another mirror. This one has a liver of sulfur patina.

Here is another mural. Click here to see close-ups of all the copper tiles. Used a liver of sulphur patina.

Want to try? Click here for full-color tutorial for making copper repousse tiles.

Materials:

For school use, Mural 2 below uses two tone copper tooling foil roll cut into pieces. or 5″x5″ pre-cut copper tooling foil squares. These pieces are copper toned on one side and aluminum on the other. I’ve used these products and they are easy to work. Mural 1 below used heavier all-copper sheets – I haven’t used them.

(note: these are all compensated affiliate links).

copper murals for school auctions
Photo source mural 1. Photo source mural 2. Photo source mural 3.

Do you like these copper repousse school auction murals? Click here for mural 1, click here for mural 2, and click here for mural 3.

I did a repousse lesson with the fourth grade – click here for my foil repousse  lesson plan.


Enjoy!

note: this post contains affiliate links.

Two-Tone Tooling Foil – $16.50
from: Blick Art Materials (compensated affiliate)

art metal tooling foil sheets dick blick
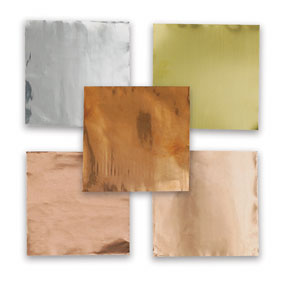
Art Metal Foil Sheets – $2.81
from: Blick Art Materials (compensated affiliate)


Wyland Ocean Mural

Inspired by aquatic artist Wyland, our fourth graders recently completed a great big ocean-themed mural. We recreated the California kelp forest for the Wyland Foundation’s ‘Water is Life’ Mural Challenge.

Our entry in the Wyland mural challenge

The completed kelp forest mural. Dimensions 5’x10′

Who is Wyland?

Wyland Whaling Wall in Detroit.
Photo source: Wahkeenah via Wikimedia Commons

Wyland is an American artist best known for creating life-size whale murals. He painted 100 of these ‘whaling walls’ around the world, as well as many more paintings of  aquatic life. As seen in the whaling wall photo, Wyland often paints a ‘two worlds’ view of the ocean (both above and below the sea). Wyland’s art is very popular and he is commercially successful.

Materials

The Wyland Foundation provided us with a free kit, containing instructions, acrylic paints, brushes and a 5’x10′ Fredrix Paint It Yourself Classroom Mural Cotton Canvas Roll. We also used acrylic house paint and rollers. Blue painter’s tape was essential for getting a clean horizon line. We used Sharpies to sign the artwork and to add small details. We used soft-kut blocks and lino cutters to create fish stamps for our school of silvery fish. Tip: I matched our background paint to an undersea photo with the free Color Snap app.

The free Color Snap app is great for matching paint to a photo.

The free Color Snap app is great for matching paint to a photo.

Mural Process:

Brainstorming:

Students used their iPads to research the kelp forest and Wyland’s art. Students posted their  favorite images, plus  suggestions to an online board on Edmodo.

Painting:

We painted the mural in stages. Day 1: background, days 2 and 3 were for sea life and details.  A maximum of eight kids painted at one time; the rest made sea creature drawings at the adjacent lunch tables while they waited their turn to paint. We used several tricks to create the illusion of space in our mural, including size, placement, value, warm/cool colors and (most especially) overlap. This video shows six tricks artists use to show illusion of space.

We also had small teams of students on special assignment: team seal, team sea otter, official photographers, and fish stamp carvers.

Fourth graders add marine life to the kelp forest mural.

Fourth graders add marine life to the kelp forest mural.

Each student stamped a fish on the mural, creating our own school of Pacific Jack Mackerel.

Each student stamped a fish on the mural, creating our own school of Pacific Jack Mackerel.

Although we didn’t win the Wyland Challenge, we created a beautiful mural.  Everyone is so proud of it! We learned about the kelp forest, and how to create depth in art.  Thanks so much to the Wyland Foundation for all the art materials, and to our parent volunteers for all their help.

Want to learn more about Wyland? Watch 2007 video from the CBS Early Show.

Enjoy!

The mission of the Wyland Foundation is to help children and families around the nation rediscover the importance of healthy oceans and waterways through public art programs, classroom science education, and live events. Click here to see the winning 2013 murals and to find out about the 2014 Wyland ‘Water is Life’ Mural and Art challenge.

Group Art Rug

Punch rug created by a group of elementary students. Photo appeared in Arts and Activities Magazine, February 1974

Punch rug created by a group of elementary students. Photo appeared in Arts and Activities Magazine, February 1974

IMG_6583

I found a really interesting group art project in an old Arts and Activities magazine. Teacher Harriet M. Judy of Niles, Illinois, wrote ‘Rug Punching’ for the February 1974 issue. Before reading this article, I had never even heard of rug punching, but I was attracted to the bold graphic design (it reminds me of Disneyland’s ‘It’s a Small World’). Here is an excerpt:

The children were introduced to rug punching in the late fall.  The use of bright colors and bold, geometric shapes was stressed as each child planned his design on manila paper.  Old picture frames were collected, and burlap was tacked to them. (The tacking itself required coordination and was great fun.)  The children drew their designs on the back of the burlap with permanent markers.  A spare frame was used to demonstrate to the children the technique of using the rug punch needles.  The children were allowed to work on their rugs after they had completed their other assignments and during a specified time at the end of the day.

The results were judged so magnificent that the teachers and the children decided to combine all the separate designs into one large wall hanging for display inside the entrance to the school.  So a stretcher frame big enough to handle a large piece of canvas was purchased by the school.  The burlap was attached to it, the designs were drawn, and the group work was begun.

…these boys and girls were so enthusiastic and absorbed in their project that they worked well together.  Each one had his own design to work on, and everyone worked together around the frame.  All the children’s names were worked into one corner by a teacher.  When the rug punching was completed, the frame was painted.

The rug now hangs on a large wall in the entrance to the school.  It is most impressive, and everyone admires and enjoys the colorful designs.

Click here to learn how to rug punch, or watch this 2-minute video.

Enjoy!

Happy Throwback Thursday! Stop by next Thursday to see what I’ve found in my stash of vintage art education magazines.

30-Minute Chihuly Chandelier

30 minute chihuly chandelier

Dale Chihuly makes fantastic, organic-shaped glass sculptures.  They are in collections all over the world. This summer I saw the Chihuly chandelier at San Diego’s Mingei International Museum and participated in a group art project taught by art educator Jackie Hwang.

Mingei Museum Chihuly Chandelier

Materials:

  • Overhead transparencies (like these  – make sure they are made for photocopiers)
  • photocopier
  • colored permanent markers (colored Sharpies or Art Color permanent markers)
  • scissors
  • pipe cleaners for assembling chandelier
  • UPDATE: single-hole punch
  • UPDATE: OPTIONAL rubbing alcohol and cotton balls

spiral acetate chihuly

Prep:

Jackie photocopied a spiral onto overhead transparencies. She made two sizes of spirals – a full sheet size, and a half sheet size containing two spirals.

The Art Project:

Families colored the spirals and cut them out, then turned them in to Jackie for assembly. Coloring time depended on the complexity of the design (but took FAR less than 30 minutes).

Assembly:

UPDATE: carefully punch each spiral on the tiny dot at the center of each spiral.

UPDATE: OPTIONAL: You may experiment with smearing the spirals with a cotton ball lightly dampened with rubbing alcohol. This will cause the colored sharpie to smear and blend. It’s a different look, and it takes extra time. Totally optional!

Jackie created the chandelier form using a mix of the large and small spirals. She used a couple of pipe cleaners to suspend the spiral clusters.

Jackie’s project is perfect for grades K-6. It would be super for art teachers on a cart, or art teachers that teach at multiple schools. You could fit the photocopied transparencies and all the other materials you need for this project in a tote bag.

Here is a 4-minute video of Dale Chihuly from the CBS morning show

Special Notice for San Diego Teachers and Parents:

  • Teachers: Do you want to take your class to the Mingei Museum? The Mingei provides free admission for all K-12th grade tours as long as they’re scheduled in advance.
  • Parents: The Mingei is free to San Diego county residents and military the third Tuesday of the month. Monthly Family Sundays offer admission and fun activities for just $5/family. Go to www.mingei.org for more details.

Coming up in the next post: two more Chihuly-inspired projects.

What’s your favorite Chihuly project?

Kandinsky Circles Mural

kandinsky circles mural

Here is a twist on the popular Wassily Kandinsky circles project: a group art mural made from recycled CD case trays. This project is perfect for Earth Day, but it does require advance planning.

Kindergarteners use oil pastels to draw concentric circles in CD inserts. Allow one 40 minute class, plus time to assemble mural.

Kindergarteners use oil pastels to draw concentric circles in CD trays. Allow one 40 minute class, plus time to assemble mural.

Materials:

  • CD Jewel Case insert trays, preferably donated, one per student
  • Oil Pastels (we used Crayola)
  • glue and backing for mounting (see below)

Prep:

  • Source CD jewel cases. I got 250 CD jewel cases via the ‘for sale – free’ section on Craigslist. Like many others, the donor had switched from CDs to MP3s and didn’t want the old CD cases going to a landfill. Score!!!! Free art materials AND trash kept out of the landfill.
  • Pry off the colored plastic CD trays from the clear jewel cases (a parent volunteer helped me with this step). Save the clear cases for another project.

The Art Lesson:

I introduced Wassily Kandinsky to the kindergarteners. We looked at several of his famous artwork including Color Study: Squares with Concentric Circles. We noticed Kandinsky liked to make paintings with bright colors and shapes – not landscapes or paintings of people. Here are two brief YouTube videos I showed the kinders.


kandinsky circles how to

The Art Project

The art project couldn’t be easier:

1. Pass out oil pastels and CD case insert trays. Flip trays so central ‘bump’ is up.

2. Students start by coloring a fat ring around the center bump. They trade colors with a neighbor, then color another concentric circle. Repeat until the entire plastic circle is colored. Finally, they color the edges.

3. Group completed insert trays and mount

So easy and fun!  100% of kindergarteners had success with this project.

Mounting:

I plan on using four glue dots per CD tray and mounting on foam core.

UPDATE: The glue dots failed immediately. I had better luck with strong spray glue (3M Super 77 Spray Adhesive – use it outside or in a well-ventilated area). One week after the art show, I was able to remove the plastic circles to hand back to the kids.

However, you may choose to use a different adhesive and base depending on the number of circles you have, and the length of time you want the mural on display. Because I have 45 circles and only want the mural on display for one week, I am creating a display that can be easily dissembled.

UPDATE:  If you want to a more powerful adhesive for long-term mounting, try 3M Scotch Heavy Duty Mounting Tape. I created CD case mural using the mounting tape, and sent it off to a museum show. The mounting tape worked beautifully.

 Another option: keep the plastic insert inside the jewel case. Color, then close and mount each case to display surface (I separated the insert tray from the jewel case because I needed the clear cases for another project).

This would be a great activity for an Earth Day event – each participant can make a square for the mural. The entire activity, including the videos and clean up, took only 40 minutes.  I also see this as a fun art activity booth at an art fair or school carnival.

Enjoy!

Do you have a great resource for free art supplies?

 Do you have a favorite recycled art project?

Related Posts Plugin for WordPress, Blogger...