Bottle caps are abundant, colorful and free – a perfect art supply! Second graders worked in small groups to create bottle cap mosaics. We used an under sea theme to tie into our whole-school ocean education program. The art will be displayed in the school lobby.
Prep:
Paint foam core or cardboard if desired (I painted all the boards the same color – no matter how they are arranged, they will make a unified design). Sort bottle caps by color. Lay out overall design on prepared board (I used a paper template or chalk for this step).
Assembly:
We used Aleene’s Tacky Glue to attach the caps to the painted cardboard. I squeezed out the glue onto paper plates and the kids applied it using popsicle sticks. Kids worked in groups of 6-7 to complete their murals.
Second graders glue bottle caps to mural.
Each class had a unique design.
Each mural panel was made by a table of 6 second graders.
I planned the color scheme based on the most popular bottle caps colors. We had lots of water, soda and Gatorade caps in white, green, red, dark blue and orange. The least common colors were yellow and purple – we had to use these rare colors as accents only (my dream of a giant purple octopus mural was out).
Are you looking for a permanent bottle cap mural? I bought the book, Bottle Cap, Little Bottle Cap by artist Michelle Stitzlein. The book has detailed directions for creating murals using boards, electric drills and special screws. Parents at our school are preparing outdoor art using this method right now, and I will post their photos next week.
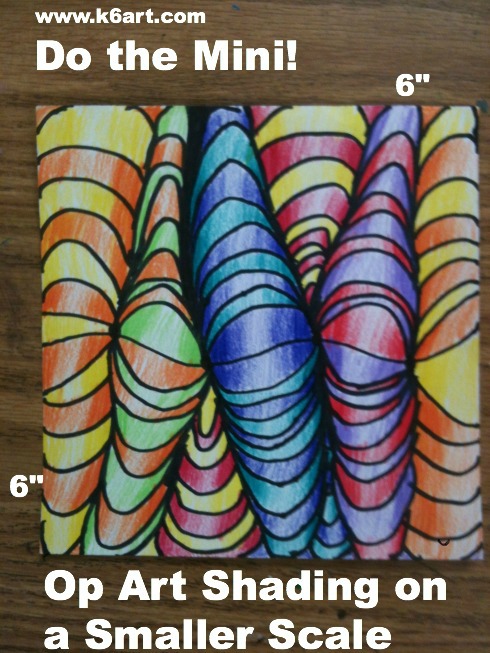
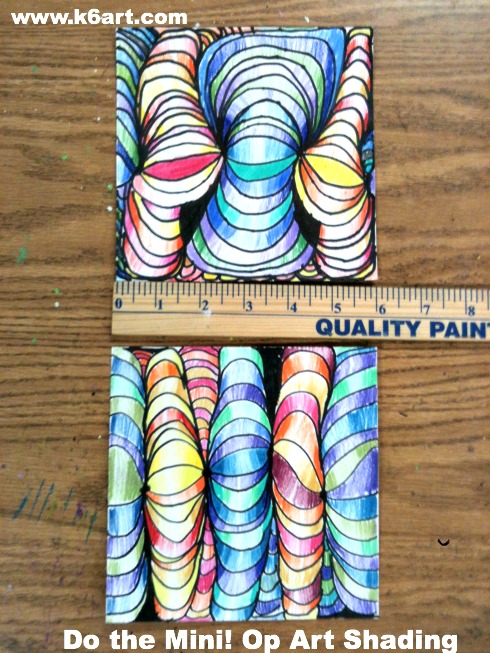
This Bridget Riley-inspired colored pencil op-art line shading lesson is extremely popular. I first saw it on Art With Mr. E., then on Teach Kids Art, and finally a post on Artisan Des Arts with a teaching video (wow!). If you are unfamiliar with this project please start out by visiting these excellent blog posts.
My small contribution to all this awesomeness is …small. Last year I tried this project with 5th grade using 9″x12″ white paper. Well, it took a long time…too long. The full size project took at least 4 classes and many students lost interest.
I decided to try a smaller format. At Mr. E’s suggestion I went down to a 6″x6″ square. SUCCESS! The 4th graders were able to complete the 6″x6″ project in 2-3 40-minute sessions. They were very proud of their artworks.
For detailed instructions, please view the teaching video in the link above. However, for the mini 6″ version of this project, start with 4 dots on the wavy line
This week the fifth graders continued work on their spectacular sport trophies. The wire and foil figures are now posed and wrapped with plaster wrap. Almost all have been stapled to wooden bases. Our fifth graders have experience working with plaster (see this post and this post) so almost all finished wrapping the figures during our 40 minute class.
Volleyball
Don’t you love the poses and accessories?
Skier with popsicle stick skis and bamboo skewer poles.
Here’s a ‘wrap up’ (get it?) of all the steps so far:
wire armature made from two pieces of 18 inch pre-cut floral wire
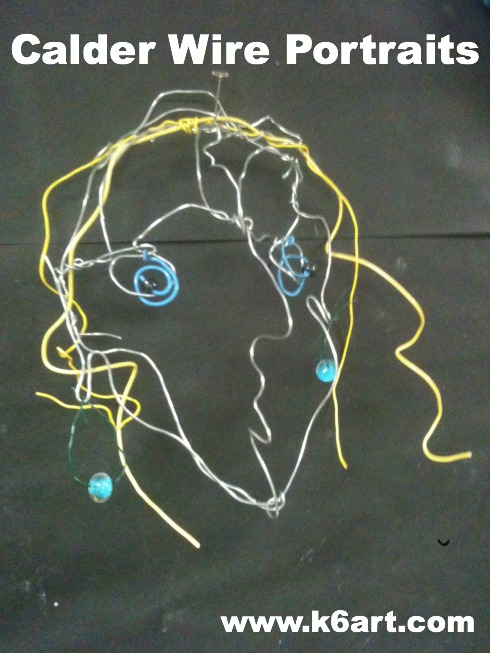
Alexander Calder was an amazing, original, sculptor with a great sense of humor. Our 5th graders had a lot of fun making Calder-inspired wire portraits.
5th grade students made 3D wire portraits in the manner of Alexander Calder. Allow three 40-minute sessions.
Materials
Basic wire sculpture supplies. All wires and decorations can be cut with kindergarten scissors.
pre-cut floral wire, (AKA ‘stem wire’) in bright aluminum, 26-gauge for wiring on embellishments (I call this fine and flexible wire ‘sewing wire’ because it is fine enough to pass through a sequin)
soft colored wires, such as Twisteez, pipe cleaners, or electrical wire (be sure it is easy to cut)
embellishments: stainless steel pot scrubbers (can cut into smaller pieces, for beard), pony beads, sequins or buttons (for eyes and earrings)
scissors
copy paper or other thin paper
Sharpie marker
optional: gallon-size Ziploc storage bag if more than one session is required.
Draw a front view of the face. Make a simple contour and touch all four sides of the paper.
Turn paper over: the black lines from the first side should be visible!
Now draw a simple profile of a face, including nose and lips. The profile should touch the top, bottom and one side of the paper.
Put sketch in labeled storage bag.
Sketch: front
Flip sketch over. Draw profile view (note front view is barely visible)
Day two:
Pass out bags, markers, and two 4 ft. lengths of 14-gauge Sculpture Wire per student. Students should turn sketch to the front view. Bend one wire around oval sketch. Overlap ends and wrap to secure.
Trace front view with wire
Flip the sketch to the reverse. Place end of second wire at top of profile and bend wire to follow sketch. Overlap ends and wrap to secure. You may have excess wire – do not cut this off yet.
Trace profile in wire.
Put sketch + wires in labeled storage bag.
Day three:
Remove wire portrait pieces from bag and insert the front view through the profile. Secure at joints at top and bottom of face using pre-cut wire and any excess wire. Give students a short piece of wire for ‘glasses’. Add ‘C’ shaped wire ears if desired (or bend out ears from face wires).
Insert the profile into the front view and secure. Add a short wire for eyes.
Side view of assembled wire portrait. Ready to embellish with pipe cleaners, beads, pot scrubbers and sequins.
Colored wire (or pipe cleaners) make fun hair and eyes.
Display:
Suspend from ceiling with string or fishing line, or link faces together with paper clip ‘S’ hooks for a giant mobile.
Calder-inspired wire portraits hang in chains at school art show.