Tear Monsters for Kindergarten and First Grade


tear monsters for kindergarten and first grade

Here is a project I did in the late spring with the kindergarteners. It was a fun way to use up all my colored paper scraps. The kids loved it!

Materials

  • black construction paper, 12″x18″
  • colored scraps of construction paper
  • glue sticks

Art Project

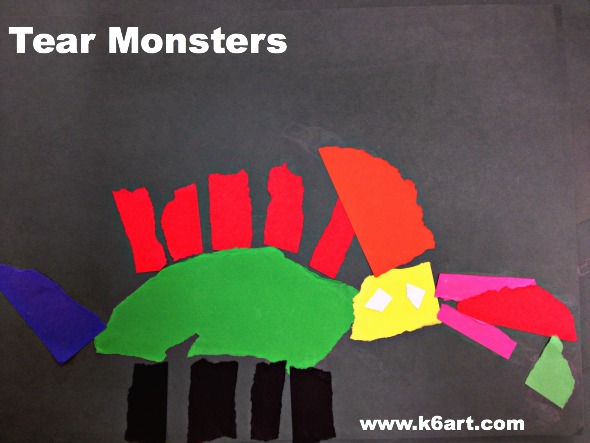
Talk about monsters. What body parts do they have? Claws, fangs, wings?  What else?  Do monsters have to be scary? Or can they be friendly?

Model Tearing

Model the correct way to tear: ask students to hold up a small rectangle of paper, and pinch the paper with both hands. Now put the hands together. Make a short tear in the paper, then another and another, always keeping the hands together.

Tear, Arrange and Glue

Students can begin by tearing a larger shape for the monster’s body.  The ragged edges look like monster fur! Keep tearing the larger pieces such as neck and head. Arrange these pieces on the paper. Students can rearrange until they find a composition they like.

Glue down the large pieces. Now add the small details – stripes, claws, eyes, etc.

Encourage kids to share scraps. Don’t let them throw away anything! Others can use the scraps for their monsters.

tear monsters

I love how each monster is unique. Friendly, funny, scary, weird…each one has their own personality.

Enjoy!


P.S. Want to organize and manage all those paper scraps? Click here and here and here for helpful ideas via Pinterest.

Don’t Let the Pigeon Drive the Bus!

don't let the pigeon

Don’t let that naughty pigeon drive your helicopter or play with the car keys!


Apparently I am the last parent on earth who hadn’t read Don’t Let the Pigeon Drive the Bus! by Mo Willems. I will use the lame excuse that my sons are teenagers, and that this hilarious book wasn’t yet written when they were in their prime story time years. I became enlightened when I saw this post on the Shine Brite Zamorano blog. 

This book is hilarious. The pigeon is simple to draw – he is a nice collection of circles and lines. I’ve included a YouTube video so you can do this project right now.

71ShXn7qtoL

http://www.youtube.com/watch?v=V10jhsNIMI8

Materials

  • 9″x12″ gray construction paper
  • yellow and white Construction Paper Crayons
  • Sharpie
  • 12″x18″ construction paper for background
  • scissors
  • glue sticks
  • copy paper, 8.5″x11″
  • crayons or markers

Day 1: Read book. Discuss naughty pigeon behavior! Pass out copy paper. Use your crayons or markers to draw something the pigeon should not be touching.

Day 2: Draw pigeon on gray construction paper using Sharpie. Note circular eye and pupil, egg-shaped head, and simple half circle for the body. Skip the legs. Color in the eye, beak and neck band with construction paper crayons.

Now cut out the pigeon. Glue the pigeon and drawing to a large piece of colored construction paper. Use Sharpie to draw legs on the paper.

Hilarious first grade results:

‘Don’t let the pigeon eat pizza otherwise he will get greasy’

Don't let the pigeon smash the gum ball machine.

Don’t let the pigeon smash the gum ball machine.

This could definitely be modified for a sub plan: 1) show the video/read the book 2) do a directed draw of pigeon 3) have students show pigeon doing something naughty.

If you want to know a little more about author Mo Willems, check out this video:


Enjoy!


Newspaper City Collage for Kindergarten

newspaper city collage for kindergarten

Are you looking for a fun collage project for kindergarten? This newspaper city collage project engages students with a discussion about their city, then lets them use their cutting, gluing, coloring and painting skills.

When asked, “What do you see in a city?” kindergarteners named all sorts of things:  houses, roads, tall apartment buildings, garages, and even boats in San Diego harbor. One girl talked about her recent trip to the city hospital, another about what she saw on vacation in New York City.

Materials:

  • black construction paper
  • newspaper
  • scissors
  • glue stick
  • construction paper crayons, plus black crayon
  • watercolor set

Day 1: Cut and glue newspapers. Emphasize shape: squares, circles, triangles, rectangles etc. Add details with crayon.

Day 2: Paint with watercolor.

newspaper city collage assembly

Kindergarteners make cut paper city collages from newspaper, then color with crayon and watercolor. Allow two 40-minute classes.

Aren’t they wonderful?

newspaper city collage 1

newspaper city collage +

newspaper city collage 2

New York City collage before and after crayons and watercolor. Do you see the Statue of Liberty?


As much as the kinders enjoyed the project, I would do things a little differently next time:

  • Use smaller black construction paper . Students had difficulty filling the 12″x18″ paper we used within the class time frame. So this class took three 40 minute classes – I want to shorten it to two.
  • Skip the front page of the newspaper!  It took extra time to eliminate inappropriate ads and articles. Next time I will try the white pages of a phone book, classified ads or financial/stock listings.

This lesson was inspired by this lesson by CCE Art Happenings.

Do you have a favorite collage project for kindergarten?

Kindergarten Clay Handprints

Want to make clay handprints for a crowd but don’t have a slab roller? Save yourself some time –  get a multi-slab cutter.

The multi-slab clay cutter.

Multi-slab cutter easily slices a 25-lb. bag of clay into identical tiles.

Prep for the handprints was a breeze: cut the clay, smooth with damp sponge and print!  I added name and date with a wooden skewer. The tiles are not perfectly square so I gave some a quick trim with a metal-edged ruler.

Kindergarten handprints

The multi-slab cutter makes 24 tiles at once and is a HUGE time saver compared to rolling and cutting out each tile individually. If you don’t have a slab roller this is the way to go.

I will let these dry 7-10 days, then bisque fire. They should be glazed and ready to go in time for the holidays. Parents love them as a holiday gift.

I read about the multi-slab roller on Deep Space Sparkle and Mini Matisse. Thanks so much for the tip!

Kindergarten Birthday Cake

We all know kindergarteners love birthday parties. Cake, presents, decorations – what’s not to love? So it was no surprise that this  birthday cake art project was super-popular with the kinders.

Day 1:

Kindergartens started by viewing my birthday cake powerpoint  (note: if art class is before lunch your students will say they are hungry!). We discussed the lines and shapes we saw on the cakes, and in the frosting and decorations.

Cake drawing emphasizes lines and shapes.

Kinders drew the cakes with crayon. I emphasized that they didn’t have to color the large areas with crayon because we would paint the cakes next week. However, they should use crayon to color in the small areas such as candles, flames, balloons, numbers, etc.

Day 2:

We added cut paper birthday gifts with glue stick, then painted with regular and metallic pan watercolors.

Kindergarteners painted their crayon drawings with regular and metallic pan watercolors. Allow two 40-minute sessions.

Completed birthday cakes:

This would be a great end-of-the-year lesson to celebrate all the ‘summer’ birthdays that occur when school is out of session. This could also be a nice project for a Wayne Thiebaud lesson.

How about adding a book to the project? When I was little, Dr. Seuss’ Happy Birthday to You! was one of my favorite books and I still remember reading it on my 6th birthday (I also remember Baskin-Robbins clown cones plopping all over the back yard at the birthday party, but that is another story).

I’d love your suggestions on a book to read along with this project.

Do you have a special birthday-themed book for primary students?


Related Posts Plugin for WordPress, Blogger...