Journey Through the City: Interactive Sculpture

Journey Through the City Interactive Sculpture

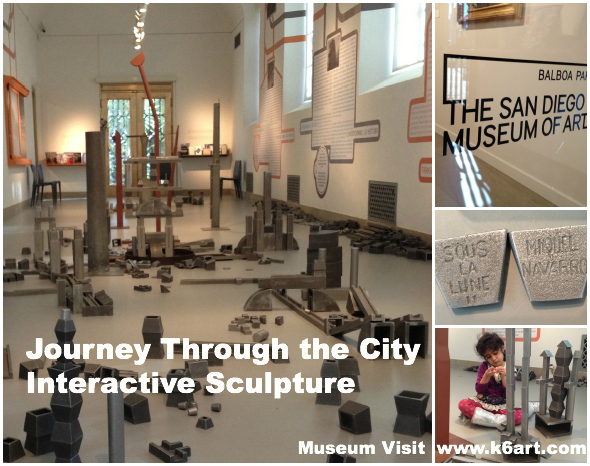
It’s winter break here in San Diego, and I celebrated with a trip to the San Diego Museum of Art. I enjoyed a FABULOUS, fun, free exhibit that will definitely appeal to children: Beneath the Moon II: Journey through the City by Miquel Navarro. It is an interactive sculpture/game/artwork made of 1000+ pieces of cast metal, ready to be assembled by visitors of all ages.

Navarro created this artwork in 1994 for the Pompidou Centre in Paris. Since then, it has toured the world, delighting children in Europe, Asia and Mexico. Here is a video of French school children enjoying Beneath the Moon.


Discussion:

What can you do in the art room to tie into Beneath the Moon II: Journey Through the City? You may want to start with a discussion. What is a city? What do we see in the city? We might see houses, factories, roads, trains, freeways, rivers, bridges or skyscrapers. Swimming pools and skate parks! Do cities stay the same forever or do they change?

Lesson Ideas:

If you visit:

The exhibit is open during regular Museum hours through April 30, 2013. There is no charge for this special exhibition, located in the new Welcome Gallery on the first floor. For docent-led school tours and group visits, click here.

The San Diego Museum of Art is located in beautiful Balboa Park, home to 15 major museums, the world-famous San Diego Zoo, theaters, gardens and much more.

A final tip: allot some time….YOUR KID WON’T WANT TO LEAVE!!!


NOTE TO SAN DIEGO COUNTY TEACHERS/ART TEACHERS, K-12

Would you like to see your students’ artworks exhibited at the San Diego Museum of Art? Young Art, the Museum’s exhibition of local student art, opens April 13, 2013.  The theme is ‘The Story of Me’. This is a juried exhibition.  Click here for more information. The deadline for submission is February 9, 2013.

How to Make a Calder Mobile

I love Alexander Calder! I teach a Calder wire project each year, but I have never successfully made a Calder-inspired mobile. Until now!

I recently received this 1975 edition of Making Things: Book 2. The Handbook of Creative Discovery by Ann Wiseman. Inside this gloriously illustrated book I found these  instructions for making Calder mobiles:

Making Things Book 2 – Handbook of Creative Discovery by Ann Wiseman. ISBN-10: 0316948519


Easy to follow step by step illustrations for a variety of mobiles


I decided to test it out with items I had on hand in the art room.

Materials for first mobile:

  • 18-inch pre-cut Stem Wire (AKA floral wire) 20 gauge
  • construction paper
  • scissors
  • hole punch
  • pliers (note: I didn’t have any pliers so I just did this with my hands)
  • AND A BALANCING FINGER 🙂


Materials for making a simple Calder-inspired mobile


Ms. Wiseman tells us mobiles are built from the bottom up. Aha!

Success! A 4-tier mobile!

Now for my second mobile. I made this mobile using Ann Wiseman’s illustrations and Peel & Stick Foam Sheets.

Calder-inspired mobile made with wire and self-adhesive craft foam.

To add interesting organic shapes, sandwich wires between matching pieces of self-adhesive craft foam.

If you choose to make these multiple tier wire mobiles, try it yourself first, be patient, and expect a lot trial and error. Balancing those wires is tricky and takes practice. I think these projects would be great for middle and high school students.

If you want to try this with a whole class of upper elementary students, I would keep it simple. Stick with one or two wires. Check out this project from Meet the Masters. I like how they have three degrees of difficulty and incorporate a stabile as a base.

Illustration from Meet the Masters website.


Here are some more ideas for Calder mobiles for kids:

If you love Calder, you might like my previous Calder posts:

Enjoy!

Have you ever made a mobile with your students? 

———————————————————————————-

Note: This post contains affiliate links.

Note: post updated 12/30/13

Best. Conference. Ever.

What makes a good conference? Great workshops and networking, of course. Hold it in a drop dead AMAZING setting like San Diego’s New Children’s Museum (NCM) and you have a home run hit! San Diego Art Education Association held its first annual Visual Arts Educators Conference this month at the museum. After introductions by energetic new SDAEA president Ron Jessee and a keynote address, Tomoko Kuta, NCM’s Director of Education & Exhibitions, took us on a tour.

The New Children’s Museum is one of the only children’s museum in the United States dedicated to commissioning artists to create site-specific works for a youth audience.

Staff held a kiddie yoga class under this Layer sculpture the day we visited.

Jason Rogene’s sculpture/light fixture made of styrofoam packaging.

Jason Rogenes’ Megalitransponder includes kiddie climbing wall topped with cardboard installation.

I got to attend three workshops, all tied in to NCM’s current exhibition, TRASH. They were held in the museum’s art education studios.

  • ’30-minute’ collograph printmaking with the museum’s art educator, Maxi Moraga
  • sculpture/drawing project based on the art of Peter Opheim by fellow San Diego elementary art teacher and blogger Don Masse of Zamorano Arts Academy
  • cardboard climbing squares group sculpture based on Charles and Ray Eames’ House of Cards, again by Maxi Moraga

Maxi Moraga leads collograph workshop.

Collograph print. No press required!

Sculpt/draw with Don Masse. I really admired this project when I first read it on his blog. So thrilled to try it out myself!!

Starting point for the house of cards sculpture. We collaged/painted our pieces, then assembled. This would be a great whole class or whole grade project.

As if all this wasn’t enough, we had a fabulous lunch from Urbane Cafe, gift bags with goodies from Blick and Artists and Craftsmen and a raffle with prizes donated by Blick, A&C and area education and arts organizations.  I won tickets to the City Ballet! Thanks also to local arts advocacy group art pulse.

A lot of foks in SDAEA, SD County Office of Education and NCM put together this amazing event. Thanks so much for a perfect day.

Like I said:

BEST. CONFERENCE. EVER.

 UPDATE: San Diego County art educators: check out our new SDCAEA Facebook page!

Wire Name Art

Give your name art lesson a twist – literally! Our fifth grade students had a ball sculpting their names in wire.

Materials:

Pre-cut floral wire (AKA stem wire) and sculpture wire

Session one:

To practice, give each child a piece of paper, marker and an 18 inch piece of wire. Kids should write their first initial on the paper. They may print or use cursive. They they trace their written letter in wire.

100% of 10- and 11-year-old students could do this by the end of the first 40 minute session.

Session two:

Give each child a piece of paper, marker and a 6 ft. length of sculpture wire. They should write out their first name in marker this time. They may print or use cursive, then trace their name in wire.

Write out name on paper, trace with sculpture wire (teacher example).

Did you notice? I added a single pony bead to dot each lower case ‘i’ and ‘j’.

 There should be a lot of excess wire at the end of the wire name. Students should loop the excess wire back, and attach to the beginning of the name with a quick twist. Voila! Name art with hanger!

Approximately 85% of 10 and 11 year olds were able to make their names in wire. I would recommend struggling students create a larger, single initial.

Session three (optional):

Want to take it further? Offer pony beads, sequins, and super-fine wire (I use pre-cut 18 inch 26-gauge stem wire).

Students can string the hanger wire with pony beads. They can clip the excess wire with (kindergarten!!) scissors. They can thread a bead or sequin onto 26-gauge wire and tie a knot around it.

Some students created small sculptures to embellish their name art.

Robby suspended his name from his sculpture.


Milan made a tiny mouse.


Riley perched a peacock on her name art.

How nice these will look on the students’ walls at home!

This would be a nice tie in to an Alexander Calder project. Check out my other Calder wire projects: wire sculpture and wire portraits.


Disclosure: I am an affiliate of Amazon and Blick Art Materials. I have been using Blick’s 14 gauge sculpture wire for 9 years and I love it!

Andy Goldsworthy Art in the Garden

Famous artist Andy Goldsworthy is fascinating. Our 5th graders were amazed at an artist who creates  and photographs art made from gathered leaves, mud, twigs, ice or rocks.

We began by viewing brief videos of Andy Goldsworthy on YouTube.

We discussed the repeating motifs in Mr. Goldsworthy’s work, including serpentine lines, spirals, and a circle with a hole in the center. We also looked at examples of stacked stone.

Students wend to the school garden and created temporary art works from materials found there.


A group of fifth graders worked together to make this dry-stacked rock arch.

Leaves arranged by color.

Early finishers made insect sculptures!


I took the photos initially, then turned over the camera to some early finishers who shot the rest of the photos.

Most students chose to work in pairs or groups for this project. Several said it was their favorite art project EVER! A few watched the YouTube videos again at home.

Next time you have good weather, consider an Andy Goldsworthy project.

Related Posts Plugin for WordPress, Blogger...