Eiffel Tower Line Drawings

marz paris pinable

Guess what? The Eiffel tower is not hard to draw. Our sixth graders drew the Eiffel tower, then created a Paris scene in the style of American artist Marz Jr.

The Art of Marz Jr.

We looked at the Marz Jr. website and noticed that many of his illustrations feature detailed black line drawings of famous architecture, such as the White House, the Brooklyn Bridge, and the New York Stock Exchange.

The focal point is often black line on white, contrasted against a simpler black line drawing on a brightly colored background.


Marz Jr.'s illustration of the New York Stock Exchange.

Marz Jr.’s illustration of the New York Stock Exchange.

Materials:

  • white paper (we used copy paper)
  • Sharpies
  • construction paper, 12″x18″ – yellow, orange or light green
  • scissors
  • glue sticks
  • reference photos of the Eiffel Tower and Paris

Day 1: Drawing the Eiffel Tower:

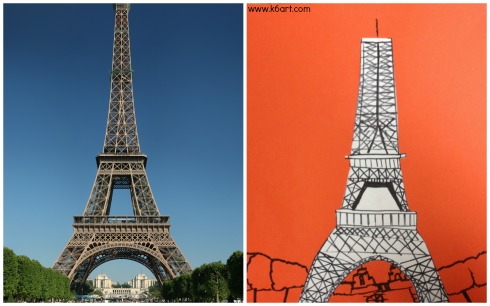
We began by looking at this close-up photo of the Eiffel Tower. I asked the students to look closely at the metal work, beginning at the bottom of the tower. The entire tower is made of metal ‘X’s!

They lightly folded copy paper vertically (‘hot dog’) to create a line of symmetry, then used Sharpie for the directed draw. We drew from the bottom up, starting with the ‘rainbow’ arch, to the first viewing platform, to the ‘legs’, to the second viewing platform, and then up to the top. X, X, X, X……..


marz paris 4

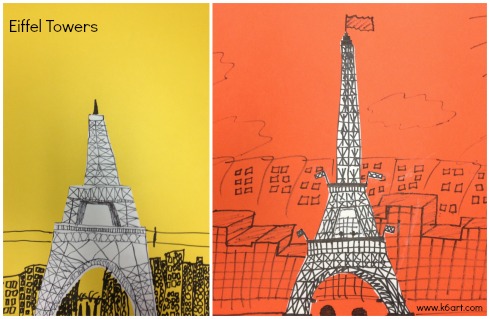
Day 2: Create Paris Scene, Cut and Collage

Using iPads, students looked at Google images of Paris. They used Sharpie to draw simple background scenes on colored construction paper, then cut out their Eiffel Towers and glued them on with glue stick.

marz paris 2


marz paris 3

The project took two 40-minute classes. It was a very successful project with no prep and minimal clean up.

The project was inspired by Marz Jr. projects in this post on the shine brite zamorano blog and this post at Deep Space Sparkle.

If you are really into Paris, check out my series of Paris-themed art (and cooking!) projects from art camp last summer. And definitely check out Cassie Stephens’ Paris unit on her elementary art blog.

Enjoy!

Seurat Pointillist Food

seurat pointillist food: Q-tips, pan watercolor and markers. Very successful!

Fourth grade just finished their Seurat pointillism art project. Our students used pan watercolors, Q-tips and markers to make pointillist food! The project was inspired by this project by Jessica Young at Miss Young’s Artroom.

Materials:

  • pan watercolors
  • Q-tips
  • colored markers (we used Crayola and Sharpie)
  • pencil/eraser
  • white paper, 9″x12″
  • reference photos (I found dessert images on Pinterest)
  • loups or magnifying glasses
  • pointillist note cards (like these – available at walmart.com and galison.com) or books

Day 1: Learn about pointillism

I passed out pointillist notecards and magnifying loups (borrowed from our science lab). It was a lot of fun to see the dots up close.

Next we watched the first half of an AMAZING video: ‘Get to the Point’ – Georges Seurat and Pointillism  by Artrageous with Nate.

Finally  we completed a color mixing worksheet, using marker dots to make the secondary colors.

Use a magnifying glass or loop to examine pointillist art up close


homemade pointillist worksheet

Homemade pointillist worksheet

Day 2: Create dots with Q-tip or marker

Students selected a food reference photo, then lightly sketched their basic food shapes on paper. They had the option of using Q-tip or marker to dot their papers.

(warning: we discovered you can’t erase pencil lines after they’ve been painted with pan watercolor. Remind kids to draw lightly!)
seurat pointillist orange

Day 3: Erase lines, add more dots

Students erased their pencil lines from last week, then added MORE DOTS! Some students added a background – a couple even added pointillist borders.

pointillist sundae


Fourth grade results:


20131015-223638.jpg


This was a VERY popular and successful project! I will definitely repeat.  Are looking for a group pointillism project? Please check out my earlier post for a Seurat mural.

Here’s the cool pointillism video by Artrageous with Nate


This is the first project of our food art series, in honor of the FEAST! exhibit at San Diego’s New Children’s Museum. This year we will be making food art projects at each grade level.

Do you have a favorite food art project?

Easy Chihuly ‘Bellagio’ Ceiling

bellagio ceiling collage


Dale Chihuly is an American artist known for his fanciful, organic-shaped glass sculptures. Here is a group art project inspired by Chihuly’s ceiling installation at the Bellagio in Las Vegas. Our project turned out so well I installed it on my art room ceiling!


Chihuly bellagio


Materials:

  • basket-type coffee filters, various sizes
  • watercolor markers (such as Crayola)
  • spray starch
  • assorted plastic cups and bottles for drying
  • newspaper or other table covering to protect drying surface
  • tag board
  • hole punch
  • hot glue

The Art Project:

Students colored their coffee filters with Crayola markers. We did a quick review of the color wheel before coloring: students should select analogous colors, or use warm or cool color combinations. Avoid complementary color choices – the colors will muddy when sprayed.

Students DO NOT have to color every inch of the coffee filter! Leave some white space – the colors will run together when sprayed with starch.

Spray and Assemble:

Cover a table with newspaper. Set up old plastic tubs, bottles, etc. Invert coffee filter over the tubs and spray with spray starch. The colors will run and blend. Let dry over night.

Hot glue the flat bottoms of the dry coffee filters to a sheet of tag board.  I punched holes around the edge of the tag board, and used T-pins to pin the artwork into my acoustic ceiling tiles.

(Guess what? My ‘Bellagio’ ceiling didn’t set off the motion sensor alarm. Hurray!)

This project was inspired by one of the many projects in the Chihuly unit from Nashville public schools.

More Chihuly Resources:

The Children’s Museum of Indianapolis has an extensive virtual glassblowing interactive for kids.

Watch a variety of Chihuly videos on Yahoo Screen.

Check out my earlier post for a 30-minute group art chandelier.

Enjoy!


30-Minute Chihuly Chandelier

30 minute chihuly chandelier

Dale Chihuly makes fantastic, organic-shaped glass sculptures.  They are in collections all over the world. This summer I saw the Chihuly chandelier at San Diego’s Mingei International Museum and participated in a group art project taught by art educator Jackie Hwang.

Mingei Museum Chihuly Chandelier

Materials:

  • Overhead transparencies (like these  – make sure they are made for photocopiers)
  • photocopier
  • colored permanent markers (colored Sharpies or Art Color permanent markers)
  • scissors
  • pipe cleaners for assembling chandelier
  • UPDATE: single-hole punch
  • UPDATE: OPTIONAL rubbing alcohol and cotton balls

spiral acetate chihuly

Prep:

Jackie photocopied a spiral onto overhead transparencies. She made two sizes of spirals – a full sheet size, and a half sheet size containing two spirals.

The Art Project:

Families colored the spirals and cut them out, then turned them in to Jackie for assembly. Coloring time depended on the complexity of the design (but took FAR less than 30 minutes).

Assembly:

UPDATE: carefully punch each spiral on the tiny dot at the center of each spiral.

UPDATE: OPTIONAL: You may experiment with smearing the spirals with a cotton ball lightly dampened with rubbing alcohol. This will cause the colored sharpie to smear and blend. It’s a different look, and it takes extra time. Totally optional!

Jackie created the chandelier form using a mix of the large and small spirals. She used a couple of pipe cleaners to suspend the spiral clusters.

Jackie’s project is perfect for grades K-6. It would be super for art teachers on a cart, or art teachers that teach at multiple schools. You could fit the photocopied transparencies and all the other materials you need for this project in a tote bag.

Here is a 4-minute video of Dale Chihuly from the CBS morning show

Special Notice for San Diego Teachers and Parents:

  • Teachers: Do you want to take your class to the Mingei Museum? The Mingei provides free admission for all K-12th grade tours as long as they’re scheduled in advance.
  • Parents: The Mingei is free to San Diego county residents and military the third Tuesday of the month. Monthly Family Sundays offer admission and fun activities for just $5/family. Go to www.mingei.org for more details.

Coming up in the next post: two more Chihuly-inspired projects.

What’s your favorite Chihuly project?

Art + Cooking Camp: Degas, Sculpture and Chocolate Fondue

We had a fabulous time all week at my Paris-themed art and cooking camp. On the last day, we wrapped up our sculpture project and made yummy chocolate fondue.

20130723-173625.jpg
20130724-122304.jpg
A couple of campers wanted to make animal sculptures. They used foil and plaster or white Sculpey polymer clay to create their creatures. Not so Parisian, but I love how they turned out.

20130723-174158.jpg

20130723-174222.jpg

20130723-174240.jpg
The recipe for chocolate fondue was the easiest of all our recipes this week: 8 oz. of chopped semi-sweet chocolate heated with 1/3 cup of half-and-half. Pound cake cubes, whole strawberries and sliced banana tasted delicious dipped in the warm chocolate.
So much fun!

Enjoy!


Let’s Go to Paris! Art + Cooking Camp
Day One: Crepes and Monet
Day Two: Madeleines and the Eiffel Tower
Day Three: Meringues and Degas
Day Four: Cherry Cake and Pointillism

Related Posts Plugin for WordPress, Blogger...