Melted Marble Pinch Pots


This is it!  The most beloved clay project of all. Second graders use clay, glaze and marbles to make glittering animal pinch pots. They visit a kiln and load it themselves. If you are looking for a truly memorable clay project, try this.

Day 1: Make an Animal Pinch Pot

Second graders use clay to make a pinch pot, then use the ‘scratch attach’ (score and slip) method to add head, legs, tail, etc. I let students make any animal they want, real, imaginary or extinct.

I let the clay dry and then bisque fire it.

Day 2: Glaze Day

On glaze day, students paint their pots inside and out with many colors.

Glaze in 2 oz. ‘salsa cups’. I use one color per table and let students switch tables.

I put out one glaze color and several brushes on each of my tables. Students switch tables to get different colors. The brushes stay at the table and don’t travel (so I don’t need water on the tables). I use 2 oz. plastic portion cups and  lids (also available at Costco) for my glazes. At the end of class I spray the leftover glaze cups with a little water and cap them.

Day 3: Marbles and The Kiln Field Trip!!!

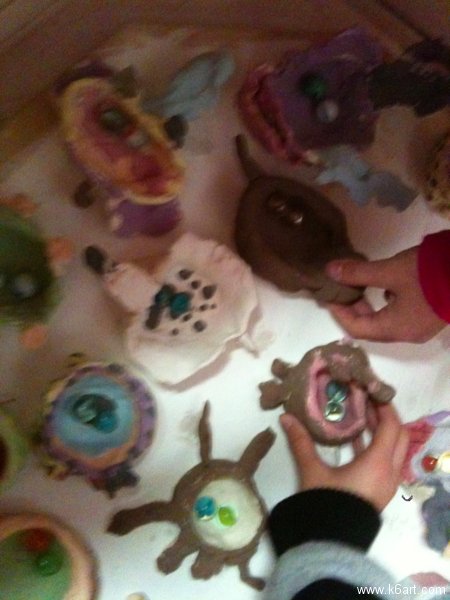
Oh boy! The kids come up to the marble tray and pick two marbles for their pots. There is much deliberation….which to pick? I tell them the marbles don’t have to match, and no matter which they pick, they will be very surprised at the result.

pots filled with marbles ready to fireSecond graders load their own pots into the kiln.

I tell the students we are going to the school kiln – a super-hot oven we use to fire their clay. We then load up the pots on my cart and walk as a group to our kiln (how fortunate we are to have a kiln on site!).  I always have a parent (or 6th grade) volunteer help with this step.

Each student puts his or her own pot into the kiln.

Ready for the second firing!

(Note: I use low-fire clay and underglazes. I fire the glazed clay/marbles to cone 06).

Day 4: Return the Pots

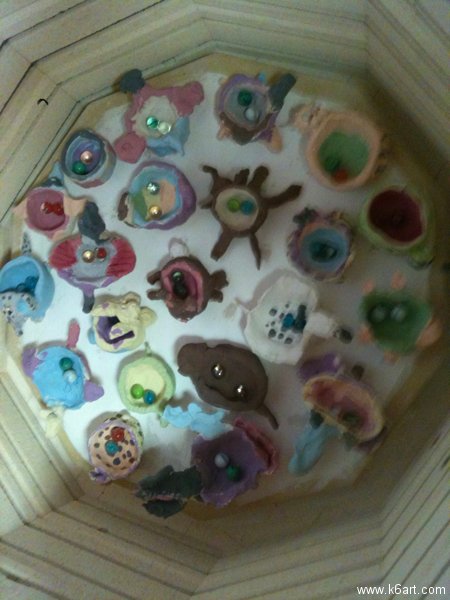
I pass back the fired pinch pots. Wow!

Finished melted marble pinch pots

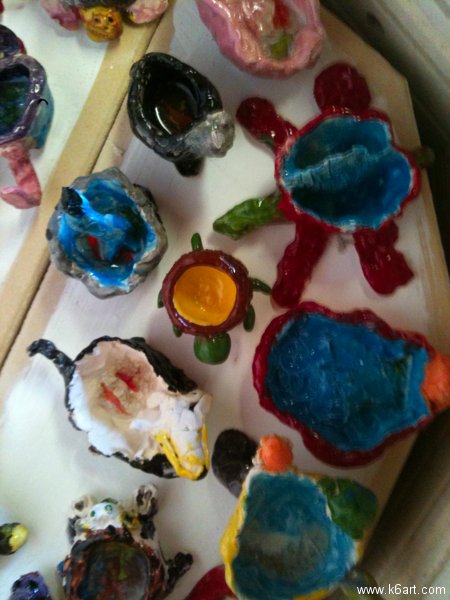
Students are amazed at the melted marbles. Kids describe them as ‘pools of glass’ or ‘pools of ice’. We have to see them all! So we take a ‘museum tour’ and examine ALL the pots.

Tips:

  • skip the marbles and use  glass gems for flower arranging or  glass gems for aquariums, You will get a better range of colors.
  • You don’t have to pay a lot of money for marbles. Marbles are available at my local dollar store and in the toy section of my local drug store.
  • Caution: do not use this method on coil pots!  You do not want molten glass leaking out of the pot onto your kiln shelf.

Kids love this project!  I had some 7th graders visit the art room recently – they immediately smiled when they heard we were doing this project again.  They said it was their favorite and that they still have their pots.

I learned about this method (years ago!) through one of the art education list serves (I can’t remember if it was The Incredible Art Department or the Getty Museum Teacher Art Exchange).


Good luck!  If you end up trying this project and post it in your blog, please link back to this post. 🙂

Chalk Pastel California Missions for Fourth Grade


Fourth graders made chalk pastel drawings as a complement to their California history social studies unit.  Allow two 40-minute classes.


Thinking about a successful, fun art project for a 4th grade California Mission lesson? Try this  art project from Deep Space Sparkle, easily adapted for a California Mission project.

Mission San Juan Capistrano

Mission San Diego de Acala, San Diego, California

Materials:

  • black, dark blue or purple construction paper
  • chalk pastels
  • black or dark blue oil pastel for outlining
  • hair spray (or other fixative) to keep completed artwork from smearing

Examples of completed 4th grade student work:

Deep Space Sparkle has all the instructions and a downloadable drawing aid for adobe architecture.  You may want to print out this California mission coloring page to use as a Mission drawing aid.

This art project fit in beautifully for our school’s annual 4th grade California history field trip. This year: Rancho Buena Vista Adobe. In past years: Mission San Juan Capistrano.

Tips:

Don’t let students blow excess pastel color. During class, provide a piece of newspaper so they can tap off the excess.

After class, I washed down the tables with a bucket of plain water and a large sponge. Expect to change the water and rinse the sponge out after just a few tables – they get really dusty – but it is worth it for such a successful project.

The completed artwork will smear unless you spray it with a fixative (I use ordinary unscented Aqua Net hairspray from the drugstore). Please spray the artwork outside!


UPDATE: New Photo tour of Mission San Diego de Acala! Full color photos of Mission San Diego PLUS PHOTOS OF REAL SIGNAGE from the exhibits. A great resource for your classroom, Mission San Diego field trip or mission project. Just $5 each. Click here for Mission San Diego PowerPoint.  Click here for Mission San Diego Keynote.


Vochol: Coolest Art Car Ever!

Here is a museum exhibit you don’t want to miss! ‘Vochol’ – a VW bug COMPLETELY covered with colorful hand-set seed beads. ‘Vochol’ takes its name from ‘Vocho’ (the Mexican nickname for VW bugs)  and Huichol (the Mexican people famous for their yarn paintings and beadwork).

Vochol ®, photographed by Alejandro Piedra Buena, Copyright 2010 Museo Arte Popular

This amazing bug has 2,227,000 beads on it! It was created by eight Huichol craftsmen. On exhibit at the San Diego Museum of Art until March 11, 2012. Vochol is next traveling to Washington, D.C. from March 20, 2012 – May 6, 2012.  Check out the Vochol Blog for more info. Vochol is even on Facebook!

If you have a chance to see this amazing artwork, please go.  And bring children with you….they will love it!


Even the hubcaps are covered with beads!

Beaded mirror

A peek inside shows a beaded steering wheel and dashboard.

Map of Mexico showing region where the Huichol people live.

‘Secret’ Rainbow Fish for Kindergarten

secret rainbow fish for kindergarten

Looking for a kindergarten art lesson? Try this line lesson based on the popular book ‘The Rainbow Fish’.

Kindergarteners create watercolor resist line art based on the book ‘The Rainbow Fish’. Allow two 40-minute classes.

Materials:

  • white construction paper 12″x18″ (use paper sturdy enough for watercolor)
  • Sharpies
  • white crayons
  • watercolors: purple, blue and green (cool colors)

Day 1: Draw

Read the book The Rainbow Fish by Marcus Pfister (or listen to it online for free!) Point out the cool colors and name any lines you see.

Using Sharpies, students draw the outline of the fish as a step-by-step. I tell students to draw a large ‘rainbow’ for the back, ‘smile’ for the belly, and triangle for the tail. We divide the body with a few vertical lines.

Kinds of Lines

Each section is filled with a different kind of line.  We use

  • spirals
  • diagonal
  • wavy
  • zig zag
  • vertical
  • horizontal
  • dotted
  • dashed

Add  SECRET (white crayon) lines

Now for the SECRET! Use the white crayon to add more lines around and in-between your black lines (the white lines are hard to see and therefore ‘secret’). For best results, encourage students to press hard with the white crayon. Tell students you will tell them the secret when we paint the fish.

Day 2: Paint

Paint with purple, blue and green watercolors. Listen to the ‘oohs’ and ‘aahs’ as the SECRET lines pop out from the watercolor. It is OK for colors to overlap (the cool colors mix beautifully).


Cool color watercolors and white crayon resist.

If you have extra time after clean up, read The Rainbow Fish again (or try another book in the series such as Rainbow Fish to the Rescue! or Rainbow Fish and the Big Blue Whale).

Enjoy!

Do you have a favorite story book for kindergarten art?

NOTE: This post was updated on 9/2/13.

Related Posts Plugin for WordPress, Blogger...