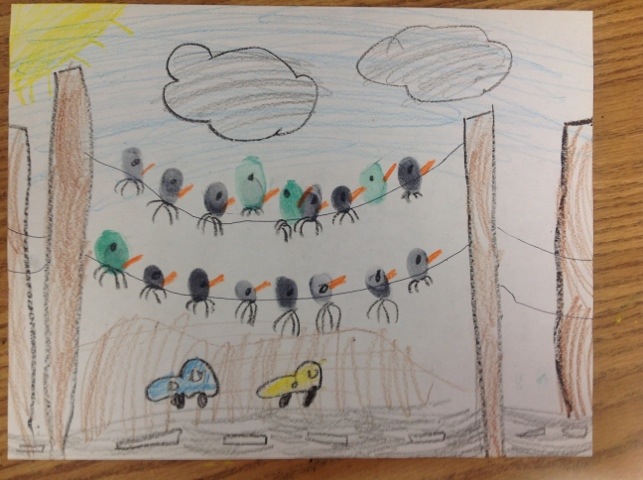
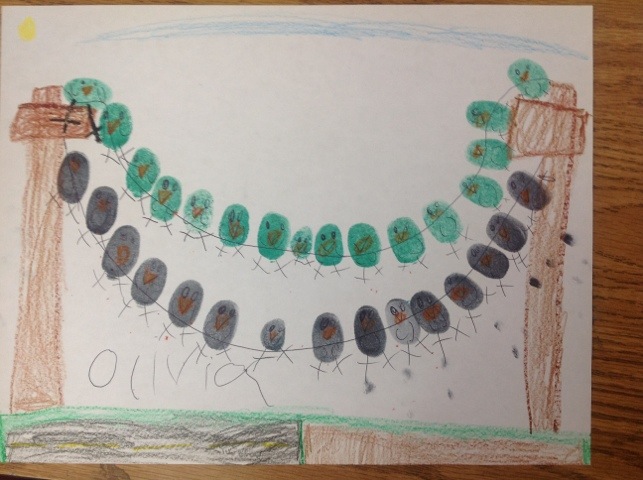
Looking for a quick 40-minute project? Get out your stamp pads. Kindergarteners used crayon, stamp pads and ballpoint pens to create these cute thumbprint birds on a wire.
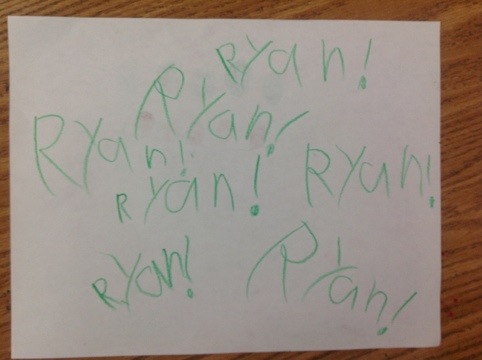
And just for fun….look how Ryan signed the back of his art! He must be very proud of his writing skills. These kids have come so far since the fall. What a joy!
A small art camp can be a great way to earn extra money.
Are you thinking about running an art camp this summer? For three summers, I ran a small art camp for kids entering grades 1-6. It was a great way to earn extra money. But there are some practical issues you need to think about.
Money:
How much should I charge? Obviously, you need to see what others are charging in your area. I charged $175 for a 5 day session, at 3 hours/day. The price included all supplies and a snack.
Here are some questions the parents asked me:
Do you have a day rate?
Can we go to camp M,W,F only?
Can we bring a cousin who is visiting for a day?
Can I have a refund if my kid gets sick?
Think about prorating. And think about which projects you will offer – can they be done (and dry?) in a day?
Are you going to ask parents to put down a deposit to hold their space? (You could ask for a check, and then not cash that check until the first day of camp).
Record keeping:
I kept good financial records. I set up a special checking account and got a debit card associated with it so I could keep my camp finances separate from my home finances.
Are you going to declare your proceeds on your taxes? You are supposed to (at least here in the U.S.). I did declare my earnings, and was surprised that I had to pay not just federal and state taxes, but a self-employment tax when I went solo. Run your art camp ideas past your accountant before you start planning – it may save you some headaches next April.
I once offered my camp at the local community center. They had a ‘split’ – I think it was 60%/40%. They collected the money. They paid me, and withheld taxes.
Where to hold camp?
I held camp in my garage and back yard, with trips to the playground down the street. I once held a short camp at our community center. I have even seen an artist hold camp at a local park: she put a shade structure over a picnic table, and set up shop right there. My colleague once rented out studio space in the back of a gallery, with ‘recess’ at the adjacent park.
No matter what camp you offer, and where you offer it, you need to think about safety and liability.
Safety:
At minimum, you need a first aid kit. If you work for a school district you may have already had CPR or first aid training. If not, you may want to brush up on your first aid. You need to know the kids food and insect allergies. I asked parents to send their kids with hats and sunscreen so we could stay outside if we wished.
Liability:
I bought camp insurance from this company. Price varies according to how many kids you have. Because I held camp in my own home, I added an umbrella policy to my homeowner’s insurance.
I had parents fill out a camp health and emergency form (you do want to know about allergies/meds). There is a ‘hold harmless’ section on this form…think about putting some sort of hold harmless language on your forms.
Ratios:
My ratio was 1:8. I sometimes had a teenage helper – then I could accept 10-12 kids instead of 8. Think about the minimum number of sign ups you need to make it worth your while to hold camp. Teenage helpers are great (p.s. if you know any teens, they could set up their own art camp and do crafts with neighborhood kids this summer).
Hours of operation:
I had one a.m. session from 9-12, and a p.m. session from 12:30 – 3:30. The first and last 15 minutes were open to free draw, books and art games as kids did not all arrive on time. We worked about an hour, took a break, and then worked a second hour.
Here are some issues that (occasionally) came up:
Parents dropped off kids too early
Parents picked up kids too late
The 30 minute break between sessions was too short for me.
Shrinky Dink 'Mini Monets' are about 2 inches long when shrunk.
Shrinky-Dinks are shrinkable plastic sheets. They are available in frosted, white, brown. You can draw on them. There is a variety you can run through your printer. They are also known as ‘Shrinkles’ in the UK. A similar product is Grafix?
If you are unfamiliar with this product, you are in for a surprise. When baked, Shrinky Dinks shrink to 1/3 their size and 9 times their original thickness.
All you need to do is cut a sheet of Shrinky Dinks into 1/4s. Ask kids to draw on the rough side. Use sharpie and colored pencils. You can cut into a shape at this point. If you are making a pendant or earrings, punch a hole before baking.
If at all possible, let kids view the baking/shrinking process. It is magical!
My colleague Nancy prints out masterpiece coloring sheets and reduce them on a photocopier. Students trace them in sharpie and colored pencil. She shrinks them in the school oven. Instant mini-masterpiece!
Nancy also loves illuminated manuscripts. She has her students design a fabulous first initial and trace onto shrinky dink. She finishes with a magnet.
Tips:
Ask kids to sketch first. Rough ‘n’ Ready is see-through so they can easily trace a finished sketch.
White, black and brown shrinky dinks are not traceable.
Provide lots of small size images for tracing: cartoon characters, line drawing of animals are popular.
Punch before baking
When baking, let the plastic warp, shrink and re-flatten in the oven. Do not pull out when warped! Allow plastic to remain in oven 30 seconds after shrinking.
Listen up: YOU CAN DO AN ENTIRE ART CAMP JUST USING SHRINKY DINKS!!! This is by far the most loved and versatile art camp material of all.
Need more inspiration? Go to Etsy and type ‘Shrinky Dink’ in the search box. Look what you can do!
Kings of the QR code: Max and Arman, 4th graders, created all the QR codes for the 2012 art show.
Art show, 5:30-7:30 p.m. Wednesday, April 25. All day Thursday, April 26. Friday April 27, 8:30 a.m. – 10:00 a.m.
Thanks to all our fabulous artists!!!! You made such beautiful works of art this year! Thanks also to our fabulous Art Show Chair, and all the art room, art show and student volunteers who helped make this show possible. Thanks to the PTO for its continued support of art at our school.
Sixth grade clay fish
Foil name art reliefs
Plaster masks
Fifth grade Sport trophies: winter olympics
Seurat Fourth grade QR code
Teacher scans QR code to discover facts about a famous artist.