Eraser Stamps for Sixth Grade: Abstract Design

Sixth graders carve erasers with their own abstract design and use them to print individual and group artworks.

Sixth grade is making eraser stamps.

I learned the method from Geninne’s Art Blog. Geninne has a fabulous tutorial on stamp-making including an instructional video. This assignment has two parts….1) create an abstract design stamp and 2) create a stamp based on your initials.

Part 1: Abstract Design

Materials:

  • Magic Rub vinyl erasers
  • Pencils
  • Paper (copy paper is fine)
  • Tracing paper
  • Popsicle stick or ruler
  • Lino cutter (student grade – we used the ones from this Soft Kut class pack)
  • Stamp pads
  • Watercolor markers (we used Crayola)

I teach this assignment with a packet of handouts…

Explain to students we will be cutting away the white portions of their design…..since they are beginners, the design should be fairly simple. No letters, no words, no numbers!!!!

Here are some sketches…I have to approve their final designs before they cut.

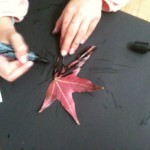
After approval, students transfer design to eraser. Placed traced design ‘dirty side down’ on the eraser and rub with edge of Popsicle stick to transfer.
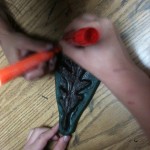
Carve eraser:

Rules:

  • Stay seated.
  • Keep eraser flat on the table.
  • Grip cutter as if it was a pencil.
  • Make shallow cuts, not deep.
  • Your cutting hand should stay low, close to the table. Your wrist can go up about an inch above the table.
  • Direct cuts away from your body.
  • Rotate eraser so that cuts are directed away from your hand.
  • Cut away white portions of design.
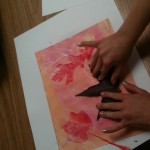
Printing:

Time to print! Students could use a stamp pad or color their erasers with watercolor markers (we used Crayola markers). The stamp pad method is quick, but the marker method allows more variety.

Instructions on the board.....
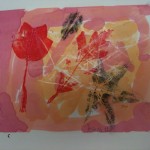
Student Results:

Carved eraser stamps inked with watercolor marker.

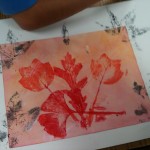
6th grade artist thought overlapping colors 'looked 3D'

This student hand-colored her stamp with markers.

Group project with three stamps (hand-colored with markers).

Student hand-inked design inspired by Nike logo and colored negative space with marker.

Many students said this was their favorite project ever!!!! They are clamoring to go on to part 2, a design based on their initials. To be continued!

It is also a special joy for me to see the 6th graders complete the project – I have had about 25% of these kids since they were 5 years old and learning how to write their names.

This printmaking project is also great opportunity to discuss art principles and elements: repetition, unity, and variety. It is appropriate for grades 6-12.

Tasty Cakes: Scratch Foam Printing with Watercolor Markers

Maybe you have used scratch foam for printmaking in the art room. I’ve seen a lot of beautiful art work using scratch foam and printer’s ink applied with brayers. But did you know scratch foam prints can look like this?

This set of four cupcake prints were all made from the same scratch foam plate during a single 40-minute class.

3rd graders used watercolor marker and scratch foam to create multiple prints. We did an easy directed drawing of a cupcake onto scratch foam, colored the foam with watercolor markers, and then printed the cards onto damp paper.

Materials:

  • Scratch foam, cut to desired size
  • sketch paper, cut to same size as foam
  • dull pencil
  • masking tape
  • watercolor markers in assorted colors (I use Mr. Sketch markers)
  • oil pastels or other embellishments (optional)
  • shallow tub (dishpan) of water
  • beach towel (several if you are teaching multiple or large classes)
  • plastic sleeve protectors for printing station
  • white construction paper for printing – cut larger than scratch foam

Prep:

Set up a printing station. Fill tub with water depth of 2-3 inches. Set out a folded towel. Tape a sleeve protector to the table. Slide in an alignment sample (see below).  Cut a stack of printing papers, enough for each student to make at least 3 prints. Think about drying space (always an issue when printing multiples). Drying rack? Clothes line?


Drawing

  • draw cupcake onto sketch paper.  Click here for my step-by-step  how to draw a cupcake instructions.
  • Remind students: NO LETTERS, NO WORDS, NO NUMBERS.
  • tape sketch paper on top of scratch foam.
  • go over cupcake sketch with a dull pencil.  The lines should transfer to the scratch foam below.
  • pull up the paper.  Drawing directly on the foam, go over any lines you missed with the pencil.  You can also add sprinkles or other small lines at this time.
  • discard the sketch paper and tape.

Tape sketch on top of scratch foam. Go over lines with dull pencil to incise foam below.

Inking

  • use the watercolor markers to ink the scratch foam.  Students should use multiple colors.  Fill the scratch foam completely with color.

Color in the scratch foam with watercolor markers.


Printing

  • take your foam to the printing station.
  • write your name in small letters on white construction paper. Use pencil.
  • dip white construction paper in water
  • put wet paper in folded towel to blot
  • align inked scratch foam on sleeve protector INK SIDE UP
  • put damp white paper on scratch foam NAME SIDE UP (align using the sleeve protector)
  • rub paper firmly without wiggling
  • PULL THE PRINT

Printing station. Students align foam with white rectangle, damp paper with blue rectangle.


The third graders were amazed!!!! Vibrant colored cupcakes for their beautiful birthday cards.

ARE YOU READY FOR EVEN MORE FUN?????

Re-inking

  • Students re-ink the scratch foam plates using a different color scheme.  It doesn’t matter if the plate still has a little color on it – go right over the plate with a different color.

Print again!

Students should carefully sign their name on the back of the foam plate WITH PENCIL. Write small.


A word of caution: as always, test this project out yourself before attempting with your students.

1) The degree of dampness of the printing paper is critical.  Too dry and the ink won’t transfer to the paper.  Too wet and the ink will bleed and blur as the paper dries. For blotting, a fresh beach towel is ideal. My towel was too damp by the third class of the day. I wish I had a couple of fresh dry ones with me. Next year!

2) Size of drawing matters. Tiny drawings the size of a thumbnail just won’t look good.

Day 2: Embellish Prints with Oil Pastels

Students have the option of embellishing their dry prints.  These cupcakes are decorated with oil pastel. This is a great way to rescue students less-than-perfect prints. Can you imagine these with a little clear glitter and/or a sequin?

Next we trim our cupcake prints and glue them onto colored construction paper. What fabulous birthday cards for all our family and friends.


Fun – colorful – successful – easy to clean up!

This would be a great Wayne Thiebaud lesson plan – it relates to his dessert paintings in terms of subject matter and repetition.

Wayne Thiebaud. Cakes. 1963


A huge thank you to Carol Catelano Webb, master art teacher, who taught this printing process at a San Diego Art Educators workshop back in 2005.


Watercolor Marker Fall Leaf Prints

Second graders use watercolor markers to make colorful leaf prints. Allow two sessions.

The second graders just completed their annual fall leaf project. This year I used fall leaves to introduce second graders to the warm colors and printmaking in a two-part lesson.

Day 1: rub and paint

We discussed the warm colors and looked at some real fall leaves. Kids did leaf rubbings with real leaves and white crayons on white paper, and then painted over the paper with red, orange and yellow watercolors.

Day 2: watercolor marker printing

Today kids inked the backs of freshly fallen fall leaves with black watercolor markers and printed them on the colored paper. We used red and orange markers on rubber leaf stamps (similar to those used for gyotaku).

Allow time for extra time at the sink for hand washing.

What a hit!  All the kids loved the printing process. The second grade teachers LOVE the completed art as well and are trying to nab it for Thanksgiving place mats.

If you’ve never tried printmaking with watercolor markers, give it a try. There is almost no prep time and minimal clean up. You’ll be thankful!

I use Mr. Sketch watercolor markers. You could use any brand of water-based marker, but be sure they are very moist.


Related Posts Plugin for WordPress, Blogger...