Inspired by aquatic artist Wyland, our fourth graders recently completed a great big ocean-themed mural. We recreated the California kelp forest for the Wyland Foundation’s ‘Water is Life’ Mural Challenge.
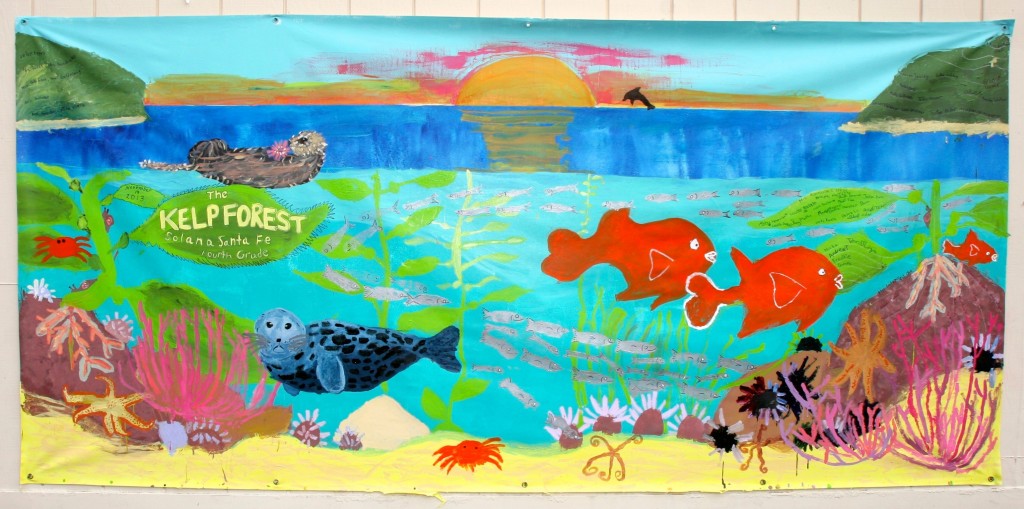
The completed kelp forest mural. Dimensions 5’x10′
Who is Wyland?

Wyland Whaling Wall in Detroit.
Photo source: Wahkeenah via Wikimedia Commons
Wyland is an American artist best known for creating life-size whale murals. He painted 100 of these ‘whaling walls’ around the world, as well as many more paintings of aquatic life. As seen in the whaling wall photo, Wyland often paints a ‘two worlds’ view of the ocean (both above and below the sea). Wyland’s art is very popular and he is commercially successful.
Materials
The Wyland Foundation provided us with a free kit, containing instructions, acrylic paints, brushes and a 5’x10′ Fredrix Paint It Yourself Classroom Mural Cotton Canvas Roll. We also used acrylic house paint and rollers. Blue painter’s tape was essential for getting a clean horizon line. We used Sharpies to sign the artwork and to add small details. We used soft-kut blocks and lino cutters to create fish stamps for our school of silvery fish. Tip: I matched our background paint to an undersea photo with the free Color Snap app.
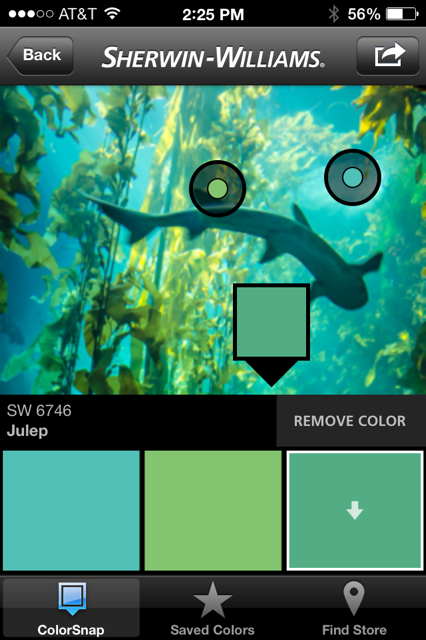
The free Color Snap app is great for matching paint to a photo.
Mural Process:
Brainstorming:
Students used their iPads to research the kelp forest and Wyland’s art. Students posted their favorite images, plus suggestions to an online board on Edmodo.
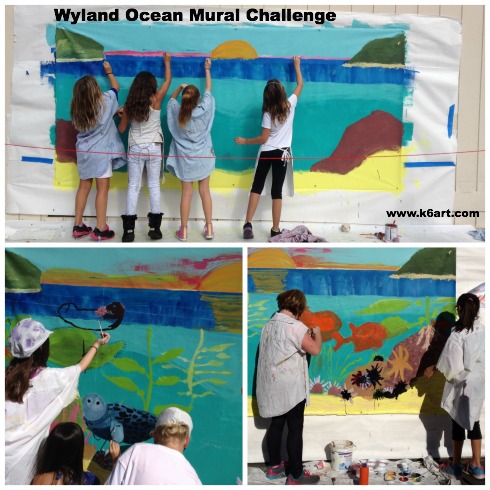
Painting:
We painted the mural in stages. Day 1: background, days 2 and 3 were for sea life and details. A maximum of eight kids painted at one time; the rest made sea creature drawings at the adjacent lunch tables while they waited their turn to paint. We used several tricks to create the illusion of space in our mural, including size, placement, value, warm/cool colors and (most especially) overlap. This video shows six tricks artists use to show illusion of space.
We also had small teams of students on special assignment: team seal, team sea otter, official photographers, and fish stamp carvers.
Fourth graders add marine life to the kelp forest mural.
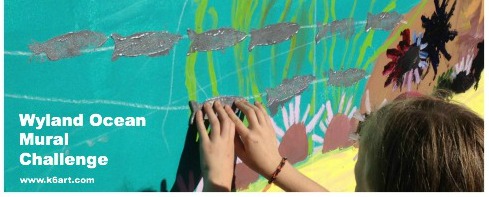
Each student stamped a fish on the mural, creating our own school of Pacific Jack Mackerel.
Although we didn’t win the Wyland Challenge, we created a beautiful mural. Everyone is so proud of it! We learned about the kelp forest, and how to create depth in art. Thanks so much to the Wyland Foundation for all the art materials, and to our parent volunteers for all their help.
Want to learn more about Wyland? Watch 2007 video from the CBS Early Show.
Enjoy!

The mission of the Wyland Foundation is to help children and families around the nation rediscover the importance of healthy oceans and waterways through public art programs, classroom science education, and live events. Click here to see the winning 2013 murals and to find out about the 2014 Wyland ‘Water is Life’ Mural and Art challenge.


")