Notan for Fifth and Sixth Grades

notan for 5th and 6th gradesOur 5th and 6th grade students did a quick 40-minute cut paper notan collage project. Our inspiration came from these beautiful notan artworks at the MiniMatisse blog. If you are unfamiliar with notan, it is a Japanese design concept of dark and light. Notan cut paper projects are great for teaching a lot of concepts including contrast, positive and negative space, symmetry, and geometric vs. organic shapes.

This was the very first time I taught notan. I found two really good resources that gave me confidence: 1) a great video that shows the notan process and 2) a great illustration showing single and double cuts.

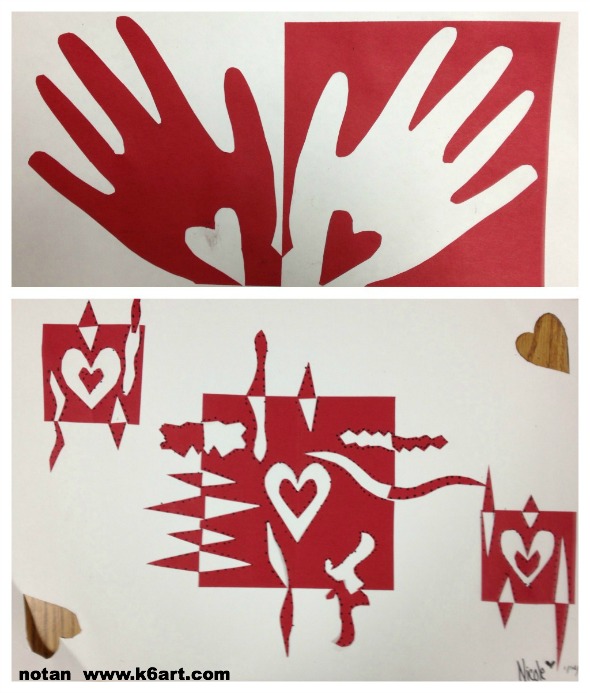
Each student started) with a 6″ square of red construction paper and a white format (background) paper . The minimum assignment was to make four single cuts – one cut from each of the square’s sides. Double cuts were optional (about half the students tried them). Cut pieces could be geometric (hearts were popular) and/or organic shapes.

Our students really liked this project. Some made Valentines and wanted to take them home immediately. I think they turned out great. I also think that their second attempts will be even better. Definitely a project to repeat!

Fifth and Sixth Grade Results:

more notan

notan valentines

notan names

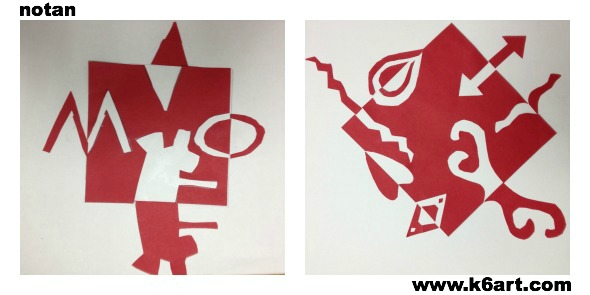
The next two designs contain cut pieces that were rotated incorrectly. But you know what? I consider the artworks successful. They are beautiful designs, even if they don’t fully fulfill the assignment. They still illustrate the concept of positive and negative space although they are in places asymmetric.

not notan

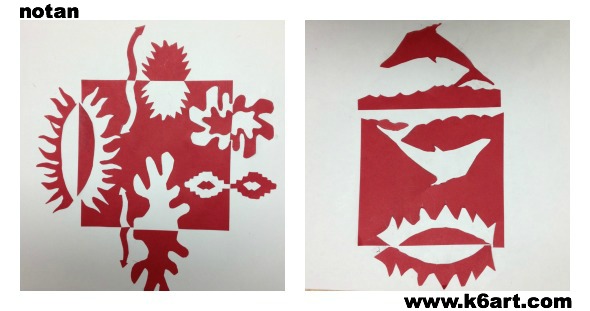
Although we did these red paper notans in honor of Valentine’s Day, they will look great displayed as a group any time of year.

I would LOVE to find an iPad app or interactive website that illustrates notan. If anyone knows of one, please leave a comment!!

Enjoy!

Have you even tried notan with your students?

Do you have any tips to share?


Warm and Cool Color Fall Leaves

It’s fall – time for a fall leaf project! This lesson takes just two 40-minute sessions and covers:

  • warm and cool colors
  • stenciling
  • organic shapes
  • positive and negative space
  • symmetry

Materials:

  • cardstock, cut into rectangles
  • pencils and erasers
  • scissors
  • white construction paper
  • oil pastels in warm colors (red, orange, yellow) (note: compensated affiliate link)
  • liquid watercolors in cool colors (purple, blue, green)
  • kosher salt (optional)

Leaf silhouettes


Session 1:

We looked at the silhouettes of fall leaves. We talked about the variety of leaf shapes. We discussed the difference between the organic leaf shapes and geometric shapes.

Next we created our stencils: students folded their cardstock, and drew a simple 1/2 leaf on the fold (note: don’t bother with a stem in your stencil design).

About 90% of second graders were able to design and cut a simple leaf stencil independently on their first attempt. As an alternative, you could cut stencils for your students.

Once we created the stencils we noticed they were symmetric. We also defined the leaf-shaped hole as the negative space and the leaf piece as the positive space.

Students stenciled multiple leaves . Some swapped stencils with their friends. After stenciling, they added a stem line to each leaf.

Paint leaves with cool color watercolors.

Session 2:

Students painted the leaves with liquid watercolors. They loved to see the oil pastel resist the paint. After painting, they had the option of sprinkling kosher salt on their wet art before placing their art on the drying rack.

Second grade results

Fall leaves with salt added.

Fall leaves with salt added.

The project was extremely successful. The students really enjoyed the process, and reviewed a lot of art concepts.

This lesson was inspired by  this post on Kids Art Market and this post on Use Your Colored Pencils.

Do you have a favorite fall leaves project?

Old School Friday- ‘Henry Moore’ Plaster Sculpture

Arts and Activities Magazine – June 1968

I inherited a treasure trove of old Arts and Activities and School Arts magazines from the 1960s and 1970s.

Plaster sculpture cast in a wax paper milk carton. Inflated balloons create interesting negative space.

The balloons created terrific negative space. It reminded me a bit of Henry Moore’s sculptures. I thought it would be cool to try this out as a Henry Moore sculpture lesson with my art campers. We looked at some images of his work, then got busy.

The campers were able to scrape and shape the damp plaster.

It was a huge mess, of course. But fun! The kids (ages 8-11) really enjoyed the process.

Chalk Pastel Stencils – Quick, Easy and Beautiful

5th graders used chalk pastels and cut paper stencils to make overlapping hearts.

These beautiful chalk pastel stencils take only one 40 minute session!

Materials:

  • Chalk Pastels
  • Stiff brush (we use our old tempera brushes)
  • scissors
  • construction paper for background (we used white 9″x12″)
  • construction paper cut approx. 4″x6″ for making stencils
  • optional: ready-made stencils

Instructions:

Fold the small rectangle in half. Draw a half heart on the fold and cut out.

Students can use both the positive and negative shapes from homemade stencils.


Color around the edges of the cut out 'window'.


Now take the stiff brush and brush the colored pastel into the stencil ‘window’.

These pink hearts 'stencils' were made on the school die-cut machine.


Lift up the stencil. Students will ooh and aah if they have never tried this process before! Now shift the stencil and repeat the process.  Encourage students to overlap.

Now take the positive shape and color the edge with pastel. Place on the background paper, and brush the color outward onto the paper.

Positive shape can be used as a stencil.


Nice composition and color.


We reused our die-cut stencils for three classes. We just colored and colored again around the edges. Tell the students to relax – it’s going to look beautiful.

Students can also color the background.


Another stencil made on the school die-cut machine.

This student used his stencils to make a bird.

This method would be very interesting with cut paper snowflakes or doilies.

Experiment with doilies.

Try a homemade snowflake stencil.


Minimize the mess: ask students to tap their excess chalk pastel dust onto a piece of newspaper.

What to do with all those used colorful stencils? Try this used stencil collage project. Double the art fun!

This method came from the San Diego Museum of Art  2010 Educator’s Art Fair. The lesson can easily be adapted for all grades K-6.

Related Posts Plugin for WordPress, Blogger...