Leaf ‘Collage’ + Photography

Want to try a leaf collage project? Want your leaves to stay fresh and bright forever? Skip the glue/wax paper/laminator and try a camera instead!

Third graders arranged leaves into animal shapes, then photographed their art. Allow one 40-minute class for this ‘collage’ lesson.

Third graders just completed their leaf collages, inspired by the book Look What I Did with a Leaf! by Morteza E. Sohi.

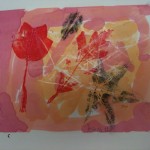
In the book, M. Sohi arranged leaves on a white background to create fanciful animals, then photographed them. Click here to see more examples.

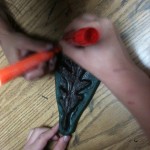
To prepare for this lesson, you need to gather a variety of leaves and flatten them. I placed the leaves between the pages of an old phone book. Plan to do this at least a couple of days in advance so the leaves will be really flat. You can also ask kids to bring in leaves from home

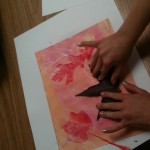
On the day of class, cover tables with white paper to create a backdrop and spread out the leaves.

Cover tables with white paper to create a unified backdrop for the collages.

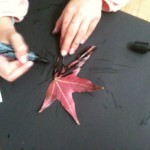
Students arranged the leaves to resemble animals.  Butterflies were very popular!

Student arranges a leaf butterfly.

We used camera-equipped iPods to photograph our artworks. Our third grade is 1:1 iPod Touch so each child was able to take photos of their own creations.

Students used camera-equipped iPods to photograph their collages.

Students then rearranged their leaves and repeated the process. Most of our third graders made 3-5 animals during the 40 minute class.

Third Grade Student Work:

Ashley’s alligator


Deer


Mouse

Fish

One of the benefits of this method is that students can re-use and share leaves. Remind your students not to crumble the leaves, and you can reuse them for multiple classes. Students can work alone, in pairs or in groups – there is no argument over who takes the work home because everyone can have a digital copy of the work.

Next class we will learn to rotate and crop our photos, and how to email them.

Display options:

  • Upload to Artsonia
  • Email the images home, or put them up on the class wiki
  • Create a large class poster of all the images for the art show
  • Students can write a paragraph about their animals, or illustrate a story.

For further inspiration, check out the book Leaf Man by Lois Ehlert. The artist used real fallen leaves to create her illustrations.


Warm and Cool Color Fall Leaves

It’s fall – time for a fall leaf project! This lesson takes just two 40-minute sessions and covers:

  • warm and cool colors
  • stenciling
  • organic shapes
  • positive and negative space
  • symmetry

Materials:

  • cardstock, cut into rectangles
  • pencils and erasers
  • scissors
  • white construction paper
  • oil pastels in warm colors (red, orange, yellow) (note: compensated affiliate link)
  • liquid watercolors in cool colors (purple, blue, green)
  • kosher salt (optional)

Leaf silhouettes


Session 1:

We looked at the silhouettes of fall leaves. We talked about the variety of leaf shapes. We discussed the difference between the organic leaf shapes and geometric shapes.

Next we created our stencils: students folded their cardstock, and drew a simple 1/2 leaf on the fold (note: don’t bother with a stem in your stencil design).

About 90% of second graders were able to design and cut a simple leaf stencil independently on their first attempt. As an alternative, you could cut stencils for your students.

Once we created the stencils we noticed they were symmetric. We also defined the leaf-shaped hole as the negative space and the leaf piece as the positive space.

Students stenciled multiple leaves . Some swapped stencils with their friends. After stenciling, they added a stem line to each leaf.

Paint leaves with cool color watercolors.

Session 2:

Students painted the leaves with liquid watercolors. They loved to see the oil pastel resist the paint. After painting, they had the option of sprinkling kosher salt on their wet art before placing their art on the drying rack.

Second grade results

Fall leaves with salt added.

Fall leaves with salt added.

The project was extremely successful. The students really enjoyed the process, and reviewed a lot of art concepts.

This lesson was inspired by  this post on Kids Art Market and this post on Use Your Colored Pencils.

Do you have a favorite fall leaves project?

Watercolor Marker Fall Leaf Prints

Second graders use watercolor markers to make colorful leaf prints. Allow two sessions.

The second graders just completed their annual fall leaf project. This year I used fall leaves to introduce second graders to the warm colors and printmaking in a two-part lesson.

Day 1: rub and paint

We discussed the warm colors and looked at some real fall leaves. Kids did leaf rubbings with real leaves and white crayons on white paper, and then painted over the paper with red, orange and yellow watercolors.

Day 2: watercolor marker printing

Today kids inked the backs of freshly fallen fall leaves with black watercolor markers and printed them on the colored paper. We used red and orange markers on rubber leaf stamps (similar to those used for gyotaku).

Allow time for extra time at the sink for hand washing.

What a hit!  All the kids loved the printing process. The second grade teachers LOVE the completed art as well and are trying to nab it for Thanksgiving place mats.

If you’ve never tried printmaking with watercolor markers, give it a try. There is almost no prep time and minimal clean up. You’ll be thankful!

I use Mr. Sketch watercolor markers. You could use any brand of water-based marker, but be sure they are very moist.


Related Posts Plugin for WordPress, Blogger...