Tree Huggers – Environmentally-Friendly Sculptures


tree huggers - CAEA 2013

Do you like to create art outdoors?

Imagine a warm fall day in the mountains. Now imagine a bunch of art teachers walking among the trees and gathering leaves, acorns, dried grasses, and branches. That describes our Tree Huggers outdoor art workshop offered at CAEA Southern Area Conference, held amidst the pines at Idyllwild, California.


elements-of-scale-girl2


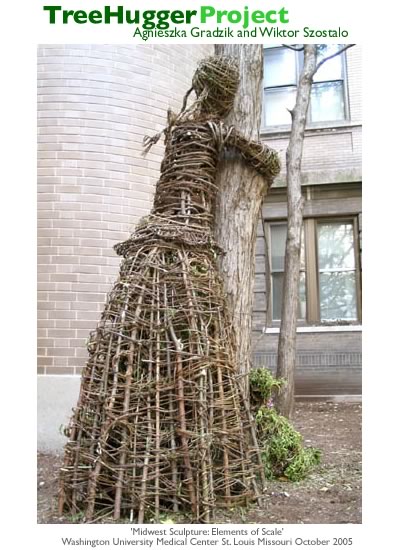
Our sculptures were inspired by the Tree Hugger Project by Agnieszka Gradzik and Wiktor Szostalo. Tree Hugger Project installations feature large-scale figures created from branches and vines gathered on site. Copenhagen, St. Louis and New York City have had Tree Hugger Project installations.


tree hugger from CAEA 2013


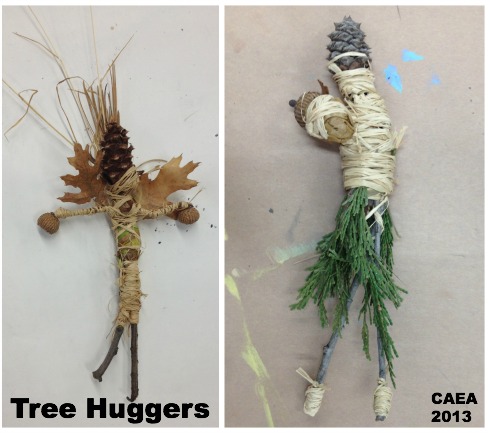
Workshop participants created their own tree huggers using gathered cones, grasses, and branches. The instructor provided corn husks and raffia to bind the figures.

When doing this project with children, you may want to let them gather for a set amount of time. Just in case, you may want to  have extra branches and leaves on hand.


tree huggers from CAEA southern area conference 2013


Art teachers had a great time making these sculptures. Imagine how Tree Huggers would look in your town, created from your own regional (and seasonal) gathered materials.

Thanks to our instructor, Dr. Kenneth Sakatani, for leading the Tree Hugger workshop at CAEA Southern Area Conference.

 Enjoy!

Type Drawing App for iPad

Student art. Look carefully - each line is composed of text.

If you are looking for a creative way to integrate art and text, consider the iPad app Type Drawing. I learned how to use this app in just a few minutes at the iPad workshop at the CAEA Southern Area conference.

I started out by finding an image of a Garibaldi fish on Google.  I saved it to my iPad camera roll. Next I opened the Type Drawing app and opened the fish photo. To create an image, I selected text (I chose ‘fin’, ‘gill’,  ‘tail’ etc.) and traced my finger on the screen. Look carefully – all the lines are composed of words!

type drawing app 1

I matched the text colors to the fish using the eyedropper tool. I played around with the background color too.

Here is a piece of middle school artwork shared by our instructor, art teacher Lyn Gardner.

Larkspur (flower) created on an iPad with Type Drawing App

Type Drawing flower by Kylie C., created when she was an 8th grade student at Valley Christian Middle School.

Want to see even more Type Drawing artworks? Look at these beautiful illustrations from Gardens by the Bay in Singapore.

Gardens by the Bay art from Singapore

Beautiful Type Drawing art from Gardens by the Bay in Singapore

Type Drawing is not a free app, but it is a nice, easy to use typographic art tool.

Thanks to our instructor, art teacher Lyn Gardner, for presenting Type Drawing at the California Art Education Association Southern Area Conference in Idyllwild.

Enjoy!

(note: photo credit updated 11/8/2013)

Art Ed Conferences in Southern California – Are You In?

Hi everyone

One of my goals for this blog is to connect with other art teachers. I’m attending three art ed conferences in Southern California in the next six months. If you plan to attend any of these conferences – please leave a comment! It is nice to meet other art teachers in person.

October 11, 2013: MEGA-ARTS conference, San Diego, Balboa Park. I’m presenting my Olympic Sport Sculptures project.

arts empower san diego mega conference

November 2-3, 2013: CAEA Southern Area Conference, Idyllwild, CA.

caea2013stateconf logosm

March 29-31, 2014: NAEA National Convention, right here in beautiful San Diego, CA.

NAEA 2014


Clay Sea Rocks

5th graders made clay 'sea rocks'. Allow three 40-minute sessions.

Want an ocean-themed clay project with high success? Super fun? Colorful? Only one firing? And……NO SLIP!

Try this sea rocks lesson plan!

Supplies:

  • clay
  • newspaper
  • white vinegar in small cups
  • Q-tips
  • toothpicks
  • pencils
  • Popsicle stick or other clay tools
  • gallon-size Ziploc storage bags (if more than one session is required)

Day 1:

Look at photos of sea life that attaches to rock.

Coral reef.

For another artist’s take on sea life, view images from Disney movie ‘Finding Nemo’. Look at the sea life on the ocean floor.

Inspiration: colorful sea floor from Disney movie 'Finding Nemo'

Download this clay sea rocks powerpoint from CAEA conference (we think this project was presented by clay educator Barry Bernam around 2005).

It all starts with a pinch pot. Stuff with crumpled newspaper for support and turn upside down. Apply starfish, urchins, coral etc. to top of rock using vinegar to attach.

Vinegar, clay tool, toothpick


If you don’t finish, wrap clay in damp paper towels and seal in Ziploc bag.

Day 2:

Finish adding sea life to rock.


I let them dry for 12 days, then fired on slow setting.

Although no slip was used to attach decorations, only one decoration came off during bisque firing.

Day 3:

We painted with pan watercolors and tiny brushes. Students had option of rinsing off excess paint (they called this ‘fading’). Also could draw on painted ‘rock’ with colored pencil.


I will add shine with a little spray gloss (I use Rust-Oleum Painter’s Touch Spray Gloss ).

A huge thank you to SDAEA’s Carol Catalano Webb, who brought back this lesson from California state conference AND made the YouTube movie. A huge thank you to the clay teacher who created the Powerpoint (we think it was Barry Bernam-please leave a comment if you know Barry!).

Related Posts Plugin for WordPress, Blogger...