Edmodo and the Elementary Art Room

edmodo in the art room
Your school may be using Edmodo.com. But are you? Why would you?

What is Edmodo?

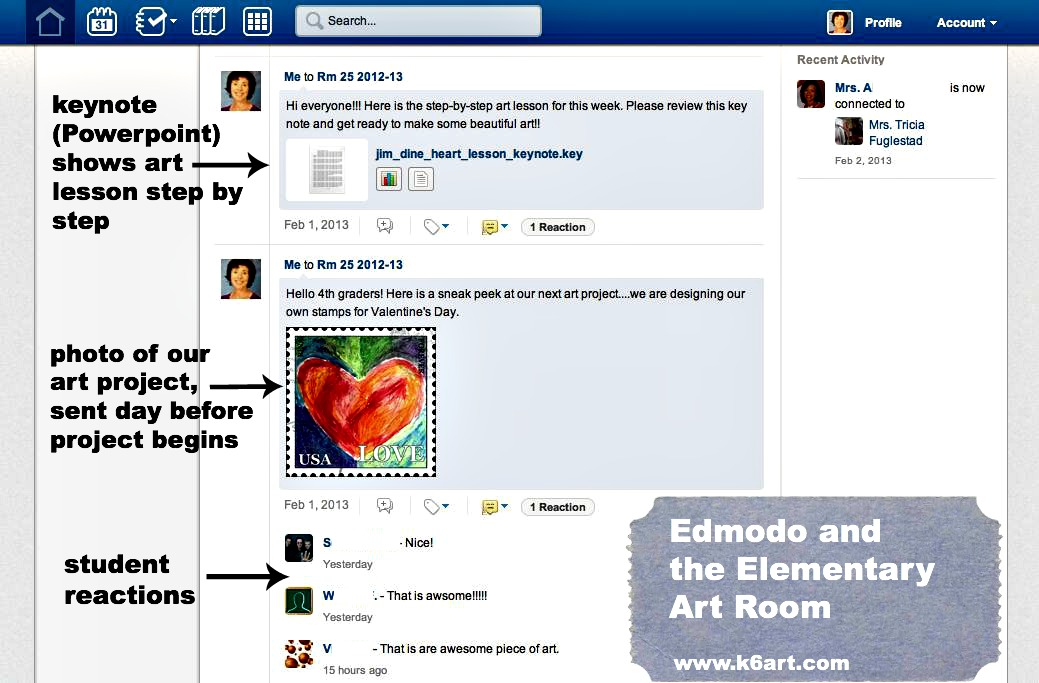
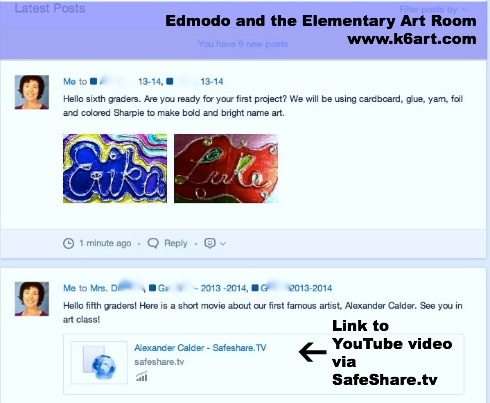
In many ways, Edmodo operates like Facebook for the classroom. You can share photos, video, links and files such as PowerPoints/Keynotes. Teachers can post homework and also take polls. Students can reply, just like on FB. Our classroom teachers use Edmodo everyday in our 1:1 iPad classrooms, and students can log in from home.

Edmodo lets teachers create a digital library of files, so they can be shared again with a new class next year. It is also integrated with Google Drive.

Share Digital Resources with Students Before Class

I like to share digital resources before I begin a new lesson. This lets me

  • create an anticipatory set
  • catch up absent students
  • ‘flip’ lesson plans
  • differentiate lesson plans: perfect for those students want to dig deeper into the project, or view step-by-step at home

Great for Short Art Classes

My class is only 40 minutes long, once a week. I would love to share all my resources in class AND do an art project. I just don’t have a lot of time.

Timely Links to Classroom Lessons

Is the general ed class studying Ancient Egypt or China? Share appropriate art links on Edmodo.

Analyze an Art Work

Post a single artwork, and ask students to analyze it (click here for some good questions to ask your students). They can post their replies; the whole class can see all the replies.

Intuitive (if you are familiar with Facebook)

if you are familiar with FB, Edmodo won’t be hard use. I didn’t go to any training. If your school already has Edmodo, get an account, and ask the general ed teachers for their ‘class codes’.

edmodo in the art room 2

Connect with Teachers Around the Country (and Around the World)

Edmodo lets you connect with other art teachers from around the country, kind of like ‘friending’ on FB.  I am currently linked with only one other art teacher, in far-away Chicago. If you are an elementary school art teacher, please look for me on Edmodo.  Rina Vinetz, Solana Santa Fe School. I would love to connect and share the resources I am putting in my library.

Enjoy!

Are you using Edmodo.com? Has it been useful?

Cut Paper Snowflakes Designed on an iPad

Cut Paper Snowflakes Designed on an iPad


It’s winter! Time for a snowflake project. Our sixth graders just finished their cut paper snowflake projects, with a special twist: all the snowflakes were designed on iPads.


Students designed snowflakes on iPads using the My Flake app, then cut paper snowflakes to match.  Allow one 40-minute class.

Students designed snowflakes on iPads using the My Flake app, then cut paper snowflakes to match. Allow one 40-minute class.

Materials:

  • round coffee filters (I got a pack of 150 at my local dollar store)
  • protractor (optional)
  • scissors
  • pencil
  • iPad, iPod Touch or iPhone with FREE My Flake app
  • Optional: construction paper and glue stick or spray glue for mounting

Snowflakes and Symmetry:

We began class by viewing this excellent slideshow of magnified snowflakes from the book The Art of the Snowflake: A Photographic Album by Kenneth Libbrecht.

Magnified snowflake photo by Kenneth Libbrecht. Source: scientificamerican.com

Magnified snowflake photo by Kenneth Libbrecht.
Source: scientificamerican.com

This is a good time to discuss radial and bilateral symmetry. Just like real snowflakes, our iPad and cut paper snowflakes will have radial symmetry, with six identical branches.

symmetry in nature


Folding the Paper

Next we folded our coffee filters in sixths. Students folded the round coffee filters in half, then used a protractor to divide the semi-circle into thirds. See this post from the Heart of Wisdom blog for great directions on folding the coffee filters.

Cut paper snowflakes start with a round coffee filter folded in half, then into thirds. Then one more fold in half.

Cut paper snowflakes start with a round coffee filter folded in half, then into thirds. Then one more fold in half to create a skinny wedge.


Designing the Snowflake on the iPad

I demonstrated how to use the My Flake app, guiding my finger on the screen to make virtual cuts on the paper image.

 cut paper snowflakes designed on an iPad collage

Students spent the next five minutes exploring the My Flake app. The app allows them to test out different designs virtually by ‘cutting’ a folded paper image, then previewing the design. They can go back and undo or redo one ‘cut’ at a time, and preview the resulting changes.

Once the students settled on a final design,they copied their My Flake design on the folded paper, and finally cut the folded paper to match.

Tip: encourage students to try a simple design on their first snowflake, and draw pencil lines lightly.

cut paper to match iPad design

Sixth grade student work:

Matching paper and iPad snowflakes

Matching paper and iPad snowflakes

Mount cut paper snowflakes on construction paper.

Mount cut paper snowflakes on construction paper.

Our school is 1:1 iPads in grades 4-6. However, this project can be done collaboratively in pairs or in small groups. Several students can share an iPad, each adding a virtual cut or two. Then they can all cut the group design (U.S. art teachers – collaboration is a big part of new Common Core standards).

These two students collaborated on an iPad My Flake design, then both cut to match.

These two students collaborated on an iPad My Flake design, then both cut to match.

On its own, the My Flake app may also be an option for an inclusion activity. Students who cannot easily manipulate scissors may be able to design virtual snowflakes on My Flake and print them out for decorations.

More resources:

If you don’t have an iPad: use the Make a Flake website.

If you are looking for a book to accompany a snowflake project: our librarian likes Snowflake Bentley, the Caldecott-winning book by Jacqueline Briggs Martin about real-life snowflake photographer Wilson Bentley.

More fun snowflake resources on my cut paper Pinterest board.

Thanks to Dryden Art and Brunswick Acres Art for sharing My Flake and other resources on their blogs. Thanks to N.T., one of our awesome sixth grade teachers, for support on this project.

Do you use iPads in the art room?

Do you have a favorite app?

Leaf ‘Collage’ + Photography

Want to try a leaf collage project? Want your leaves to stay fresh and bright forever? Skip the glue/wax paper/laminator and try a camera instead!

Third graders arranged leaves into animal shapes, then photographed their art. Allow one 40-minute class for this ‘collage’ lesson.

Third graders just completed their leaf collages, inspired by the book Look What I Did with a Leaf! by Morteza E. Sohi.

In the book, M. Sohi arranged leaves on a white background to create fanciful animals, then photographed them. Click here to see more examples.

To prepare for this lesson, you need to gather a variety of leaves and flatten them. I placed the leaves between the pages of an old phone book. Plan to do this at least a couple of days in advance so the leaves will be really flat. You can also ask kids to bring in leaves from home

On the day of class, cover tables with white paper to create a backdrop and spread out the leaves.

Cover tables with white paper to create a unified backdrop for the collages.

Students arranged the leaves to resemble animals.  Butterflies were very popular!

Student arranges a leaf butterfly.

We used camera-equipped iPods to photograph our artworks. Our third grade is 1:1 iPod Touch so each child was able to take photos of their own creations.

Students used camera-equipped iPods to photograph their collages.

Students then rearranged their leaves and repeated the process. Most of our third graders made 3-5 animals during the 40 minute class.

Third Grade Student Work:

Ashley’s alligator


Deer


Mouse

Fish

One of the benefits of this method is that students can re-use and share leaves. Remind your students not to crumble the leaves, and you can reuse them for multiple classes. Students can work alone, in pairs or in groups – there is no argument over who takes the work home because everyone can have a digital copy of the work.

Next class we will learn to rotate and crop our photos, and how to email them.

Display options:

  • Upload to Artsonia
  • Email the images home, or put them up on the class wiki
  • Create a large class poster of all the images for the art show
  • Students can write a paragraph about their animals, or illustrate a story.

For further inspiration, check out the book Leaf Man by Lois Ehlert. The artist used real fallen leaves to create her illustrations.


iPad Alphabet Photography Collages

  • 20120624-060257.jpg

Just finished the fourth grade iPad Alphabet photography collages.

I am thrilled with the results!

Our fourth graders shot color letter photos in our school garden, using camera-equipped iPads and iPod touches. I wrote about the first two days of this process in this post.

20120624-060640.jpg

On Day 3, students brought iPads to the art room (note: make sure your tables are super clean!). Students partnered up to help each other during the photo selection and editing process. First they selected their single best photo. Using the basic photo edit in the device, the students cropped their photos, changed them to black and white, then saved to the device’s camera roll.

Next, students emailed me their best single b&w photos.

I used a Mac computer equipped with iPhoto to sort the photos. Whatever photo editing application you use, I highly suggest creating a folder for each letter.

To create the group collages, I used the free website Pic Monkey. It was easy to create a grid and upload the 26 letter photos for each collage. I even added a frame and text before saving the photo. Note: Pic Monkey requires Flash and cannot be used on an iPad. Also, if you use Pic Monkey, plan on filling that grid in one sitting as you cannot save work to the site.

I’m not going to lie – the whole process took a lot of time. I did the collages at home after hours. I am not a photographer, and there was a lot of trial and error.
I will teach it differently next time, specifically:

Model cropping,
Model saving as a black and white image,
Model emailing photos to me with a correct email address, and subject line including name, teacher and letter.

I will also seek alternate iPad apps for the students, and photo collage apps for me.

Have you taught a photo project using iPads? Please share!

UPDATE: DONE! I finished the iBook for this lesson plan. It contains all the alphabet photos and collages.

You need an iPad to read it. Here is the link


Check out this book on the iBookstore:

Cover Art

iPad Alphabet Photography

Rina Vinetz, Cara Spitzmiller & Angie Tremble

Category: Education

iPad Alphabet Photography for Fourth Grade

Armed with camera-equipped iPads and iPods, our fourth graders spread out in our school garden in search of alphabet letters. Each student was assigned a letter to photograph.

Letter O

It was interesting to see how they completed the assignment: some students found letters in the branches of trees, some created letters from stones and twigs. Some poured water on the pavement to draw their letter. If they were absolutely stumped (get it?) , I let them use a letter from the garden signs. I asked students to take 5-10 photos of their letter.

I am happy to report the fourth graders LOVED looking for letters. They were completely engaged, and helped each other.  I heard a lot of shouts of “I found a T! Who has T?”

This week, students used their devices and the Pic Collage app to turn their best photos into a photo collage. I asked them to zoom in so that we could really see the letter – aim for making a letter so clear a kindergartener could recognize it. They emailed me their files and we reviewed them as a class.

Great work fourth graders!

Our fourth graders are in a pilot 1:1 iPad program, and it is a huge success. The goal is to turn all the photos into a free digital book downloadable through Apple’s iBooks store.

Inspiration for this project came from www.alphabetphotography.com.

UPDATE: see the completed whole-alphabet collages in this post.

Related Posts Plugin for WordPress, Blogger...