Clay Picture Frames – Part I

Painted and assembled Clay picture frames

This spring I collaborated with our third grade teachers on an identity project. These clay picture frames were a perfect fit: they are personal and fun to make. The parents and grandparents absolutely loved these.

The frames require only a single bisque firing and it generally takes only one session to paint them.

Let’s get started!

Materials:

To make the frames

  • Clay
  • Rolling pins and slats (or slab roller)
  • Cardboard templates
  • Pin tools
  • Textured items
  • Small cookie cutters
  • Letter stamps (like these)
  • Toothbrushes and water
  • Drinking straw
  • Optional: gallon-size Ziplock storage bags and damp paper towels if you need to store for a second class period.

To paint the frames

To assemble and hang the frames

  • Student photos
  • Tape
  • Plastic lanyard cord
  • Pony beads

Prep:

Print out student photos (ours were 4″x6″).

Create two rectangular cardboard templates: a larger rectangle for the outer frame, and a smaller rectangle for the interior window. Your smaller template should be slightly smaller than the printed photo (ours were 3.5″x5.5″). This will allow you to tape the photos to the back of the frame. I made one set of templates for each table.

Cut a mock frame from cardboard. Test each photo by placing it behind the frame. Be sure the student’s face is visible. Keep in mind the actual clay frame will have a slightly smaller window, as the clay shrinks as it dries.

Directions

Cover tables. Set out clay, rollers, and slats (or set out pre-rolled slabs if you have a slab roller). Distribute pin tools and both large and small templates.

Roll the slab (rolling pins/slats or a slab roller). Position the larger rectangle template on the slab and cut around it with the pin tool to create the picture frame (Note: we were able to get two cut rectangles from each slab). Center the smaller window template on the clay frame and cut around it with the pin tool. Set scraps aside and don’t squish them!.

Completed clay frames. Allow 10 days to dry.

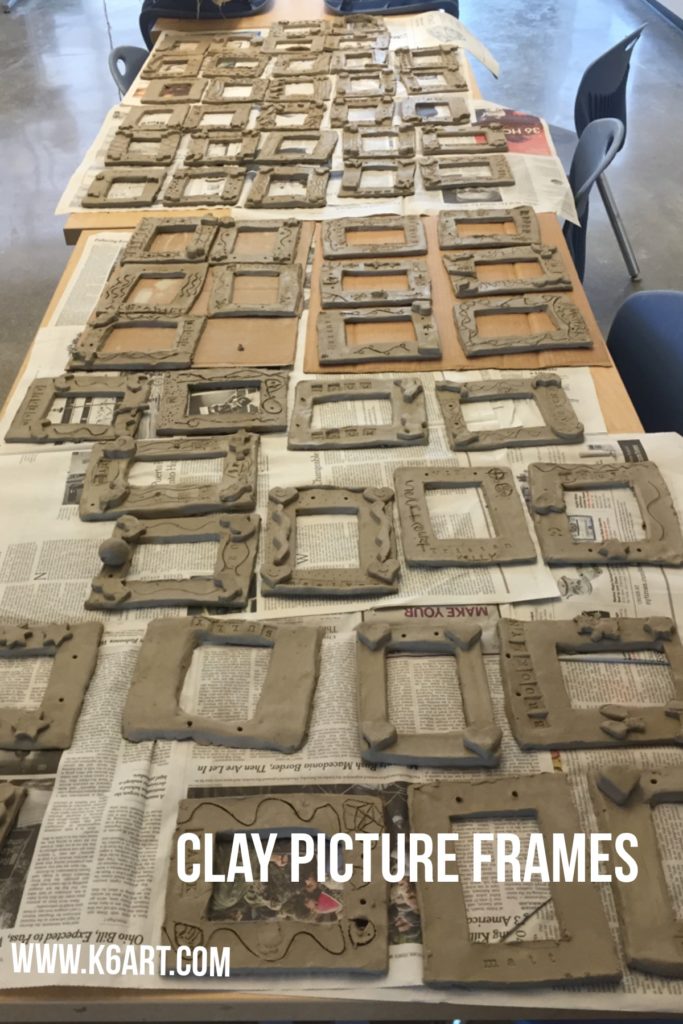
Rotate clay frame to portrait position. Stamp name at bottom using letter stamps. Texture frame using texture tools. Optional: use cookie cutters on to create decorative shapes. Attach shapes to the corners: dip a toothbrush in water and gently scrub clay to create slip. Press on the decorations.

Make the hanging holes: an adult should do this. Punch the top of the frame with the drinking straw to make two holes. The straw will fill with clay – don’t remove it, just keep going.

Air dry for 10 days. Bisque fire.

Tips:

  • Make sure the hanging holes are big enough. Really twist the drinking straw in the holes and make sure it goes all the way through the slab. I had to Dremel out a couple of holes in the fired frames because I wasn’t perfectly diligent in this step.
  • Build the template around the printed photo. Roll and fire a clay sample and make sure the cut window is a just a little smaller than the dimension of the photo. Be sure you can see the student’s face clearly in the photo. Remember, clay shrinks as it dries. That window will shrink…
  • If you are doing this project after school picture day, you could use a standard school pictures to create your template.

I found that showing an instructional video is the best way to teach a clay project like this. The kids have a clear view of my hands. I can show it over and over each class period, and share it with kids who were absent on the day we did the clay project. Plus, I get to show it next year, or whenever I choose to do this project again.

I created a YouTube playlist with the whole process. Here you go!

(P.S. I make instructional videos all the time! Subscribe to my YouTube channel for my latest videos).

Enjoy!

In my next post I will show you how we painted and assembled the picture frames .

Blick Art Materials flat rate shipping is $4.95!

Oldenburg: candy, pencil, marker

We used butcher paper, poster tubes, fake spider webs and paint to create large scale sculptures.

We used butcher paper, poster tubes, fake spider webs and paint to create large scale sculptures.+6

5th graders are almost done.

  • Fork: insulation wrapped in tape.
  • Flag, mike & Ike and m&ms: computer images projected onto white butcher paper. Painted with tempera cakes.
  • Pencil and marker: poster tubes
  • Cotton candy: Halloween spider webs sprayed with liquid watercolor over armature.

Shadow Puppets on the Overhead Projector

Shadow puppets on the overhead projector

Our fifth graders just completed a shadow puppet unit. We had a lot of fun creating shadow puppets and performing with them on our old overhead projector.  If you’ve got one (or more) of these old projectors at school, grab them! Your students will have a blast making shadow puppets.

Materials:

  • overhead projector
  • tagboard or construction paper
  • pencils/erasers
  • scissors
  • bamboo skewers
  • tape
  • decorative punches
  • push pins
  • wax paper
  • overhead transparencies
  • colored Sharpie permanent markers

Create a puppet:

Draw a character on tagboard or paper. Encourage kids to make puppets with interesting silhouettes. Cut out. Use the punches to add a decorative edge. Students can also cut out slits or interesting shapes within the puppets. They can also pierce the puppets with a push pin to make tiny dots of light (look carefully at the octopus below to see this effect). Tape on a bamboo skewer and you are ready to go!


Students created shadow puppets from black paper and bamboo skewers

You can learn to create a shadow puppet show step-by-step in the book Worlds of Shadow: Teaching with Shadow Puppetry. The book has great direction for making puppets with movable joints as well.

Worlds of Shadow

Worlds of Shadow

Backdrops:

Wax paper:

We used wax paper as a backdrop. It makes a smokey, translucent shadow when placed on the overhead projector. We used cut wax paper to make ocean waves and torn wax paper to make mountain tops.

Overhead transparencies + colored Sharpie:

Students made a lot of beautiful backdrops on transparencies. Here is a brief video that shows the vibrant color:

I wrote about part one of our shadow puppet unit in this post.

I learned how to create shadow puppets from Baltimore art teacher Grace Hulse – you can see Grace’s shadow puppet Prezi and video in this post.

Enjoy!

Tableaux Vivants: ‘Living Pictures’ Performance Art

tableaux vivants pinable

First grade tableau vivant: Keith Haring, “Five Figures Dancing”.

Our first and second graders acted out a series of tableaux vivants (‘living pictures’ ) last week. In traditional tableaux, people dress up as the characters in an artwork. They hold a minutes-long pose in front of an elaborately painted background. We skipped the costumes and backdrops, but still had a great time interacting with the artworks.

We began with a Powerpoint and video (see below). For a warm up, we practiced posing like the Mona Lisa. After students understood the basic concept, they acted out artworks with progressively larger groups of characters.

After a few group activities, I put a bunch of art books on the tables and let students act out whatever they liked.

homer tableau vivant

First grade tableau vivant: Winslow Homer ‘Snap the Whip’.

Second grade tableau vivant: Henry Moore, "Reclining Figure"

Second grade tableau vivant: Henry Moore, “Reclining Figure”.

Second grade tableau vivant.

Second grade tableau vivant.

I love the second grade interpretation of Roy Lichtenstein’s Wham!. The little girl in the photo is acting out the explosion.

Wham! tableau vivant

Second grade tableau vivant: Roy Lichtenstein, ‘Wham!’

Resources:

‘Pagent of the Masters’ is an elaborate tableaux vivants production staged each summer here in Southern California. It has been going on since 1933, and features tableaux based on painting, sculpture, prints and more. Check out this video from CBS Sunday Morning .

Here is the Google Presentation (it’s just like a Powerpoint) I created for our lesson. It includes some fun ‘sculpture game’ activities at the end.

Tableaux vivants are a great way to interact with artworks at the museum. Check out this article from Art Museum Teaching.

Next steps:

Can you imagine the students staging their own Pagent of the Masters? They could select their own artworks, dress up, paint their own background, gather props, have a student director, an iPad photographer….how cool would that be? Maybe next term….

Enjoy!

Related Posts Plugin for WordPress, Blogger...