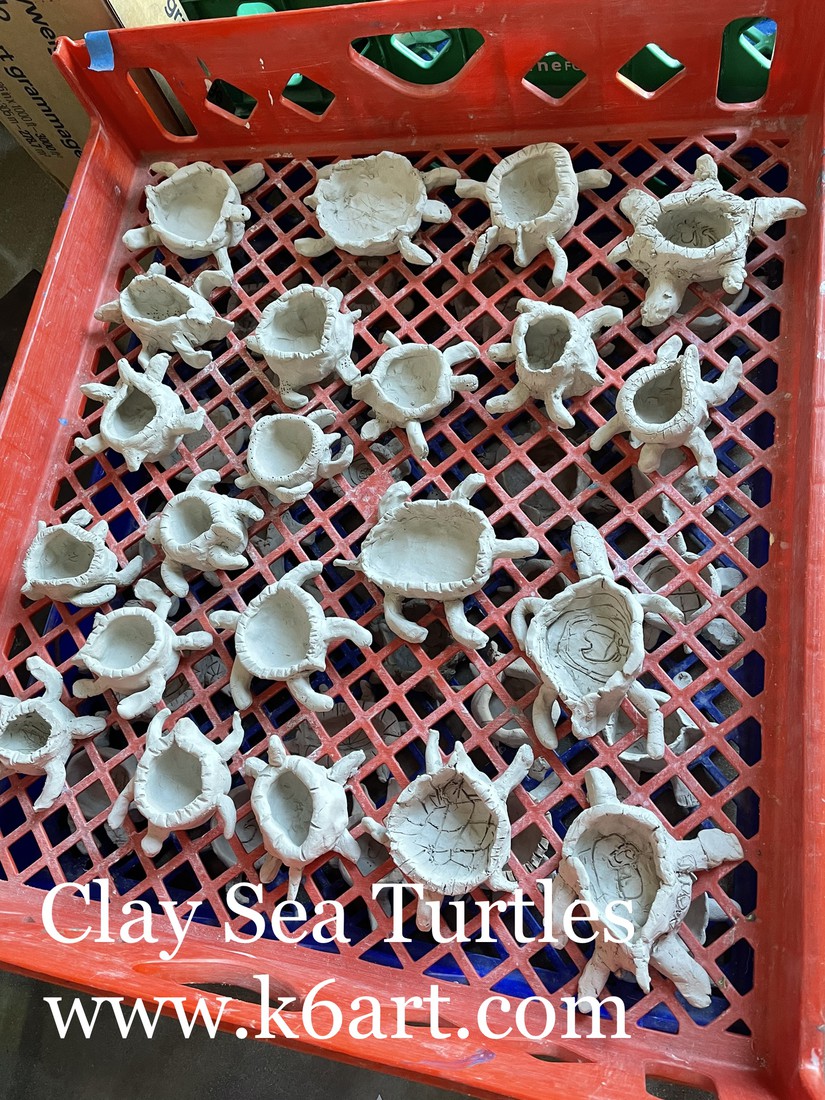
Are you looking for a super-successful clay project for 3rd-5th grade? Our third graders loved making these sea turtle pinch pots. Check out the video tutorial!
I’ve included a short video of our school’s Skutt kiln. I’ve found that young students don’t understand the process that transforms their soft, gray, clay creations into a pale-colored, hard ceramics. I show this video in class to all grades, no matter what clay project I’m doing.
Materials: clay, a popsicle stick, a toothbrush, and water.
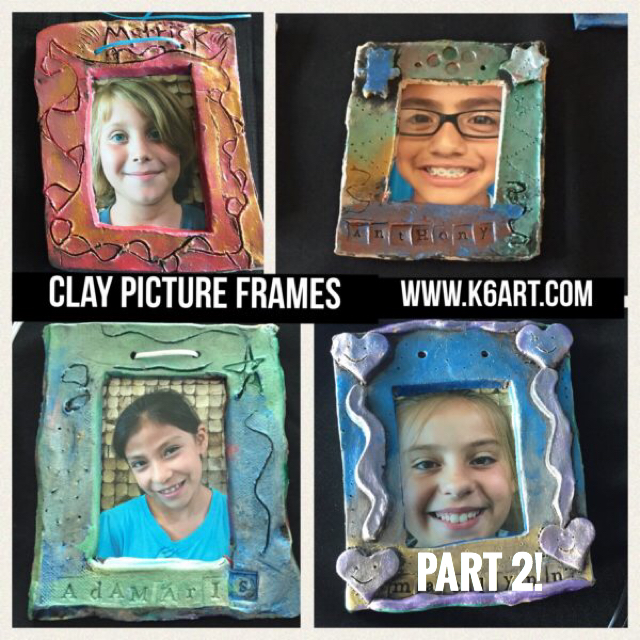
In part one of this lesson, we rolled and cut out clay picture frames. They dried, and I bisque fired them in our school kiln.
In part two, we painted the frames with tempera cake and metallic acrylic paint.
To paint the frames
Materials
Metallic acrylic paint in bright colors, plus silver and gold (like these)
Small plastic cups with lids (salsa cups)
Black tempera cake
Old, stiff brushes
Dishpans, one per table
Prep:
Finger painting station: Put a very small amount of metallic acrylic paint into a salsa cup. Barely cover the bottom. Prepare a cup for each color. Cover the table with paper or tagboard painting mats.
At the other tables: Put a black tempera cake and one old brush per student in a tray. Set it on each table with a dishpan of water.
Directions:
Paint the frames black. Distribute the fired frames. Each student takes a brush, dips in water, and swirls it on the tempera cake until bubbles appear. Paint the front of the frame only, being sure to work the black paint into all the recesses. Use an up-and-down motion to drive the paint into the crevices.
Rinse the frames, either in the dishpan or in a sink. Students can rub with hands and/or scrub with their old brush. Don’t wash all the paint off – the stamped and textured areas should remain black.
Pat dry with a towel, or lay on a newspaper for a few minutes.
Go to the finger painting station. Dip finger in metallic acrylic paint, scrape on edge of salsa cup, and rub on the ceramic in a circular motion. The paint should stay on the surface. TELL STUDENTS TO USE A LIGHT RUBBING MOTION AND TRY TO AVOID GETTING THE COLORED PAINT INTO THE LETTERS AND TEXTURES. These should remain black. To change colors, wipe finger on paper mat and move on. There should be no water at this table!!!
Students can also layer colors. A little silver or gold (or a white or light colored pearl paint) looks great layered over the bright color acrylic.
Feel free to limit your palette to just cool color or just warm color acrylics, plus silver and gold.
These dry almost instantly. They can be assembled with photos and hangers the same day if you have help.
Tips:
To store the metallic acrylics: if there is almost nothing left in the salsa cups, I let them dry out on the table overnight. I stack them the next morning, and stash them until I need them again. Then I just refill according to color. If you have left overpaint and need them soon, spritz each with a little water, cap them and put in an airtight container. Don’t overfill the salsa cups with metallic acrylic. I fill them sparingly and they last a long time.
here is a video of my students using the metallic acrylic technique on another project.
This spring I collaborated with our third grade teachers on an identity project. These clay picture frames were a perfect fit: they are personal and fun to make. The parents and grandparents absolutely loved these.
The frames require only a single bisque firing and it generally takes only one session to paint them.
Let’s get started!
Materials:
To make the frames
Clay
Rolling pins and slats (or slab roller)
Cardboard templates
Pin tools
Textured items
Small cookie cutters
Letter stamps (like these)
Toothbrushes and water
Drinking straw
Optional: gallon-size Ziplock storage bags and damp paper towels if you need to store for a second class period.
Create two rectangular cardboard templates: a larger rectangle for the outer frame, and a smaller rectangle for the interior window. Your smaller template should be slightly smaller than the printed photo (ours were 3.5″x5.5″). This will allow you to tape the photos to the back of the frame. I made one set of templates for each table.
Cut a mock frame from cardboard. Test each photo by placing it behind the frame. Be sure the student’s face is visible. Keep in mind the actual clay frame will have a slightly smaller window, as the clay shrinks as it dries.
Directions
Cover tables. Set out clay, rollers, and slats (or set out pre-rolled slabs if you have a slab roller). Distribute pin tools and both large and small templates.
Roll the slab (rolling pins/slats or a slab roller). Position the larger rectangle template on the slab and cut around it with the pin tool to create the picture frame (Note: we were able to get two cut rectangles from each slab). Center the smaller window template on the clay frame and cut around it with the pin tool. Set scraps aside and don’t squish them!.
Rotate clay frame to portrait position. Stamp name at bottom using letter stamps. Texture frame using texture tools. Optional: use cookie cutters on to create decorative shapes. Attach shapes to the corners: dip a toothbrush in water and gently scrub clay to create slip. Press on the decorations.
Make the hanging holes: an adult should do this. Punch the top of the frame with the drinking straw to make two holes. The straw will fill with clay – don’t remove it, just keep going.
Air dry for 10 days. Bisque fire.
Tips:
Make sure the hanging holes are big enough. Really twist the drinking straw in the holes and make sure it goes all the way through the slab. I had to Dremel out a couple of holes in the fired frames because I wasn’t perfectly diligent in this step.
Build the template around the printed photo. Roll and fire a clay sample and make sure the cut window is a just a little smaller than the dimension of the photo. Be sure you can see the student’s face clearly in the photo. Remember, clay shrinks as it dries. That window will shrink…
If you are doing this project after school picture day, you could use a standard school pictures to create your template.
I found that showing an instructional video is the best way to teach a clay project like this. The kids have a clear view of my hands. I can show it over and over each class period, and share it with kids who were absent on the day we did the clay project. Plus, I get to show it next year, or whenever I choose to do this project again.
I created a YouTube playlist with the whole process. Here you go!
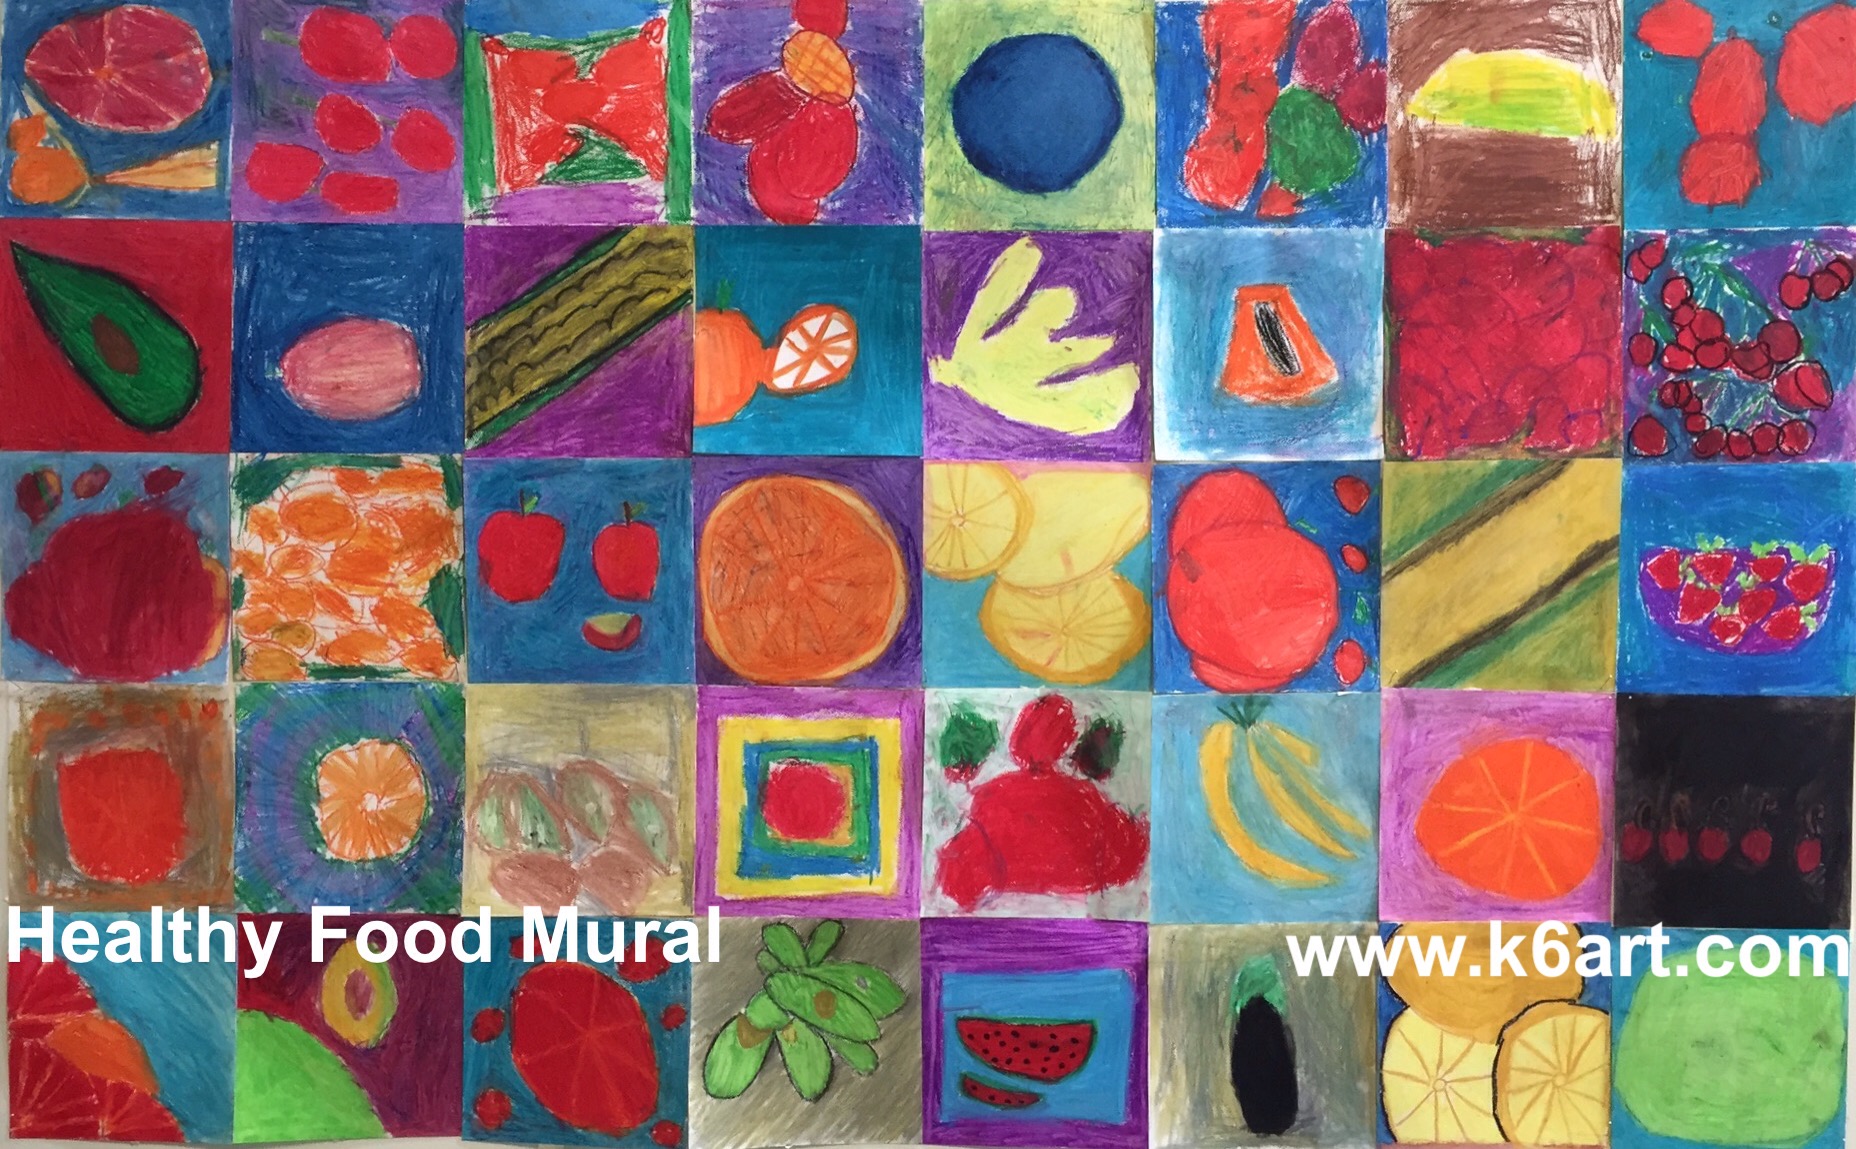
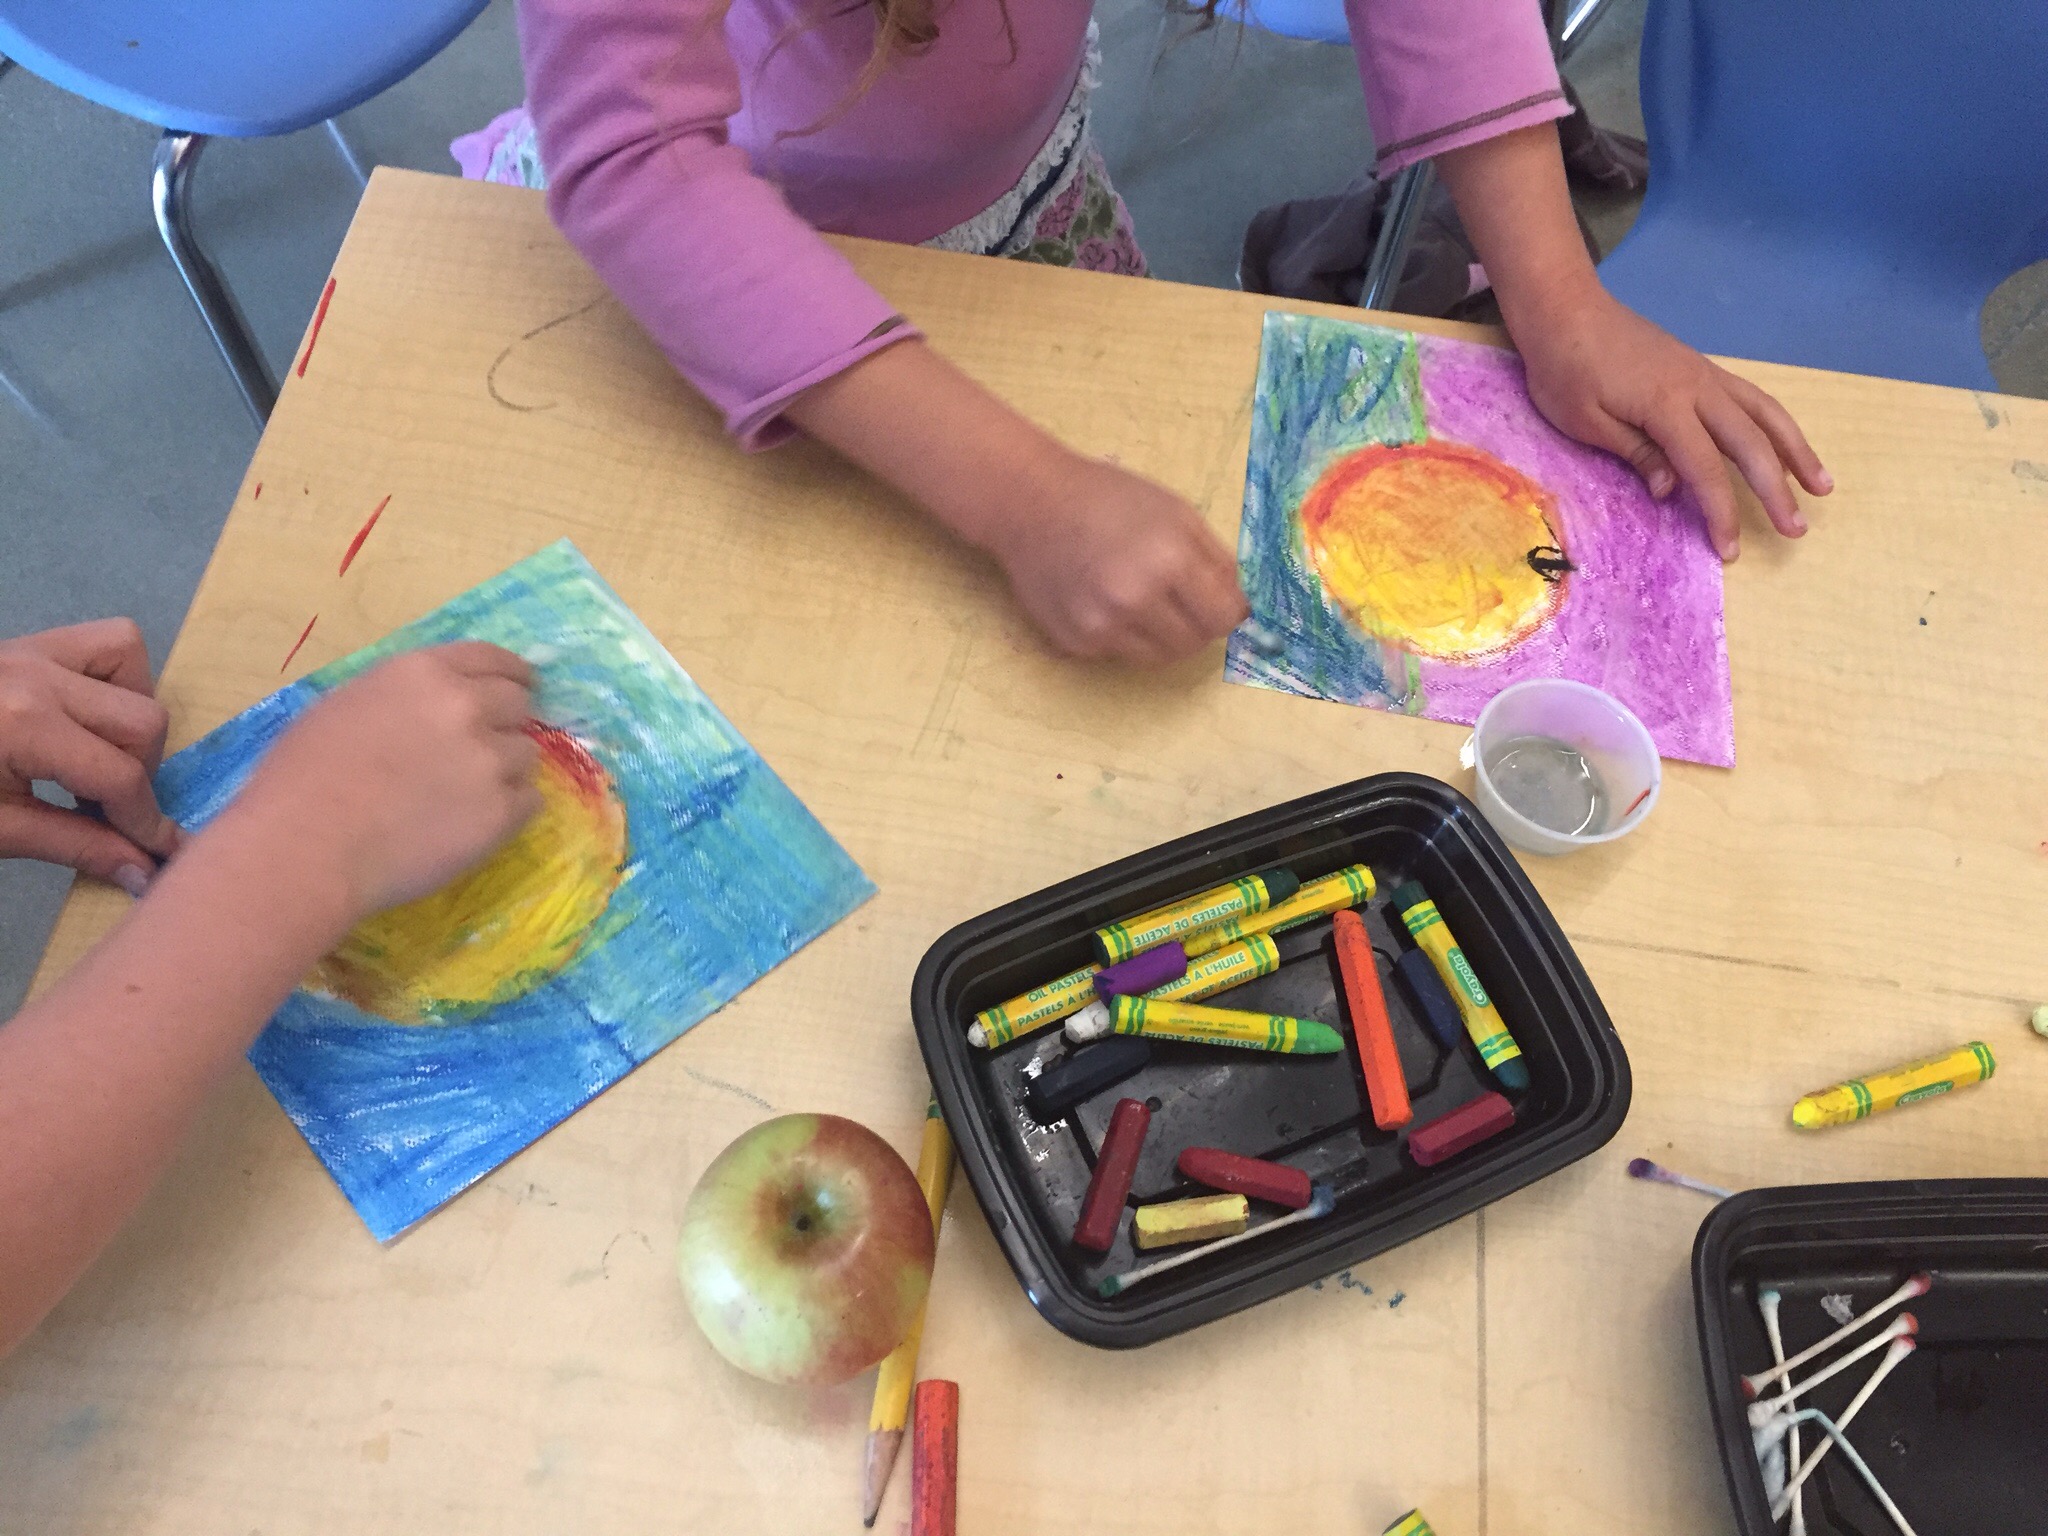
Our second graders are studying healthy foods. We created this mural as part of the project. It was also an extension of our warm and cool color lesson.
Materials:
watercolor paper, 7″x7″
oil pastels
baby oil
q-tips
reference photos of fruits and vegetables (we used the weekly grocery store ads from the newspaper)
Directions
Draw one type of fruit or vegetable on the paper using oil pastel. Fill the square. Use and warm and cool color scheme – if you draw a warm color fruit, use a cool color background, and vice versa.
After drawing, blend the oil pastels with a q-tip dipped in a BIT of baby oil. Be sure to use two q-tips – one for blending warms, and one for blending cools.
Place completed artworks on a drying rack for a day or two so excess oil can absorb into the paper.
Mounting:
I laid out the artwork face down in a grid, and taped all the seams together with masking tape. If you use enough tape on the back you can hang it as a single piece.
If you ever decide to take down your masterpiece, you have the option of cutting on the seams and returning individual artworks to students.