

Want to amaze and engage your students? Try oil pastel ‘painting’. The colors are vibrant, set up and clean are a breeze and students love the process.
Materials
Oil pastels
Q-tips
Baby oil
Small cups for oil
Watercolor paper
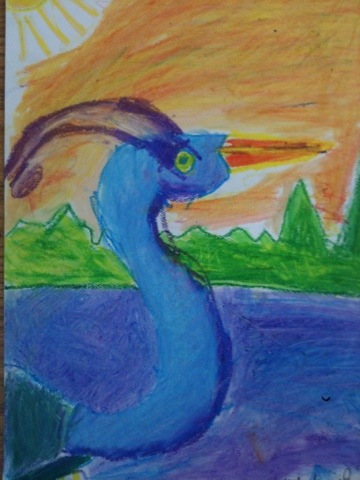
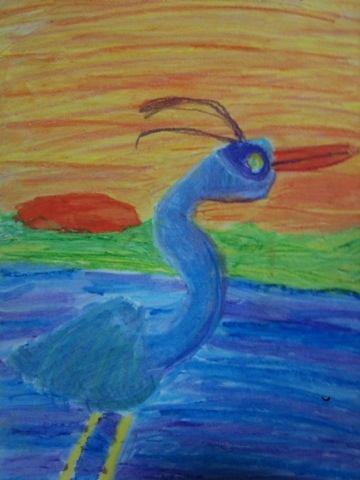
We did a directed draw of a great blue heron. We grouped our oil pastels so that they would blend nicely. This was a good opportunity to review warm and cool colors and analogous colors.
Heron: cool colors (purple, blue, green)
Water: purples and blues (analogous colors)
Sunset sky: warm colors ( red, orange, yellow) and pink
Hills: green and yellows (analogous colors)

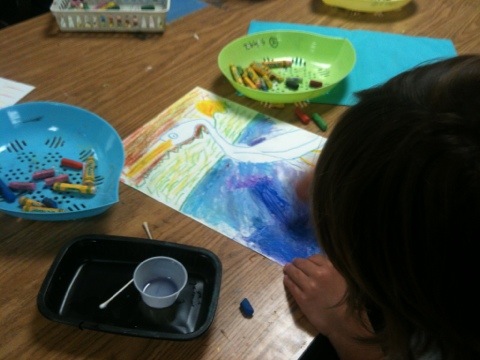
Students make short strokes of oil pastel. Use two or three colors side by side. Then dip a q-tip in baby oil and blend the colors. A little oil goes a long way!
Dry on a drying rack.
Tips:
Use watercolor paper. Construction paper is too thin and oil will soak the paper.
Blot excess oil with tissue.
Have fun!
I learned this process from art teacher Nicole Nelson at The San Diego Museum of Art.
New pinterest follower from sharefest! Love your art ideas and can’t wait to try some!
Dr. Momsie recently posted..Baby Experiment – Jr. is a Genius!
I am excited to meet a school psychologist/mom with time for blogging. Very cool!
Visiting from SITS. Love your blog. My girls are really into art so I am going to search your site for some fun projects for this summer. On a side note….I am also from San Diego. 🙂
Thanks Michelle! I love your blog, too. Yay for San Diego bloggers!