
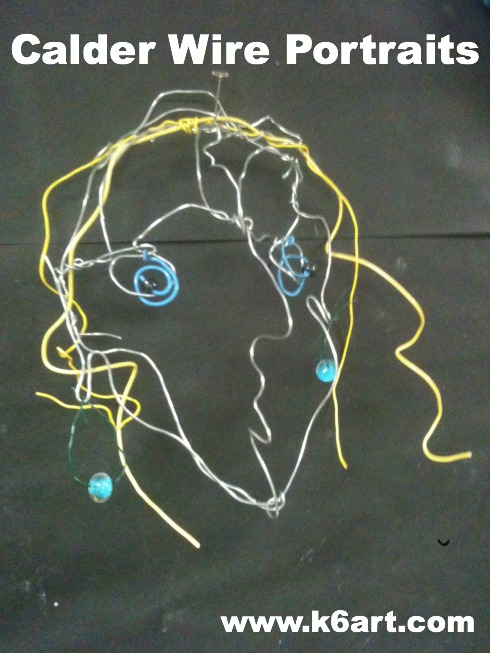
Alexander Calder was an amazing, original, sculptor with a great sense of humor. Our 5th graders had a lot of fun making Calder-inspired wire portraits.

5th grade students made 3D wire portraits in the manner of Alexander Calder. Allow three 40-minute sessions.
Materials

Basic wire sculpture supplies. All wires and decorations can be cut with kindergarten scissors.
- two 4 ft. pieces of wire (cut from spool of 14-gauge Blick Sculpture Wire) (note: compensated affiliate links)
- pre-cut floral wire, (AKA ‘stem wire’) in bright aluminum, 26-gauge for wiring on embellishments (I call this fine and flexible wire ‘sewing wire’ because it is fine enough to pass through a sequin)
- soft colored wires, such as Twisteez, pipe cleaners, or electrical wire (be sure it is easy to cut)
- embellishments: stainless steel pot scrubbers (can cut into smaller pieces, for beard), pony beads, sequins or buttons (for eyes and earrings)
- scissors
- copy paper or other thin paper
- Sharpie marker
- optional: gallon-size Ziploc storage bag if more than one session is required.
Day one:
Discuss Alexander Calder. I made a Calder wire portrait Powerpoint you may find helpful.
- Pass out paper and markers.
- Draw a front view of the face. Make a simple contour and touch all four sides of the paper.
- Turn paper over: the black lines from the first side should be visible!
- Now draw a simple profile of a face, including nose and lips. The profile should touch the top, bottom and one side of the paper.
Put sketch in labeled storage bag.

Sketch: front

Flip sketch over. Draw profile view (note front view is barely visible)
Day two:
Pass out bags, markers, and two 4 ft. lengths of 14-gauge Sculpture Wire per student. Students should turn sketch to the front view. Bend one wire around oval sketch. Overlap ends and wrap to secure.

Trace front view with wire
Flip the sketch to the reverse. Place end of second wire at top of profile and bend wire to follow sketch. Overlap ends and wrap to secure. You may have excess wire – do not cut this off yet.

Trace profile in wire.
Put sketch + wires in labeled storage bag.
Day three:
Remove wire portrait pieces from bag and insert the front view through the profile. Secure at joints at top and bottom of face using pre-cut wire and any excess wire. Give students a short piece of wire for ‘glasses’. Add ‘C’ shaped wire ears if desired (or bend out ears from face wires).

Insert the profile into the front view and secure. Add a short wire for eyes.

Side view of assembled wire portrait. Ready to embellish with pipe cleaners, beads, pot scrubbers and sequins.

Colored wire (or pipe cleaners) make fun hair and eyes.
Display:
Suspend from ceiling with string or fishing line, or link faces together with paper clip ‘S’ hooks for a giant mobile.

Calder-inspired wire portraits hang in chains at school art show.
Helpful links:
Good all-purpose introductory video movie on Calder.
Here is a link to a past Calder portrait exhibition at the National Portrait Gallery.
The wire sculpture method for this project was inspired by the armature in this Dick Blick video lesson plan.
I absolutely LOVE Calder’s art, and I think your students will too. Check out my other Calder posts:
- Alexander Calder’s Jewelry
- Calder Wire Sculpture for 5th grade
- Calder Wire Sculpture Finale 2012
- Calder book to read online for free
- NEW!!!!!: How to make a Calder Mobile!!!
Good luck! If you try this project and post it online, please link back to this post. 🙂
Enjoy!

Do you have a favorite Calder project?
NOTE: POST UPDATED: 11/25/13
This is just fabulous! I adore Alexander Calder and I’ve been planning to do a lesson of wire portraits with my fifth graders, so this gives me some good direction.
Hi Kristin
Great! You might also check out the art of Paul Stolte, a San Diego wire artist who does Calder-inspired portraits in 2D. http://www.zhibit.org/pstolte/wiresculpture/various-wire-wall-sculptures.
Good luck!
Rina